
Ableton Live has been my DAW of choice for almost 20 years now ever since I got into recording and mixing my own music. When I graduated to mixing other people’s music, I stuck with what I knew and while I’ve tried other DAWs, I’ve always come back to Ableton. With that in mind, I thought I’d share a complete overview of how to mix in Ableton for anyone who is new to this DAW or just wants some tips.
How to Mix in Ableton

I’m going to be referencing a number of third party plugins and sharing some settings which work well for different types of processing on different instruments, but note that virtually everything I mention can be applied using Ableton’s stock plugins.
Speaking of which, refer to my complete overview of Ableton’s stock plugins for more information on the dozens and dozens of types of processing you have access to right out of the box with this DAW.
Begin With a Mixing Template
First thing’s first. I find I save a lot of time whenever I begin work on a new mix by importing any tracks I have into a pre-made mixing template.
As I covered in my overview of how to make a mixing template, this helps organize your mix. It also allows you to group tracks by instrument type to apply processing to or simply adjust the relative volume of just that group:

It can also save you time by already having instances of the next types of processing I’m going to cover on every track. If you peek above, you can see on the bass track I’ve got my gain plugin followed by a tuner, EQ, and a compressor.
Each one can have presets which typically work well with those instruments (like the cheat sheets I’m about to share) which either work as is or are easily adjustable.
I just drop the bass audio clip(s) on that track and adjust the gain, EQ, and compression if necessary, otherwise I’m good to go.
Between the routing and pre-populated effects/processing, a mixing template saves a lot of time so you simply drag and drop different types of audio in their corresponding tracks/sections.
If you don’t have a mixing template, you can create one during this overview of how to mix in Ableton then save it for later use.
You can even go into “File” and select “Set as Default Set” or “Default Template” so that this is what opens every time you open Ableton.
Gain Stage Every Track
Ideally gain staging is factored in during the recording stage, but if not and tracks were recorded too “hot”, meaning too loud, or conversely too quiet, you can adjust this via gain staging.
If you go into Ableton’s “Utilities” section of their stocks plugins and effects, you can drag and drop “Utility” onto your first track:
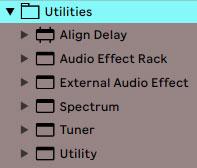
The “Utility” plugin in Ableton is a bit of a Swiss Army knife, allowing you to invert the polarity, adjust width, panning, and more:

For our purposes, I’m typically using the utility plugin to ensure the level of that track averages -18dB and peaks around -12dB.
This is known as gain staging:
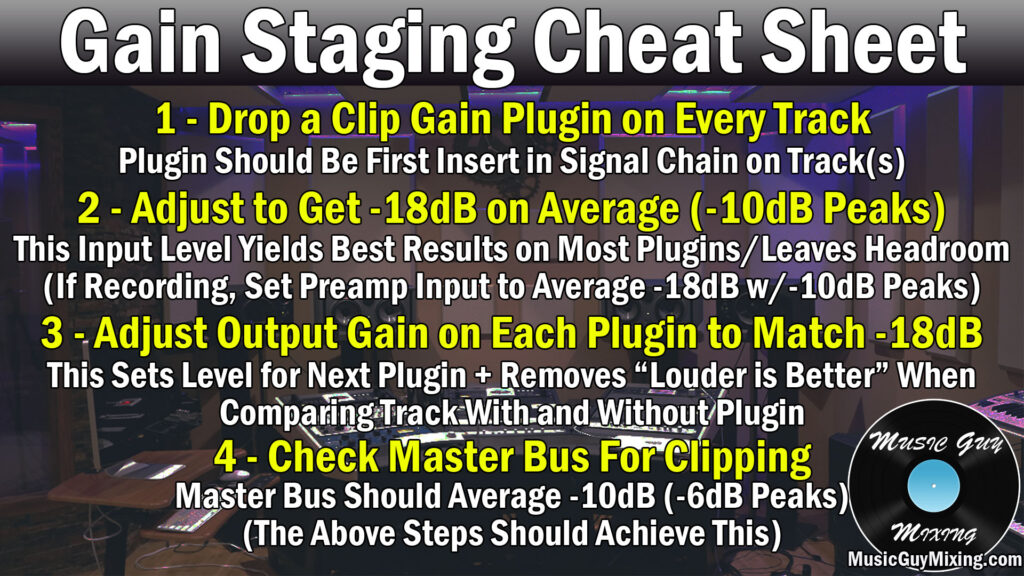
This helps get your audio at a more ideal level when feeding it into subsequent processing like compressors. Gain staging also ensures that your mix remains at a responsible level which allows you to achieve (better sounding) louder mixes and masters.
I like to begin the processing chain for every single track in my mix with a utility plugin to adjust the input gain for every track in my mix, especially when gain staging wasn’t considered during the recording phase.
Remember that the signal flow moves left to right in the insert section of Ableton Live. That’s why I begin with this plugin, so this will immediately feed the proper level into every subsequent plugin and piece of processing in the chain.
Remember to maintain the -18dB average level as the output after every subsequent plugin you insert as some plugins like compressors will have an effect on the new output level of your audio.
EQ Every Track
In answering the age old question of EQ or compression first, I like to carve out the frequencies which are detracting from my audio. This then ensures we’re only compressing the best bits.
I referenced this in opening, but I put together a complete (and free) EQ cheat sheet with visual tutorials for every single type of instrument in your mix.
Each one shows a set of cuts and boosts you can make for that type of audio/instrument as a great starting and sometimes finishing point.
As I also mentioned in opening, you can apply each cheat sheet to the excellent stock EQ in Ableton:

Let’s take a look at one of the most important elements of your mix, vocals, first.
Vocal EQ
I’ll preface this by saying that I created all of these images using my EQ of choice, FabFilter’s Pro-Q 3 (my favorite plugin in general as I explained in my Pro-Q 3 review).
So we can easily take my vocal EQ cheat sheet I made in Pro-Q 3:

… and apply those same settings to Ableton Live’s EQ Eight:

I actually put together a complete guide on how to EQ vocals in Ableton for a more in depth tutorial on applying these moves to Ableton’s EQ Eight:

Like virtually every EQ, it begins and ends with high and low pass filters, respectively.
There’s a little boost at roughly 250Hz to add a little body (though you can cut here for a boomy leaning vocal).
There’s also a small cut around 500Hz to help clean up some of the boxiness and add clarity by way of subtractive EQ. I like to keep an eye on most tracks in my mix in this region as cutting often helps to clean up mix mud.
Note that I recommend a dynamic EQ cut at 500Hz rather than a conventional/static cut. While Ableton Live doesn’t have dynamic EQ stock, I put together a quick tutorial on how to use dynamic EQ in Ableton, so check that out to apply any and all dynamic cuts accordingly.
Around 1k can be boosted or cut to correct a hollow or nasally vocal, respectively.
A small boost around 4k adds presence and clarity to the vocal, and a small shelf around 10k helps bring out a bit more punch, bite, and air from the vocal.
You can save this EQ preset by clicking the little disc icon in the top right of the EQ (or any) plugin.
Alternatively, once we finish with all the plugins for a specific track and we like the processing we’ve got going for that instrument type, we can select all of those plugins simultaneously then type “Ctrl G” to group them together as an “Audio Effect Rack” and save that for that instrument type (i.e. “Lead Vocal”, etc.)
Let’s move on now to take a look at EQing the bedrock of any mix, the drums.
Drum EQ
I actually put together a dedicated drum EQ chart for the entire drum kit, so I recommend dropping an EQ on each respective track for every piece of your kit and replicating these settings as a start:

Something to mention is that if your kick drum doesn’t have the body that you’re looking for or need, you can supplement it with the kick drum sine wave trick:
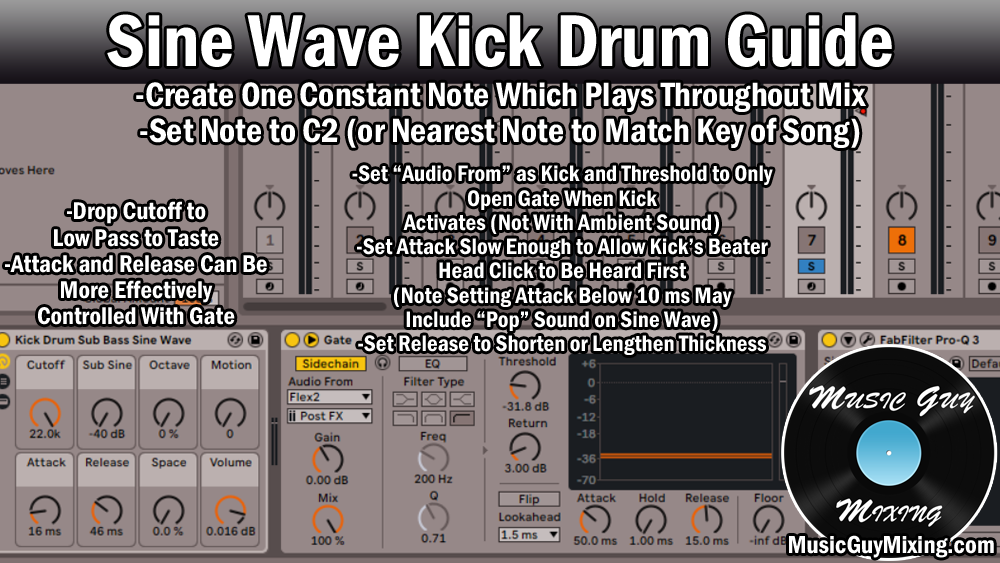
To do this, create a sine wave (which you can find in the “Instruments” section on the left panel just above “Audio Effects”, search for “sine wave”) on a midi track and add a C2 note to play (technically a C1 in Ableton on their midi note board).
Bear in mind that you can also change this note to match the nearest instance of the key of your mix, instead.
This note (which should fall in that pocket between 50-75Hz) sounds identical to the meaty “thud” that you get in the body of that kick and tricks the listener into thinking the kick sounds naturally fuller than it is.
While you can loop this note to play nonstop, I prefer to just create one long, held note for the duration of the mix.
You then drop a gate on that track and sidechain the gate to the kick with the settings outlined above. The gate opens so you only hear that sine wave note playing for a split second when the kick triggers.
Just like that, you’ve got more body in your kick.
Guitar EQ
In virtually any genre you can think of (including rock), you’ll likely want to aggressively EQ your guitar to clean it up.
I like to aggressively high pass my guitar in particular to create a nice cohesive unit between the guitar and bass where they’re working together as I outline in my electric guitar EQ overview:
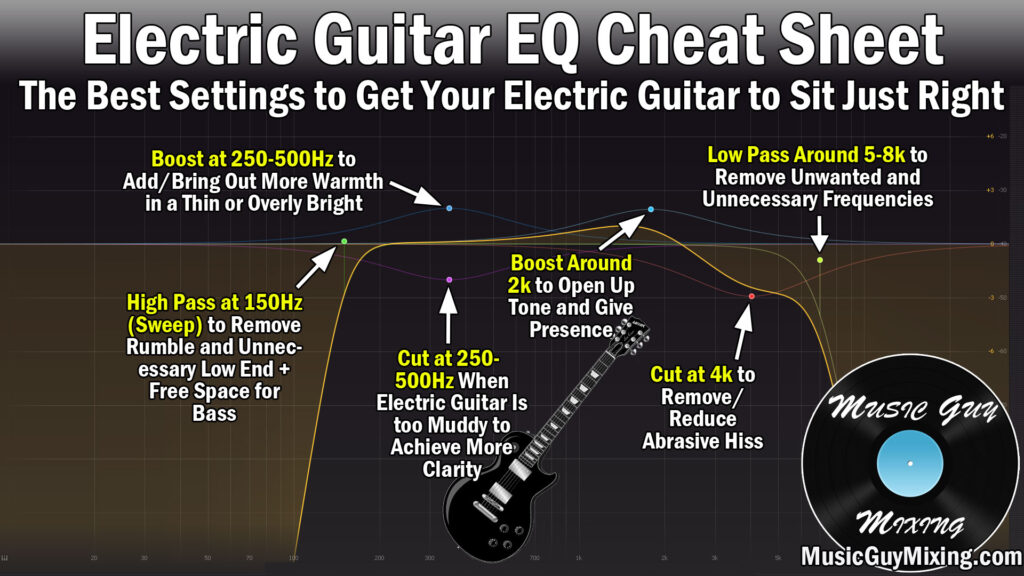
Apply these moves via EQ Eight to instantly open up and refocus your guitar (also check out my acoustic guitar EQ chart) and get it working better with the bass. Speaking of which…
Bass EQ
Bass EQ is all about getting the sub frequencies to work with the kick, maybe boosting the body around 100Hz or so, creating a little scoop for clarity, and boosting for punch:
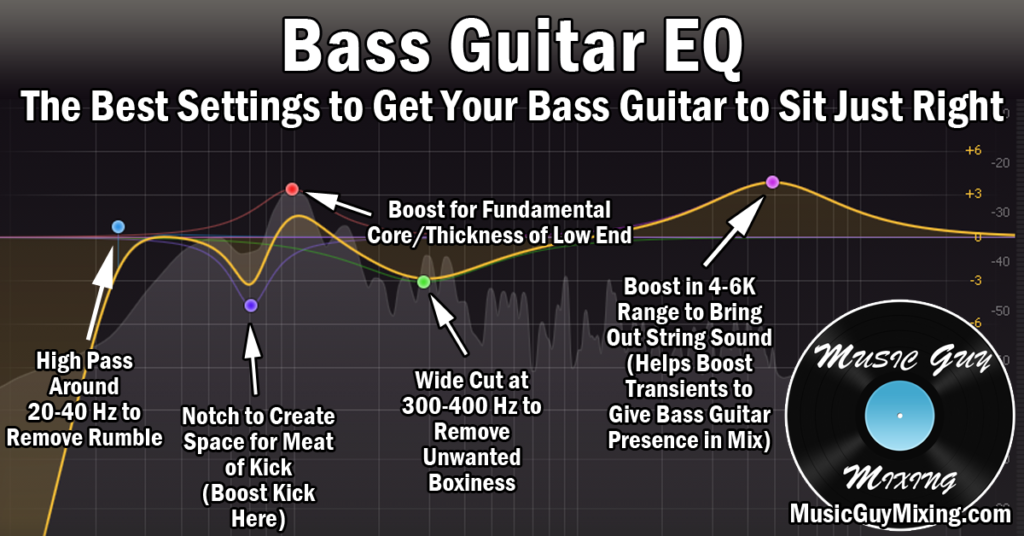
Speaking of getting the bass and kick to work together, check out my guide on how to mix bass and kick for a complete overview because if your low end isn’t working, everything else will suffer.
Compress (Most) Every Track
Ableton Live’s compressor has been the envy of rival DAWs since the earliest versions of Ableton Live over two decades ago.
Not really falling into any one specific type of audio compressor, Ableton’s stock compressor is versatile and can be applied to achieve virtually any result you want with excellent results:

It’s got all of the parameters you expect to find on a typical compressor, so check out my audio compressor settings chart for a refresher on what everything does:
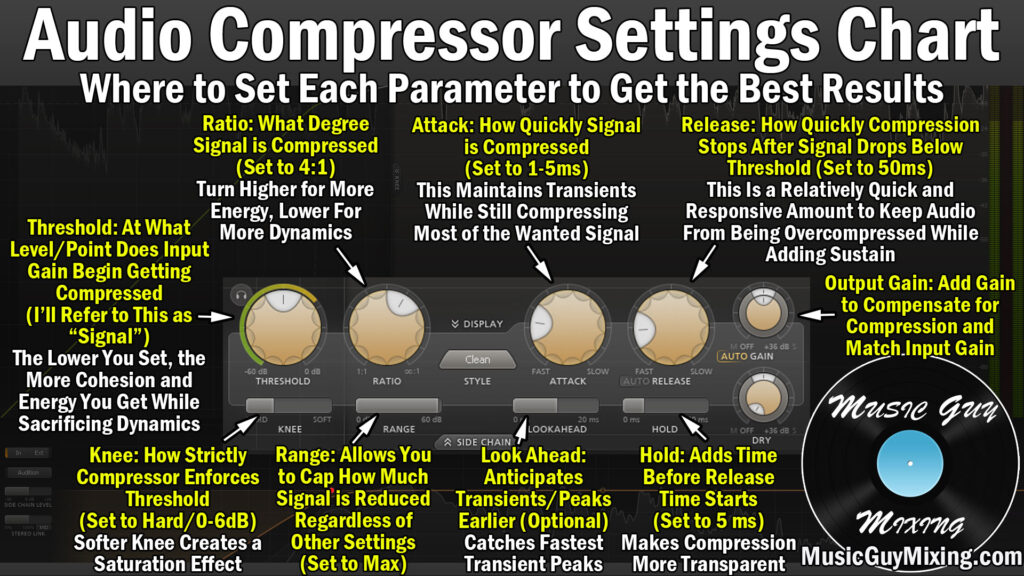
Now let’s take a look at the best settings to dial into this compressor for every type of audio in your mix.
Vocal Compression
Vocal compression is all about getting and keeping that vocal up front in the mix. I actually prefer two compressors on vocals by way of serial compression, meaning back to back.
The first compressor is the more aggressively adjusted of the two particularly in terms of its ratio to tame the dynamic peaks of the vocal:

As you can see, we’re going for 10dB or more in gain reduction, though this will vary from vocal to vocal and the dynamic range of the part. Choruses and parts which cover more range will typically need more taming, so it’s not a bad idea to separate your verse and chorus vocal parts to compress them differently.
I like to follow that initial compressor with a second one with more of a transparent configuration, including a much lighter ratio of 2 or 3:1.
This is just to smooth out any remaining peaks a bit more and ensure that the vocal stays consistent and in front of the mix (see my guide to up front vocal mixing).
Drums Compression
Similar to my EQ guide which covered the entire drum kit, I put together a complete drum compression chart which addresses the best compression settings to dial into every piece of your kit:
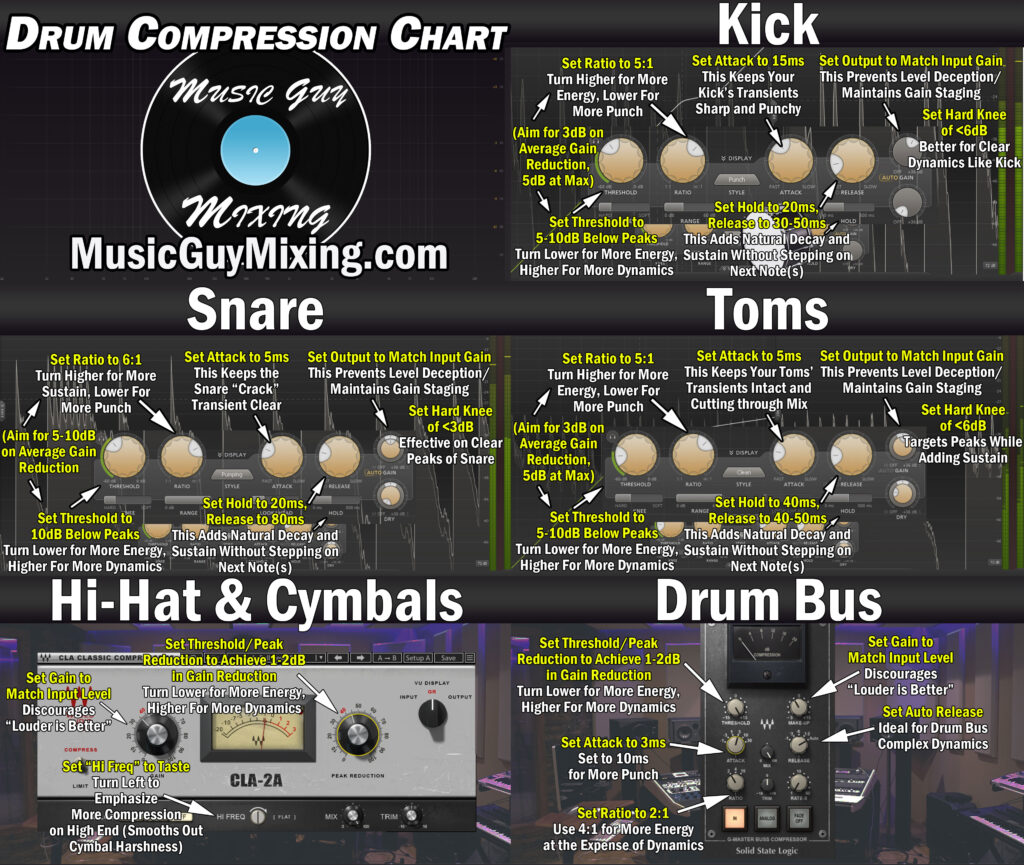
Note that in the hi-hat and cymbal compression part that I’m featuring the CLA-2A from Waves. This is an opto or optical compressor which is one of the more transparent compressors.
While Live doesn’t have a stock opto compressor, you can apply a very light ratio of 2:1 or less to gently pull the cymbals together for a touch more thickness with a dB or two of gain reduction.
You can also grab a freebie like the Variety of Sound ThrillseekerLA which is a good 2A style opto compressor which works well as a serial compressor on vocals or on its own on cymbals.
Guitar Compression
The best guitar compression settings will vary depending on the type of guitar part you’re compressing.
If it’s mostly chords, I recommend a similar approach as if you’re compressing cymbals, using a very light ratio with an attack of 3ms or so to preserve the “bite” of each chord while gently thickening them out.

If it’s more of an arpeggio or solo part where you’ll likely have more dynamic range, you will likely want to dial that ratio up to 4:1 or as high as 8:1 to ensure you don’t lose any notes.
Bass Compression
Compression on bass requires a much more aggressive ratio as this is one of the sneakily more dynamic instruments in your mix:
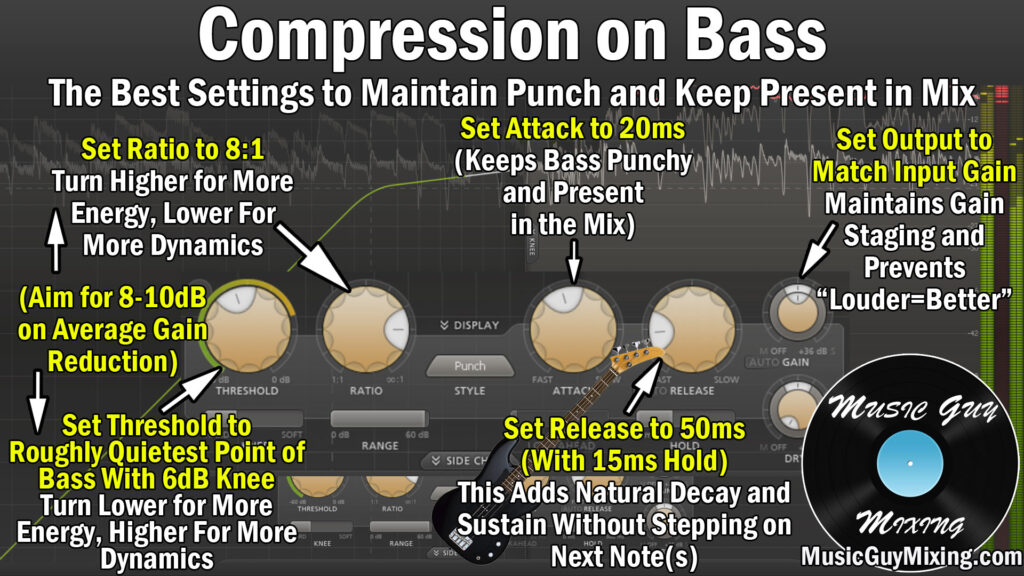
With a ratio of 8:1, we’re aiming for a lot more gain reduction than other instruments in our mix, averaging 8-10dB depending on the performance. If it’s a less complicated performance with steady quarter or eighth notes being played, you can dial this back down similar to playing chords on the guitar.
If it’s more of a complicated performance, slap bass, etc. then the 8:1 ratio works well at ensuring no notes are lost which is key to a strong low end representation in your mix.
If you’re looking for more compression settings for different instruments or want everything in one helpful resource, grab my free compression cheat sheet which covers all of the best compressor settings for the practical instruments you’ll find in most mixes.
Add Automation
Automation is the lifeblood of any good mix as it keeps certain aspects evolving, keeping your listener on your toes and keeping the mix from stagnating.
Volume automation is the most common form which can be used on vocals to keep them in front of the mix or on the master bus to emphasize certain sections of the mix with a small dB bump at key moments:

There are plenty of forms of mixing automation, however.
Sometimes I’ll drop a Utility plugin on my master bus and automate the mix width up and down, holding back 100% width until a chorus hits to make the mix feel like it’s opening up.
Check out my recent overview on how to automate in Ableton for a more in depth tutorial specific to Ableton Live.
Add Return Tracks and Blend in Effects
Also referred to as “Aux” tracks in other DAWs, Ableton Live’s “Return” tracks allow you to apply an effect to multiple tracks in your mix.
The benefits are many, but to name a few:
- Return tracks create a sense of cohesion by applying the same configured effect to multiple tracks.
- Return tracks save processing power (not to mention time) by only requiring one instance of a plugin versus potentially dozens or hundreds of the same plugin as an insert on multiple tracks.
- Return tracks blend that effect in any tracks you apply it to, thus keeping the tracks themselves “dry”.
To use a return track in Ableton Live, either select it under the “Create” menu option at the top, or use the shortcut Ctrl+Alt+T and you’ll see a new track labeled “Return Track” appear in the right of the session view or at the bottom of the arrangement view.
Drop an effect of your choice on this return track and this allows you to use parallel processing on any tracks you apply it to by turning up their respective “Send” dials (see inserts vs sends).
Remember when using return tracks that you want the Wet/Dry or “Mix” percentage of any effects you drop on that return track to be set to 100% wet so we’re only hearing the effect when we turn up the send dial.
The send dial then effectively controls the blend amount of the effect with your dry signal.
While the exact ideal amount you’ll want will vary from track to track, try turning up the associated send dial of whatever effect you want on whatever track you want to apply it to until you can just hear the effect to get a feel for a very subtle blend.
A few popular effects to use on return tracks include:
Reverb
I love using reverb as a return track to blend into any and all tracks to taste when they need a bit more width in the stereo field or depth in the third dimension of the mix.
An effect like reverb mimics a physical space so you can give your tracks a sense of depth the space they were actually recorded in can’t replicate. And because we’re using the same instance of reverb with the same settings and applying it to multiple tracks, it gives all of those tracks a sense of cohesion, making the mix sound more natural.
Try recreating these settings in Ableton’s reverb on a return track:

… and then blend in the desired amount for any and all send knobs to taste.
Parallel Compression
Parallel compression refers to creating a duplicate of your dry signal then absolutely crushing it with extreme and aggressive compression settings, then blending that compressed signal alongside the original dry signal to taste:

We don’t need to duplicate anything when we’re using this on a return track; simply drop a compressor on a blank return track with the above settings and label it as your parallel compression.
Now you can blend in a crushed instance of whatever track you apply it to in order to get more energy and thickness out of it.
Delay
Delay is a nice substitute for or companion to reverb when you want a bit more stereo width or even the illusion of depth without cluttering your mix as much.
I like a couple different delays on two separate return tracks:

… and:
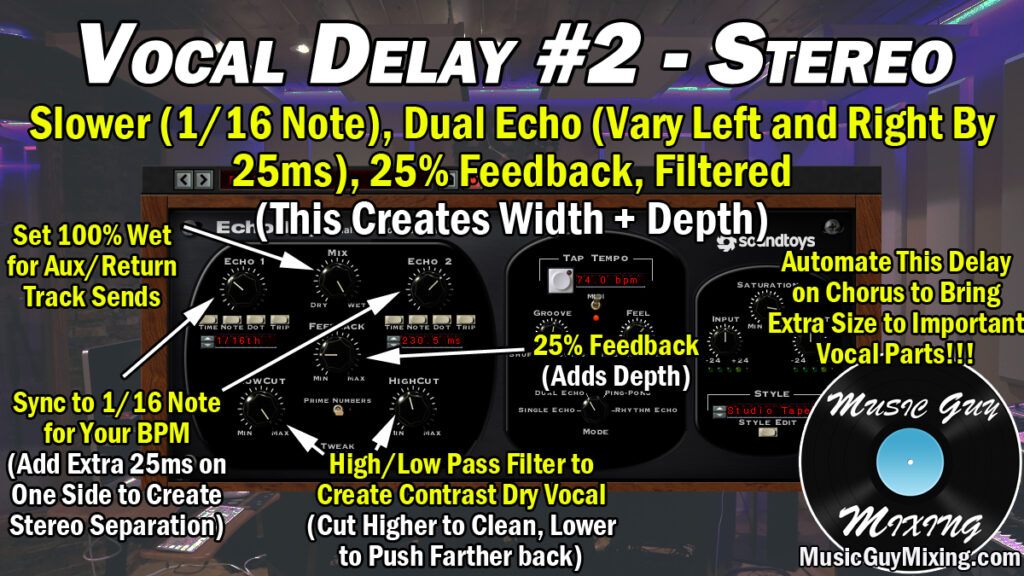
You can replicate a similar setup with a second reverb, but the idea here is we can hold the larger/longer delay until key moments, or automate more of one or both delays for key or bigger moments in the song to make them hit even harder.
Those are the main three return effects I’d argue are most commonly used in mixing, but don’t limit yourself to them and experiment with dropping any kinds of effects you know you commonly apply to multiple tracks in your mix as a return effect to simplify the mix.
Process Your Master Bus
You can of course insert plugins on your master bus like any other track or bus, but any processing here should be used conservatively.
This is because anything you add here will uniformly affect the audio across your entire mix on a macro level.
You’ll see a lot of the usual suspects, so let’s take a quick look at my master bus processing.
EQ
While we’ve done near 99% of our EQ on a track and bus level, I will sometimes reach for a bit of EQ on my master bus if I’m hearing something poking out that I don’t like. More often than not, however, this is something which can likely be targeted and fixed on a track level.
There are rare exceptions, so a bit of EQ, particularly dynamic EQ, can work well to nudge your mix in the direction you want.
This includes match EQ plugin which can likewise give your entire mix a subtle nudge closer toward the sound of a reference track you’re using.
Multiband Compression
While EQ and dynamic EQ are for more surgical jobs, I find multiband compression works well on a macro level for edging the entire mix towards more warmth, presence, etc.
Try this four-band setup in Ableton Live’s multiband compressor for a bit of cohesion:

As I mention in the graphic, you can adjust the ratios as necessary to push the overall tone in a slightly warmer or brighter direction.
Saturation
Speaking of warmth, I like a bit of saturation to help add a bit of analog tape sound to those low mids and mids of my mix.
Sometimes I’ll focus on the high-mids and higher frequencies to use saturation to add some excitement and sizzle to the top end of my mix.
This is a mix by mix situation, and it works well for another subtle nudge in whatever direction you need when everything else is where you want it.
Stereo Imaging
Stereo imaging is more of a mastering level effect, but you can make use of a stereo imaging plugin on the master bus in the mixing stage to add a bit more size.
You can do this on a band by band level with Izotope Ozone’s free Imager to increase the width and consequently the influence on a band of your choice:

Glue Compression
Aside from doing some slight sound shaping on the master bus, I like using processing to add cohesion to the otherwise random assortment of tracks making up my mix.
Ableton Live’s Glue Compressor is perfect for adding just that in a bit of glue to tie everything together in your mix:

As I covered in my overview on glue compression, I like a light ratio of 2:1 or at most 4:1 on the master bus with a relatively slow attack to ensure transients remain intact:

You only want to see 1-2dB at most in compression via the threshold unless you’re going for a really processed bordering on squashed, more pop leaning sound.
Reverb
While we used reverb a moment ago as return effects, reverb on the master bus using Ableton’s stock reverb can also add a bit of cohesion to your mix as you’re giving every track in the mix the sense that it was recorded in the same space.
As you can see, I recommend keeping the “Wet/Dry” or “Mix” percentage especially low, setting it to 15% AT MOST and filtering out everything below 550Hz in particular:
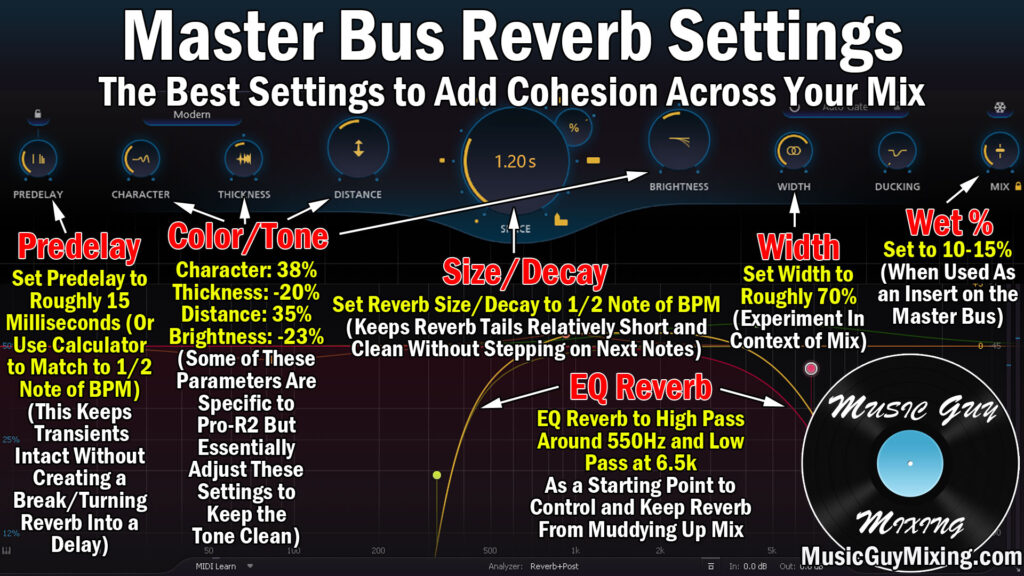
This keeps the mix and the low end in particular clean while still enjoying the benefits of a taste of the reverb to tie everything together.
Limiting
As someone who doubles as a mastering engineer in addition to a mixing engineer, I always warn against adding a limiter to the master bus in your mix.
The one exception is if you just need to turn up the volume through the course of mixing, possibly to make it more commensurate with a reference track you’re using.
Once you’re done, you can remove or mute that limiter and print the mix at its gain staging conscious volume to get the best sounding loud master that you can.
There’s a nice run through of how to mix in Ableton Live, but don’t forget to check out my additional Ableton Live tutorials for more information on what’s been my favorite DAW going on two decades now!

