
Bass can be a dynamic instrument with relatively extreme differences between the quieter and louder parts of a performance. Compression helps to sacrifice some of those dynamics in order to achieve a more consistent and steady sound which can have more sustain and energy. Overdo it and you drain the life and possibly the transients out of the performance completely. With that in mind, let’s talk how to use compression on bass.
Compression on Bass Settings
Let’s cover each compressor setting individually to best explain how to set up compression on bass:
Threshold
The compressor threshold determines at what volume compression begins. Everything below the threshold will be untouched. Any volume which exceeds the threshold will be compressed at the compression on bass settings we’ll cover in a moment.
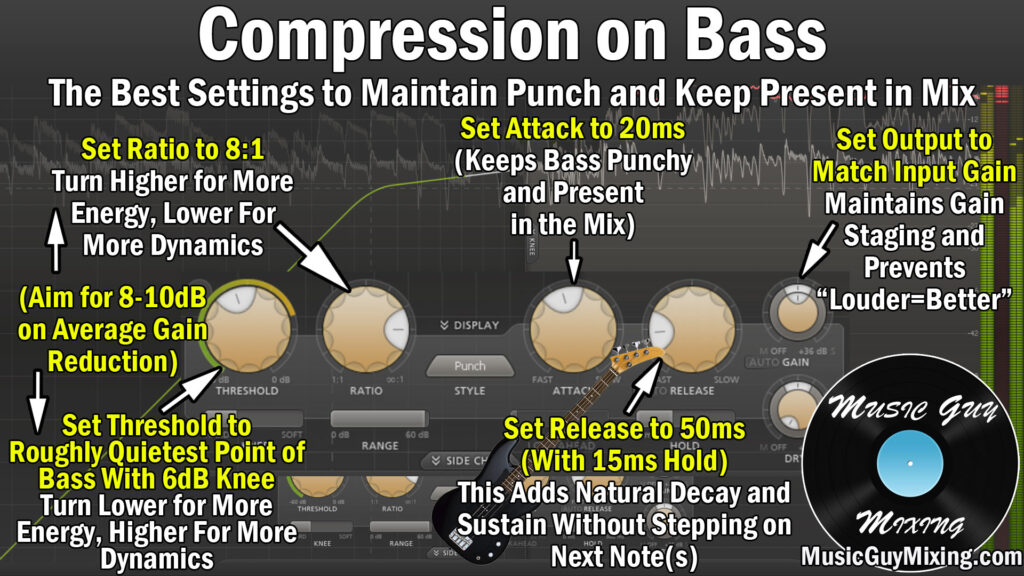
I typically like to set the threshold to roughly the quietest played note of the bass (practically speaking – if the verse is played substantially quieter than the chorus then I’ll likely separate these or automate the settings from one section to the next):
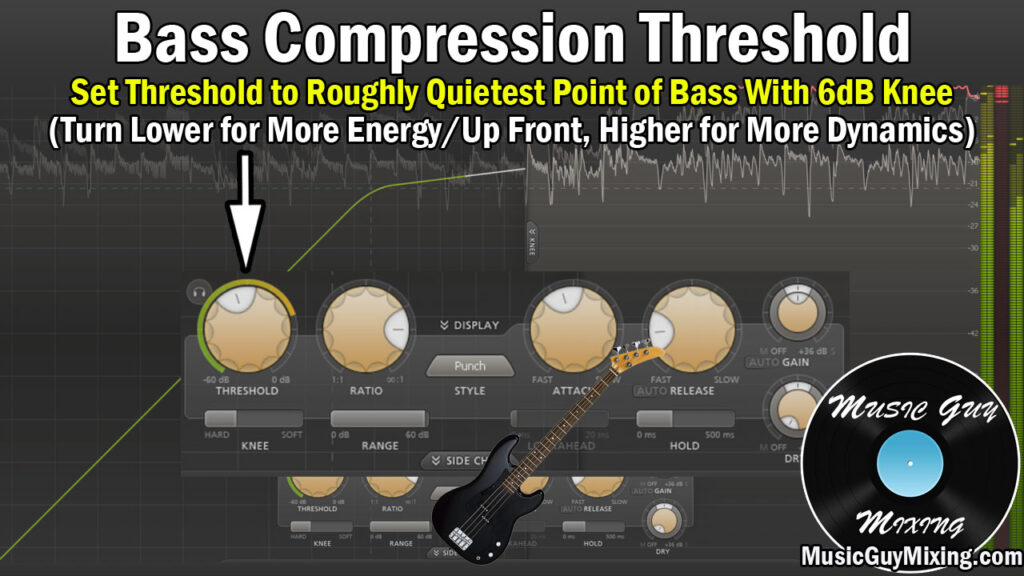
This means that I’ll be compressing the majority of the signal, though the louder parts will be attenuated more. This is an aggressive threshold admittedly as opposed to just catching peaks, but it helps to keep my bass constantly present in the mix.
Knee
The compressor knee dictates how strictly the threshold is enforced. A hard knee is 0dB, and it gets “softer” the higher we go.
If we set a softer knee, compression will begin BEFORE the threshold which we just set is met. This means that more of the signal will be compressed the softer the knee, albeit at a lower ratio than we set (which we’ll cover next).
I typically opt for a hard knee for bass compression (specifically I set it to 6dB).
While it’s a bit less transparent, I like that the threshold I set is strictly adhered to and compression will only be happening at the ratio I set, resulting in some tight attenuation of those peaks.
Ratio
The compressor ratio determines how aggressively the bass will be compressed, meaning those peaks which exceed the threshold will be turned down.
A 4:1 ratio is considered to be relatively average and it works well for most forms of compression. This is typically the starting ratio I set when I’m using compression on bass.
I typically use a bass compression ratio of 8:1. Admittedly this is on the above average/aggressive side, but it really helps in bringing the bass under control and more importantly keeping it up front and present in the mix. Sometimes I’ll even drive this ratio higher (I’ll even turn to a limiter for bass compression in some cases):
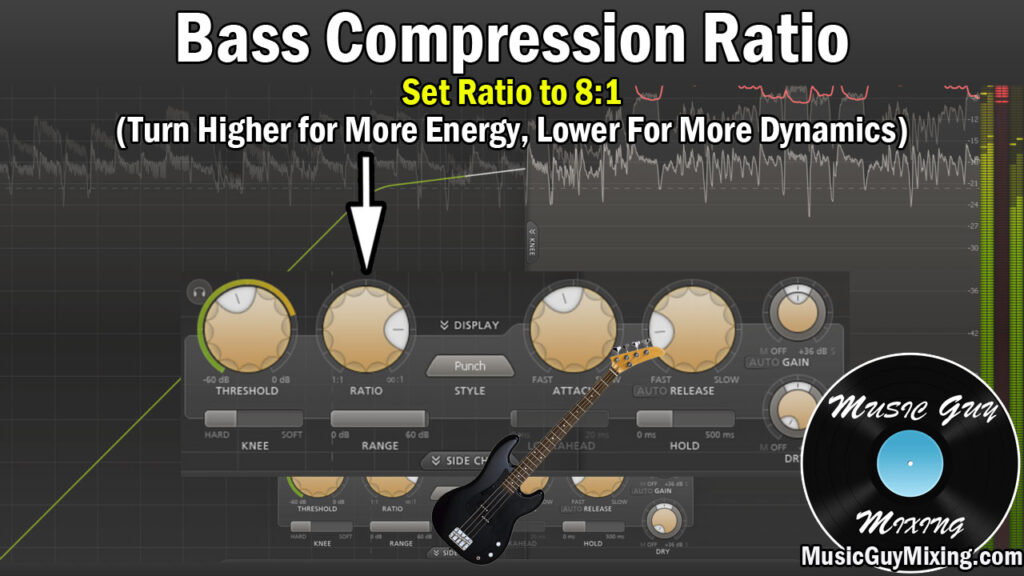
You might even pull the threshold down lower to compress more of the signal if it’s especially dynamic or you want to add more energy to your bass.
Between the ratio and threshold I aim for 8-10dB in gain reduction on average to get more energy and consistency out of my bass track.
Attack
The compressor attack controls how quickly the compression begins once the threshold is met. Setting this at the fastest/shortest speed effectively pulls down the peaks the instant they cross the threshold.

The problem with that is that this can kill the transients of our bass, the higher frequencies that cut through the mix. Adding a little attack can let the bass peaks come through at full volume for a split second to help the bass assert itself before it gets pulled back down.
A medium attack time of 20ms can be enough to achieve just that, keeping the transients intact while getting the benefits of the compression.
Release
The compression release time reflects how soon the compression “releases” the signal after it drops below the threshold, back to its normal state.
Try listening with your bass compression release time of 50ms plus a hold time of 15ms:

The hold time adds an amount of time of your choosing where the compression is still fully engaged even after the signal drops below the threshold. Check out my of hold and release for more information, but I like a bit of hold time to pad the release to get a more natural overall release.
If you’re not sure where to set your release, you can always go with the auto release setting.
Output Gain
As important as any other move you make, be absolutely sure when you’re split testing with the compression on and off to survey your progress that the output gain matches the input gain.

Not only is this important for gain staging to get the best sound out of the bass for the next effect in the chain, it keeps you from favoring whichever instance is louder.
Any changes we make to a track via processing of any kind should always be for the better ultimately, and the louder one will always win regardless of which is truly better.
Compression on Bass Tips
- Use compression on your bass to get a more consistent level with more energy for a better sounding low end in general.
- A ratio of 8:1 is effective at controlling your bass along with the threshold set to the low end of the volume of notes played. Together these should at least average 5dB of gain reduction with as much as 10dB or more on the loudest peaks.
- Set the bass compression attack for a relatively average to slow 20ms to keep the front end transients loud and biting before the compression clamps down and reduces that dynamic range. This helps to keep the dynamics in the bass while keeping it controlled.
- Try a release of 50ms with a hold of 15ms for a nice natural roll off back to uncompressed signal when applicable below the threshold.
- Set your output gain to roughly match the input gain so that you can experience a comparable volume with the compression on bass on or off.


Pingback: Bass Guitar Compression Settings | Master Your Low End
Mixer bass music