
Reverb can be a great effect for giving you some depth or even width. This can be used as a cool aesthetic effect or more practically for separating tracks in your mix by utilizing its third dimension, ultimately resulting in a cleaner mix. While we typically think of reverb as an effect we use as an insert or on an Aux/Return track to blend in to tracks in our mix to taste via send knobs, reverb on the master bus can enhance your entire mix with minimal effort from you.
Here is how to use reverb on the master bus.
Reverb on the Master Bus
I briefly touched on using reverb on the master bus in my overview of how to process your master bus, but let’s get into some more defined settings which will work in blending in some cohesive depth across your entire mix without muddying anything up.
Remember that we’re using this effect as an insert directly on the master bus rather than a send so it’s important that we keep the Mix or Wet/Dry percentage low. We don’t want the listener to necessarily hear the reverb on the master bus working, but rather feel its presence.
With that in mind, let’s get into a snapshot of the settings before I’ll go down each one, one by one at a time to better explain why I’m recommending the setting I am.
For this example, I’ll be using my reverb of choice, FabFilter’s Pro-R 2, because I like its array of features for dialing in the perfect reverb tone between its character related controls, onboard reverb specific EQ, and more. That said, you can generally apply these same settings to your reverb of choice, particularly the time based settings and adjust anything else to taste.
Predelay
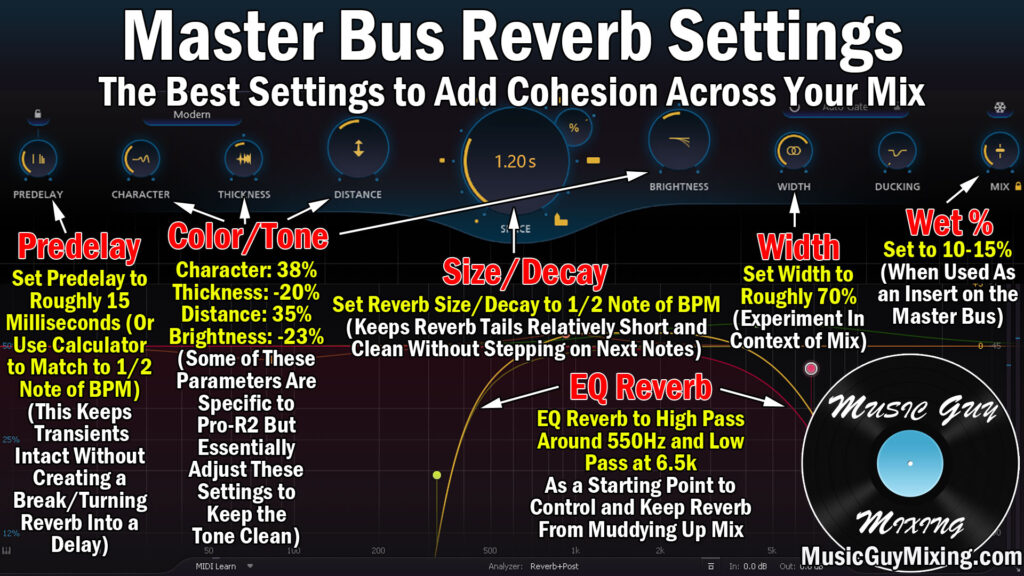
Set your reverb on the master bus’ predelay to 15 milliseconds or alternatively use this calculator to find the exact 1/2 note as per your mix’s BPM.
The predelay on any reverb is the amount of time after the initial signal before that reverb plays.
I like 15ms because it creates enough of a gap to allow the transients come through to keep the mix punchy but it’s not SO long that the Haas effect comes into play and the listener hears a gap between the initial audio and the reverb (which would be more like a delay).
The reverb is meant to be more of an extension of the audio to thicken it out a little and add some depth and even sustain, and a 15ms predelay accomplishes this.
Size/Decay
Some reverb plugins call this the size, others call it the decay, others just call it the time or delay time.
Whatever your reverb plugin calls it, I like to set this length to 1/2 note of my BPM which you can once again find by inputting your BPM into this calculator.
This ensures that the reverb tails don’t last too long, suffocating and stepping on the next notes, hits, etc. in the mix.
Setting the decay time to be too long will quickly muddy up your mix, so to achieve the benefits of the reverb while keeping it snappy, responsive, and clean, I like 1/2 note when using reverb on the master bus.
Color/Tone
These are the parameters which are specific to FabFilter’s Pro-R 2 but essentially these are the main driving settings behind the tone and character of your reverb’s sound.
Your reverb will likely have its own names for some or all of these parameters, so adjust these to taste.
For what it’s worth, I like a “Character” of 38%, “Thickness” of -20%, “Distance” of 35%, and “Brightness” of -23%.
Essentially these parameters are working together to shape the overall color and tone of the reverb, and specifically these settings are keeping the tone clean and at an average perceived distance (as opposed to the reverb coming from the end of a tunnel).
Width
The width of any reverb is pretty straightforward; this determines how much of the stereo field left and right the reverb tone will extend to.
It’s very important to note that different reverbs treat width differently. On FabFilter’s reverb, 50% represents true stereo and everything above that up to 120% begins to isolate that reverb more to the sides.
I find 70% is a nice compromise to help keep the center-most position of the mix a little cleaner while giving it some subtle size on the edges.
We’re going to be conservative with the most important reverb parameter which I’ll mention in a moment in the Wet/Dry percentage, so it’s all relative, but 70% on Pro-R 2 works very well for master reverb in my experience.
EQ
Many reverbs have an onboard EQ filter which is specific to the reverb tone, and FabFilter’s Pro-R 2 is no exception.
Reverb can get cloggy and cluttered in the low and low-mid frequencies which is why it’s typically a good idea to filter these frequencies out of the reverb.
Specifically, I like to use a high and low pass filter at 550Hz and 6.5kHz, respectively.
This is a slightly more liberal application of the Abbey Road Reverb Trick, a technique pioneered at the famous Abbey Roads recording studios in London back in the 60’s to keep the reverbs from muddying up the rest of the mix.
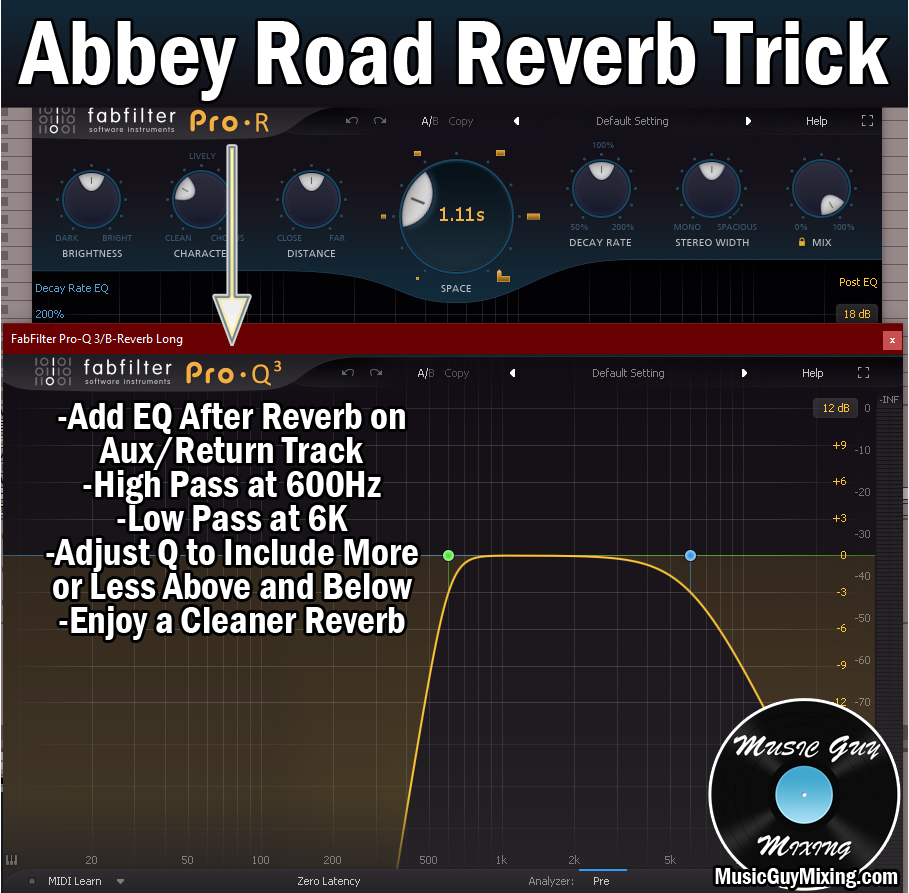
This keeps your low end instruments like the bass and fundamental of the kick drum clean, not to mention centered with no unwanted spread from the reverb.
Note that because this is an insert, you can’t simply follow the reverb up with a separate EQ in the signal chain on your master bus because this will just filter out everything below 550Hz across your entire mix, not just the reverb.
If there’s not an onboard EQ, you can get creative and create a group (in the case of Ableton Live) to work the reverb and EQ in as some parallel processing, blending it in to taste (in which case you WOULD set the Wet/Dry to 100%, the one exception).
That said, even if your reverb doesn’t have a spectral analyzer display for EQing these frequencies out, it likely still has dials for high and low passing to clean up the tone.
Mix/Wet/Dry
The Mix parameter controls the balance between the Wet (reverb signal) and Dry (original/clean signal).
Because we’re using this as an insert directly on the master bus, we want to keep this number low because this is literally the amount of the reverb we’re blending in with the mix.
As I mentioned in the aforementioned tutorial on processing your master bus, less is always more and being conservative is key whenever you add any kind of processing to the master bus/channel because it’s going to affect every single track in your mix.
This extends to the reverb on the master, as well. I like to aim somewhere around 10% with an option to go 5% either way to taste.
As I said before, it’s more about feeling the master reverb than hearing it.
Like some glue compression on our master bus, the master reverb adds a very pleasant touch of cohesion and barely perceptible swathe of depth across our entire mix, and these settings should enhance the mix’s tracks and make them feel more like a unified collection than a random assortment.
