
My DAW of choice for the last 20 years since I got into recording and mixing audio has been Ableton Live. Ableton’s introduced a number of new and useful plugins to their stock collection in that time (which I’ve covered in full in my Ableton stock plugin tutorial). Unfortunately one of the most useful features which I use regularly (and recommend in my free EQ cheat sheet) is dynamic EQ, but there’s no stock option for this in Live. Thankfully like virtually everything in Ableton Live, there’s a workaround, so let’s cover how to use dynamic EQ in Ableton Live.
Dynamic EQ in Ableton
Before I share the method on how to use dynamic EQ in Ableton, let me preface it by saying two things.
One, there are a number of different ways to achieve a similar result. You may find different methods elsewhere, but I like this method because it’s more transparent and doesn’t introduce latency like other methods I’ve tried.
Secondly, this or any method to engineer dynamic EQ in Ableton is not ideal. Yes, Live’s multiband compressor performs a similar task, but not with the precision of dynamic EQ (see my comparison of multiband compression vs dynamic EQ):

Ultimately if you’re working in Ableton Live and want to use dynamic EQ as streamlined as possible without spending any money, then I completely recommend you grab my favorite free dynamic EQ plugin, TDR Nova:

I go into greater detail on it when I called it my favorite free EQ plugin, so check that out for more information.
TDR Nova is also available for both Windows and Mac operating systems, 64 and 32bit, not to mention VST3 AND VST2.
But let’s get to my preferred method on using dynamic EQ in Ableton using stock plugins.

This method requires EQ Eight and Envelope Follower which you’ll find under “EQ & Filters” and “Modulators”, respectively.
Let’s actually roll up our sleeves here and address two different practical examples of when we might want to use dynamic EQ, first a relatively simple one followed by a slightly more advanced sidechain one.
But first, let’s perform a simple dynamic cut on a vocal. As I recommended in my vocal EQ cheat sheet, I like a dynamic cut at roughly 500Hz on a vocal to control the boxiness:

This helps to control the boxiness which is a product of certain mics, microphone setups, and room reflections. This boxiness leaves an unflattering sound on the vocal and eats into the clarity, but it’s not a uniform problem, manifesting more during certain moments. As such, I like a dynamic cut at 500Hz to attenuate there more or less as necessary.
To use dynamic EQ in Ableton to control this, there are three easy steps.
Step 1 – Drop an EQ Eight and Create a Band at 500Hz
If you already have an EQ Eight on your vocal, you can simply create a bell shaped band at 500Hz.
This simply entails selecting and ticking one of the eight bands at the bottom, then adjusting the “Freq” dial to 500Hz (you can click and type in 500, as well):

Step 2 – Drop an Envelope Follower and Map It to the 500Hz Band
Follow that EQ with an instance of Envelope Follower which is again in the “Modulators” category of your plugins:
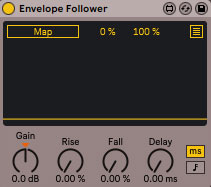
In the interface, click “Map” and it will prompt you to click on a parameter elsewhere in Live which the envelope follower’s parameters will now control.
We want to control the gain of that 500Hz band, so let’s click the dial under “Gain” in the EQ Eight while that band we just created is selected.
It will now say “# Gain A” with the # being related to whichever band we’ve selected in EQ Eight (it’s the second band in this example).
Step 3 – Adjust the Envelope Follower and EQ Band Width to Taste
Now we just need to adjust the parameters of the envelope followers to control duck more or less gain depending on how loud 500Hz is from sample to sample.
Set this at 50% for the first number and 0% for the second number to adjust the min and max, accordingly.
Now the “Gain” controller at the bottom of the envelope follower interface will control the relative size of the cut.
I have mine set to 8.3dB which, if you look back at the EQ Eight “Gain” controller reacting in real time while the audio plays, is pulling down 500Hz by just under 2dB at most:

Obviously your envelope follower’s “Gain” parameter will need to be adjusted to match your own audio. You may also want to adjust the Q setting to create a narrower or wider affected area (remember wider areas sound more natural).
Sidechain Dynamic EQ in Ableton
Let’s go one step further and say we want to pull down the gain of a band based on the behavior of ANOTHER track.
A classic example which I frequently reference when you will likely want to do this in your own mix is sidechaining a bass to the kick with dynamic EQ.
I actually did an entire tutorial dedicated to this in the past, so here’s a refresher on how to use sidechain EQ in Ableton.
Step 1 – Drop an EQ Eight on Your Bass and Envelope Follower on Kick
Let’s just condense the first two steps for simplicity sake.
Put a standard bell shaped band at 65Hz on an EQ Eight on your bass track, and an Envelope Followers ON YOUR KICK track.
Step 2 – Map Envelope Follower to Bass’ 65Hz Band’s “Gain”
Once again, the envelope follower plugin allows you to automate any parameter(s) of your choosing (see how to automate in Ableton Live).
Tick the “Map” button and instead click the bass EQ Eight’s “Gain” for the 65Hz band we just created:

Now it’s the behavior of the kick which will dictate the bass EQ’s 65Hz cut.
Step 3 – Adjust Everything Accordingly
Lastly, we once again just have to adjust the min, max, and gain parameters on the envelope follower to duck out the bass when the kick triggers to taste.
I described this in the Ableton sidechain dynamic EQ tutorial, but the 50% and 0% essentially keeps the default gain unchanged in setting it up for a cut.
With those in place, the “Gain” parameter at the bottom is the driver of the degree of the cut, so adjust it until you get the bass ducking out to the degree you want when that kick triggers. This creates a cleaner low end for that split second whenever the kick triggers, leading to a better sounding low end mix.
Lastly and for what it’s worth, you can control multiple parameters across limitless tracks with one instance of envelope follower. Simply tick the lines icon in the top right to get a drop down option with a lot of mappable options:

This can yield a number of interesting effects depending on how you use it in your next mix, controlling everything with one instance of this plugin and varying mins and max parameters.
But there you go – you can now use dynamic EQ in Ableton simply by adding a touch of automation via a second plugin.

