
Along with vocal compression (see my guide to the best compressor settings for vocals), vocal EQ is one of the most important tools at your disposal. Using vocal EQ, you can correct any frequency mistakes in the vocal and enhance what you already have. In this vocal EQ guide, we’re going to identify every relevant frequency, where to boost and cut, and why.
Vocal EQ Guide
Admittedly male and female vocals vary slightly in their fundamental frequencies. Not just male vs female, but also types of singers and the registers their voices occupy. Obviously the “body” of a baritone singer’s voice will vary from that of a soprano. That said, this vocal EQ cheat sheet will serve as a great starting point for the major relevant frequency ranges and give you advice on what to do at each and the effects for each.
Vocal EQ Cheat Sheet

This vocal EQ cheat sheet was made using my own preset I often try on my FabFilter Pro-Q plugin. You’ll notice high and low pass filters on either end, and a number of bell curves and a shelf being used. Refer to my guide on the types of EQ filters for more information.
Let’s cover each suggested move now, one by one, to explain each one in detail.
Vocal EQ Settings
The image serves to show the kind of Q and amount of gain boost or reduction I’m using on each move. Remember that wider (smaller number) Q filters (the width of the curve) sound more natural versus sharper ones. Also I recommend sweeping around in each to find the core of what I’m referring to in each point in YOUR vocal. Then, trust your ears and boost or cut to the degree which sounds best.
Now let’s get into the specific vocal EQ settings.
High Pass Around 130Hz (Sweep) to Remove Unwanted Frequencies
We want to high pass our vocal because we can eliminate room noise and other unwanted frequencies below 100Hz. 130Hz on a vocal is a good place to start sweeping on most vocals with an average slope (I use 18dB/octave).

Lower/deeper vocalists may begin to sound thin if you high pass at 130Hz so trust your ears.
While I typically recommend making most EQ adjustments in the context of the full mix, this is one of the things I like to do in solo as you really don’t want to lose the anchor or bottom of the body in your vocal.
Filtering here not only cleans up the vocal itself, but it cleans up the mix and creates more room for a cleaner low end for bass and especially my EQ kick drum guide along with my bass guitar EQ guide for similar guides on nailing the low end.
Boost/Cut at 200-300Hz to Bring Out Body/Add Clarity
We just talked about the edge of the body, the 200-300Hz area is where the real fundamental body of the vocal resides on most vocals.

Deeper vocals will favor lower, higher vocals… well, higher.
What you do here will depend on the circumstances of the recording.
If the vocal is sounding thin, try a boost here to put more of that body into the vocal.
If there’s more room sound in the vocal, you might need to make a small cut here to bring more clarity to a muffled, muddy vocal (see my 5 causes of a muddy mix).
If the vocal is lacking clarity in general, a small cut here along with the subsequent vocal EQ recommendations can help open it up.
Cutting here will quickly thin out the vocal, so be conservative and try the next vocal EQ tip before you cut here.
Incidentally I typically favor a small boost in this section make it feel a bit sturdier in the mix.
Cut at 500Hz to Remove Boxiness/Add Clarity
Before you start boosting in the high end for a muffled, muddy vocal, try a cut in the 500Hz region to remove boxy frequencies which typically build up here.

This is a great place to clean up a lackluster vocal. A cut here will help clear the vocal up by greater emphasizing the high end.
I like a dynamic EQ cut here in particular to regulate a greater cut as necessary/different tones, notes, or syllables.
Boost/Cut 1-2k for Hollow Vocals/Nasal Vocals
This is another one which goes back to how the vocal was recorded. If you’re getting a hollow sound in the vocal, try a boost in the 1-2k region.

Conversely, if the vocal is more nasally, a cut will reduce this effect (see my guide to nasally voice). A cut here works wonders on some vocalists who are more nasally when they sing in general. With some singers I work with, I always pay extra attention to this frequency range.
Boost/Cut Around 3-5k for Presence/Reduce Harshness
Like I explained recently in my cymbal EQ guide, our ears are especially sensitive in the 3-5k region. Too much sound “information” here and our ears become fatigued. This is not the effect we want our mix to have on our listeners.
As such, you need to treat the 3-5k vocal region carefully. I usually have an EQ filter set at 4k with the Q set to encompass 1000Hz on either side.
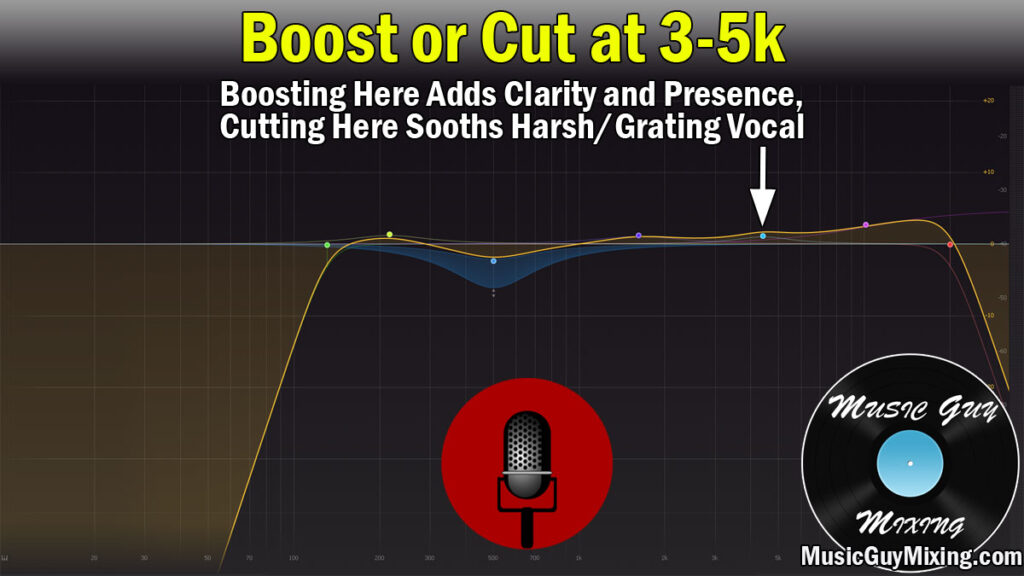
If your vocal is a bit flat even after the earlier vocal EQ tips, try a small boost here for presence in the vocal.
Conversely, if the vocal is sounding too harsh as it is, try a small cut here to tame this region.
Another tip, some saturation also works well to smooth out a harshness in the 4k range. Drop a tape saturation plugin alongside your EQ to introduce some warmth to a harsh vocal.
High Shelf at 10k to Open Up Vocal
The overtones can be brought out in the vocals around 10k.
It’s a cliche and difficult to describe concept, but if you want to hear more “air” from the vocal, try a high shelf EQ boost at 10k.

Push it up to help that vocal sit just right and add a little crispness to it.
Low Pass Around 20k to Remove Unwanted Frequencies
There’s nothing audible above 20k, so introduce a low pass filter around here to buy yourself some head room.

Vocal EQ Tips
- Vocal EQ can be used to correct frequency issues in a vocal or bring out more of the good stuff.
- Use my recommended settings as a starting point, remember that wider Q settings sound more natural, and trust your ears.
- Begin with a high pass filter around 130Hz. Remember that frequencies for lower vocals will skew lower and conversely for higher vocals.
- Boost or cut at 200-300Hz to bring out more body or thin a boomy vocal, respectively.
- Cut at 500Hz to mitigate the “boxy” sound in your vocal.
- Boost or cut at 1-2k to correct a hollow vocal or mitigate the nasal quality in a vocal, respectively.
- Boost or cut in the 3-5k region to add presence or sooth a harsh vocal, respectively.
- Boost at 10k with a high shelf to add air, crispness, and bring out overtones.
- Low pass around 20k to remove inaudible frequencies and add headroom to mix.
Pingback: Best Reverb Settings for Vocals - Your Vocal Reverb Cheat Sheet - Music Guy Mixing
Pingback: Vocal Automation Guide - How to Keep Your Vocal Alive - Music Guy Mixing
Pingback: Vocals Delay - The Best Vocal Delay Settings - Music Guy Mixing
Pingback: Subtractive EQ - What It Is and Why It's the Best EQ - Music Guy Mixing
Pingback: Vocal Clarity EQ - How to Make a Dull Vocal Shine - Music Guy Mixing
Pingback: Panning Backing Vocals - Your Guide to Fitting Them Right - Music Guy Mixing
Pingback: How to EQ Male Vocals - EQing Male Vocals Guide - Music Guy Mixing
Pingback: Phone EQ - How to Get The Phone Sound Via EQ - Music Guy Mixing
Pingback: How to Make a Multiband Compressor a De-Esser - Music Guy Mixing
Pingback: The Best Compressor Settings for Vocals (Exact Settings to Use) - Music Guy Mixing