
A mixing template is a pre-made, empty layout in your digital audio workstation which is ready to receive tracks.
It takes a few minutes to set up, but it will save you hours and hours in the future every time you begin a new mix. It’s also useful if you’re beginning to record a new song as all of the tracks are already routed properly and may even have some processing on them.
It’s easy and quick to do so let me show you how to make a mixing template.
Make a Mixing Template
This is the expedited way to make a mixing template. Note that my DAW of choice is Ableton Live, so all images and terminology will reference that, but the same principles will apply to your DAW.

Make a Track and a Bus and Label Them
The first thing to do is open a blank set in your DAW.
Create two audio tracks. Label one “Bass” and the other “BASS BUS”.
Color code the bus track white, and the bass track whichever color you want to represent the bass.
Color coding helps you quickly identify what instrument a track represents to find what you’re looking for more quickly. As you drag tracks into the set, the clips themselves automatically get color coded to the track, as well.
Route the Track
Now set the output of the “Bass” track to “BASS BUS”, and make sure that monitoring is turned on so you can hear the track(s) through the bus when it’s or they’re playing.

Make a Sub Mix, Vocal, Instrument Bus
Now duplicate the “BASS BUS” three times. Label one “VOCAL BUS”, one “INSTRUMENT BUS”, and one “SUB MIX”.
What we’re doing is creating a hierarchy which will assist us in making changes at different levels of our mix easier.
At the very top of the hierarchy is the Master Bus. This is our main output which routes directly to our speakers or whatever audio output our system is set to. This bus is already present every time we open a new set. By default, every track will feed into the master bus unless you specify otherwise.
Let’s do a bit more routing with our three new buses now. Output the “SUB MIX” bus to “Master”. I like to color code the “SUB MIX” black to differentiate it from the other buses.
Now output the “VOCAL BUS” and “INSTRUMENT BUS” both to “SUB MIX”. Because we copied all of these buses from the “BASS BUS”, the monitoring will already be set correctly.
Lastly, change the “BASS BUS” routing from “Master” to “INSTRUMENT BUS”.
Our set should have five “tracks” now, one audio track and four buses:
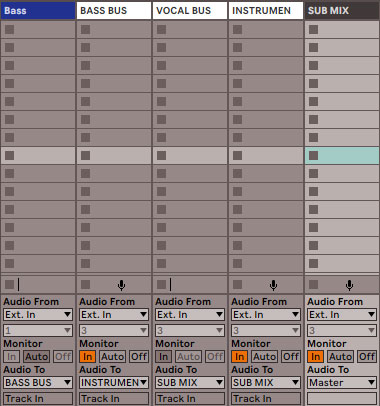
Just like that we have a hierarchy. The bass track feeds into the bass bus which in turn feeds into the instrument bus which feeds into the sub mix which finally empties into the master channel.
Duplicate “Bass” and “BASS BUS”
Select both the “Bass” and “BASS BUS” tracks and duplicate them five times.
Now rename each pair one at a time for any instruments you want to keep separate.
For instance, you might want a track and bus for “Rhythm Guitar”, “Acoustic Guitar”, “Lead Guitar”, “Piano”, “Drums”, and “Vocals”.
Once you have one pair (a track and bus) for each instrument type you’ll encounter or typically encounter in your mix(es), you can duplicate additional tracks as necessary.
A good example is drums, where you’ll want a specific track for each individual drum microphone or track. You can duplicate and label these accordingly, just make sure the first one is already routed into “DRUM BUS” so every duplicated track will do the same.
Do some color coding for the rest of your tracks and here’s a sample mixing template to see what it should look like when you’re done:

Everything is neatly labeled and broken up. The white of the buses helps not only to display which tracks are buses but also the breaks into a new instrument group.
You’ll notice with vocals I broke it down to create a bit more granularity. Specifically, I duplicated a bus track a couple more times, labeled one “Lead VOCAL” and one “Back VOCAL” (color coded off white) so I could treat lead and backing vocals differently.
I then routed my lead vocal and back vocal tracks accordingly, and fed those buses into the “VOCAL BUS” we made earlier.
Insert Effects
Now we want to insert some basic plugins on each track. I’m not talking anything specific like a reverb. After all, we don’t even have any audio on any of these tracks yet, so there’s certain types of effects which we won’t know that we’ll need yet.
There are, however, some effects that I know I’ll likely want on every track.

For instance, if you saw my gain staging cheat sheet I shared yesterday, you’ll know I start every single track (minus the buses) in my set with a clip gain plugin. In Ableton Live I just use the stock “Utility” plugin. Start every track with this plugin as the first insert, and I can adjust the audio to the parameters I explained in the aforementioned gain staging tutorial.
In fact, I have a handful of mixing templates, the only difference between them is how much clip gain each plugin is set to turn down. In other words, I have a mixing template where every track has clip gain plugins on every single track set to -5dB, and another set to -10dB, and so on.
Because I work as a professional mixing engineer, I get audio from clients which is all over the place in terms of how “hot” it is. The majority of tracks I get from clients are too loud, so it’s a matter of how much on average does it all need to come on.
With a variety of templates, I can review the audio I get sent and pick a template accordingly. This saves me a lot of time knowing most of the gain staging is already done.
Beyond addressing the clip gain, I know every single track can use an instance of my favorite EQ plugin, FabFilter Pro-Q 3 (see my FabFilter Pro-Q 3 review to see why).
Obviously every instance of the plugin is a clean slate (outside maybe a high pass filter), but the point is you’ve got that EQ ready to cut or boost when it’s time.
I’ll probably drop a clean instance of a compressor on most of my tracks, as well, as another plugin I know I’ll need.
It’s really just about knowing what your typical workflow is and working that into your mixing template to save yourself time down the road.
Admittedly your mix is likely going to have more than one vocal, guitar, etc. track.
The point is we can now easily duplicate those individual tracks as many times as we need.
In the meantime, the template is relatively light with just one instance of each track so it will open up fast and be easy to populate when we’ve got audio for it.
Add Aux/Return Tracks
Aux/Return tracks are made for blending in effects with your existing dry tracks via sends. I talk about it more in my inserts vs sends explanation, but generally with aux/return tracks, there are some effects I like to use in every mix.
These include effects to add reverb, delay, width, and parallel compression, just by the turn of a send dial.
You’ll likely need to adjust some parameters on each of those instances of those plugins with each mix, such as changing the reverb size and time to match the song, but it’s still handy to have them all ready to go.
Simply create these aux/return tracks for the effects you use most regularly so you’ll have them ready to go.
Save That Template (With a Backup)
Once you have everything routed properly, make sure you save that instance of the template. You can set it to be your default set when you open your DAW, as well.
One friendly reminder: save a backup of that template as a separate file. If you’re like me, you’ll load up the template and as soon as you start dropping audio into it you’ll likely save out of habit, saving over the template rather than giving it a new name. This is why we want that backup template saved so we can recall that in case anything happens to the main instance. Just make sure if you update your template down the road that you update the backup, as well.
Drop in Your Audio
The last thing to do is drop in your audio in its corresponding tracks. Make sure you save it under a new name before or after you drop the audio in!
If you need more than one type of any track (multiple lead guitars, etc.), simply duplicate the initial one you have accordingly until you have enough.
The effects are all ready to go, and you’ve saved yourself more than a few minutes on that mix alone. Plus everything is so much more neatly organized.
Add this up over dozens and hundreds or more mixes and we’re talking hours and days of your life that you’ve saved. Now the only question is what are you going to do with that time?
Mixing Template Tips
- Creating a mixing template is quick and easy to do, keeps all new recordings and mixes organized, and saves time.
- First create a sample track and bus. Do the routing, then duplicate these and adjust the names and routing accordingly.
- Color code each instrument type to organize your set and quickly locate certain audio types.
- Drop a clip gain plugin as well as a blank EQ and compressor plugin on each instrument track.
- Add aux/return tracks with your most used send effects to have them ready to go.
- Save your template along with a backup of it.
- Pro tip – create different instances of the template with differing amounts of clip gain uniformly across the tracks as discussed.
- Drop your audio in, duplicating tracks in each instrument group as necessary.


Pingback: What is Audio Resampling and How to Do It in Ableton Live - Music Guy Mixing
Pingback: Master Bus - How to Process Your Master Bus - Music Guy Mixing
Pingback: What is a Bus on a Mixer - How to Make and Use One - Music Guy Mixing
Pingback: How to Mix Bass - My Bass Mix Chain for the Best Results - Music Guy Mixing
Pingback: How to Make Stems in Ableton Live - Music Guy Mixing
can you make a post like this for tracking vocals in ableton.
Will do and added to the todo list, thank you NP!
Pingback: How to Mix in Ableton - A Complete Guide - Music Guy Mixing