
I recently talked about 5 music mixing tips which will never go out of style. The kinds of things I wish I knew when I first started mixing 15 years ago. Topping that list was the importance of using reference tracks when mixing, so I thought I’d delve deeper into that and talk about how to use reference tracks in your mixing to see huge improvements.
What Are Reference Tracks
Reference tracks are songs which you like the sound of – mixes you want YOUR mix to sound like.
These are songs which were professionally mixed which you can use as a guide when mixing your own music.
If you’re mixing your own music, think about the artist(s) which inspired the song you’re working on. Maybe there was even a specific song which inspired your song. This would be an ideal track to use as a reference.
Even if you’re not a massive fan of an artist, you may still acknowledge that their music is mixed well and can use that as a reference.
If no specific songs or artists jump to mind, just take a look at the Top 40. Aside from the songs themselves, the production and mixing are huge elements of why the songs are charting as high as they are, making a lot of those songs prime candidates to use as references when you’re mixing.
Typically you’ll want to use a track in the same genre as what you’re mixing as a reference. Different genres value different things in music production and mixing, so you won’t gain much using a country song to mix a rap song and vice versa. Incredibly obvious, I know, but worth mentioning.
How to Use Reference Tracks
First, I recommend having the reference song in a relatively high fidelity format. There’s services like BandCamp where you can get a song from an artist directly in any format you want.
Regardless of how you get the song, the point I’m trying to make is that it’s preferable to drag that song into your DAW over going back and forth between your DAW and say Spotify.
It’s faster and easier to split test by assigning a hotkey you can toggle on and off versus clicking back and forth between programs.
If you do end up using a third party program like Spotify, make sure that you’ve got flat EQ settings and the fidelity set as high as it will go.
Most of these services offer the option to set custom EQ settings or use lower quality audio to use less bandwidth, so just something to be aware of as we want the best and most faithful version of that mix.
This should go without saying, but listen to/reference the song on the same speakers/headphones/etc. you mix with. Playing the reference on your phone’s speakers isn’t going to help you unless you’re mixing on your phone… in which case… well that’s a whole other discussion.
Lastly, make sure when you drag a reference song into your DAW that its output bypasses the master bus. If you have processing on your master bus, you don’t want it affecting the sound of the reference.
Ableton Live, my DAW of choice, has the option to set the output to “Ext. Out”. Any audio with this output goes straight to the speakers and avoids any routing, so you’re just getting that audio.
Make sure you regularly solo that reference track in order to keep your ears trained on your end goal.
When you go too long without checking in, you begin to mix “in a vacuum” so to speak. What you’re doing might sound good in the moment, but the longer you go without checking the reference, the worse your mix might sound when you finally do.
Now let’s talk about some practical ways for how to use a reference track in your mix.
Set it to Mono
You’ve probably heard the recommendation to try mixing in mono. Mixing in mono forces you to find space for the tracks in your mix without relying on panning.

Without panning, your main weapon in creating space (along with setting your levels) is sculpting out frequencies in each track. This keeps the tracks from stepping on one another as you fit them together like a puzzle.
As such, EQing your tracks in mono can result in a better finished product.
Once you’ve created space in mono via all of the frequencies fitting together, introducing panning completely opens up your mix.
Still, mixing in mono isn’t easy, especially when you first try it.
One of the most difficult things is understanding what a mono mix SHOULD sound like. This is where the reference comes in.
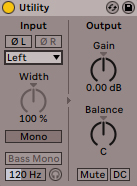
Try dropping a stock, utility like plugin on your reference track and set it to mono. This will remove stereo width and force everything right down the middle.
With the reference in mono, you can focus on how all of the frequencies are fitting together and the levels are set.
Compare this to your mix and at first you’ll almost certainly hear all of the clutter and mud.
The reference will serve as a blueprint for creating that space when you don’t have that width to rely on, greatly benefiting your mix down the road.
Solo the Left and Right
The same utility plugin in Live that we can use to mono our reference track can be used to solo the left or right channel. You can just turn the panning knob left or right, but with this method we can hear either side in solo in both ears.
When you switch between the two, you can hear which instruments are more prominent in each. This can tell you things like how the mixing engineer approached panning certain tracks which helped them create space.
You can also hear production related things, like whether a track was doubled and panned or if there are two unique guitar parts (for example) being played.
It’s not just helpful for mixing but for getting ideas on how to better compose your track, as well.
Solo the Mids and Sides
Not to be confused with the last point, we can also solo the mids and sides.

This helps us differentiate between everything that’s panned right up the middle and which instruments are panned partially or completely.
LCR mixes become quickly apparent as huge chunks of the mix disappear when you alternate between soloing the mids and sides. You’d be surprised how many of your favorite mixes utilized LCR mixing, and it might empower you to give it a try.
Analyze the Frequency Breakdown
When we have a frequency buildup in our mix, it oftentimes doesn’t become apparent until we compare it to a reference track.
One of my favorite ways of how to use reference tracks is to load one into Izotope’s Tonal Balance Control.
This plugin shows the breakdown of each frequency range in any song you have it analyze.

After you have the frequency template you want, you put the plugin on your master bus and it shows you in realtime how your frequency ranges stack up to those of the reference.
When a lot of us don’t have ideal mixing environments which can lead to hearing too much or not enough of certain frequencies, this is incredibly helpful for revealing what we either can’t hear or don’t know what to listen for.
When the frequency disparity is visually represented, it can better train you to listen for certain frequencies.

It’s also not just useful on the master bus. Stems are available for a lot of popular songs these days.
If you have an isolated drum track, bass track, etc. from a professional mix, you can use the Tonal Balance Control to compare that individual track to yours in the same way. When just analyzing one track, you can get more nuanced information. This makes getting individual components in your mix to pro level much easier, making putting together an entire pro mix much easier.
You can also drop an EQ on your reference track and solo everything below a certain frequency to get a better idea of how they’re treating their low end.
There’s no limit to what you can learn from a good reference track to bring back to your own mix.
How to Use Reference Tracks Tips
- Using reference tracks is one of the most impactful methods for improving your mixing skills.
- Be sure to routinely check in on your reference track to keep from mixing in a vacuum and keep your ears trained.
- Try setting your reference track to mono to help you mix your own song in mono.
- Also try soloing the left and right channels individually along with the mids and sides to get a better idea of how that mix was put together and hear more nuanced details.
- Compare the frequency breakdown of that reference track to yours to see a visual depiction of areas of disparity.
Pingback: How to Deal With and Fix a Harsh Mix - Music Guy Mixing
Pingback: 6 Music Mixing Tips - Advice Which Will Never Change - Music Guy Mixing
Pingback: Master EQ Settings - The Best Settings for the Master Bus - Music Guy Mixing
Pingback: Hi-Hat Compression - How to Compress Hi-Hats - Music Guy Mixing