
Gain staging is the process of setting the proper amount of clip gain for every track in your mix. Note that this is different than setting the faders which just moves the output level up and down. Finding the proper amount of clip gain for every track should be the first thing you do in every mix. I’ve put together this gain staging cheat sheet to show you exactly how to find (and set) the proper amount of clip gain.
What is Clip Gain
Clip gain is the volume in dB of the raw audio clip in your digital audio workstation (DAW).
You might be thinking, “isn’t that the same as the fader volume?”.
It’s a fair question, and assuming you don’t add any effects/plugins to that track as an insert, it will be the same.
Gain Vs Fader
An easy way to think of gain vs fader is that the clip gain is the input volume for a track, the fader is the output volume.
So the clip gain is the level which we’re feeding into the first plugin we add as an insert on that track.
Again, if we add no processing to the track (no EQ, no compression, etc.), the gain and fader will be the same volume.
But once we add a compressor for example, the clip gain and fader (output gain) will be different.
The clip gain of a track matters because feeding different levels into our plugins yields different results. More than that, if our tracks are too “hot”, meaning too loud and possibly even clipping (exceeding 0dB, causing unwanted distorted sounds) coming in, the problems will just be exacerbated as we feed that signal into our plugins.
This is where gain staging comes in.
What is Gain Staging
As I mentioned in opening, gain staging is the process of setting the clip gain levels for every track in your mix before they hit any processing (plugins).
This should be the first thing we do every time we begin a mix. In fact, it’s so important that every mixing template I use has a gain plugin at the start of every single track. Let’s get to the gain staging cheat sheet to show how to do it and what to remember.
Gain Staging Cheat Sheet
As you can see from this gain staging cheat sheet, it’s a simple four step process. The important part is to stick to it!
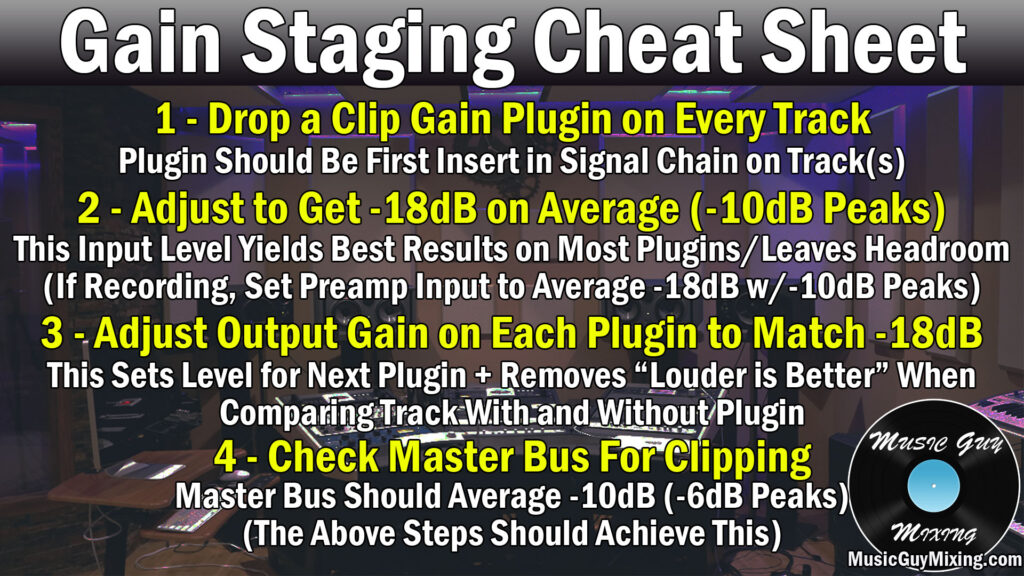
Clip Gain Plugin
There are two ways to adjust your clip gain, i.e. perform gain staging.
First, we can go to a single clip itself and manually pull the gain up or down. This will vary from DAW to DAW. I work in Ableton Live where you can click on an audio clip and adjust a slider at the bottom of the screen to change the clip’s gain.
Alternatively, the better way of adjusting clip gain is to simply drop a clip gain plugin as the first insert on the track. This is the preferred method because this will apply the same gain adjustment to every single clip on the track. Typically a track has multiple clips on it from edits, punch ins, etc., and they’ll typically all be roughly the same volume. As such, a clip gain plugin fixes everything at once.
Note that whether you manually pull a clip’s gain down 5 dB or you insert a clip gain plugin and set it to -5dB, the result will be exactly the same.

Ableton Live has the swiss army knife “Utility” plugin which allows you set the track to mono, adjust polarity, mute a track, etc. Most notably for our purposes, it features a slider which changes the gain for the track wherever it’s placed. Remember that the signal chain matters, meaning the order of plugins. We want this plugin first in the chain so the volume we choose is what’s fed into the next plugin.

But what volume is ideal for plugins?
Aim for -18dB on Average
You may have heard that magical “-18dB” number before. Believe it or not, the level you feed into a plugin (the input level) actually matters.
Plugins are generally designed to yield the best sounding results when the input level of the audio going into it is, on average, -18dB.

Why -18dB?
One, because it leaves plenty of headroom without worry of clipping, and two, because most plugins model analog gear working with audio at -18dB as a reference point. If you read the manuals associated with a lot of plugins, you’ll see them mention this point specifically.
So it’s essentially to get the best results, operate these plugins as intended, which typically means -18dB.
Obviously audio is dynamic, so you’ll have some peaks which jump above -18dB. Ideally your peaks will max out at -10dB, but you still want to average -18dB. So if the audio is fluctuating between -20dB and -16dB, you’re in a good spot.
This is a good point to mention that if you’re recording, gain staging is just as important!
When we’re setting our preamps to determine the input gain of whatever we’re recording whether it’s vocals or guitar via microphone or a bass going straight in, we want to average -18dB.
If we do this for every track during the recording process, we won’t even need to worry about doing this in the mixing stage.
By the way, I get it: we like things loud. Louder is better. This is literally true in the sense that our ears perceive sound that way. Play the same song side by side, one with the speakers turned down a few dB. Everything else being equal (and sometimes not), the louder instance will always win.
All this to say, if it sounds too quiet whether you’re recording or mixing, just turn up your speakers!
-18dB In, -18dB Out
I can’t stress this enough: -18dB on average should be the level you’re feeding into EVERY plugin in your signal chain.

This point often gets forgotten when it comes to gain staging. We think to ourselves, “Okay I’m hitting that sweet spot of -18dB after my gain plugin, I’m good”.
Then we add our EQ or compression plugins to the chain and suddenly the track has jumped 10dB on average. This means that the level going into the next plugin we add is going to be 10dB louder, and just like that we’ve lost our sweet spot.
Virtually every plugin has an output gain setting so that we can pull up or down the output level after that plugin has done its thing. This means we can make sure it’s averaging -18dB before it goes into the next plugin (or to the bus if that was the last plugin in the chain).
It’s a good rule in general to make sure that the output level coming out of a plugin matches the input level you fed into it.
This ensures that you won’t be tricked by a louder output signal when evaluating what that plugin did to the audio because, again, louder is always “better”.
Don’t Clip the Master Bus
One thing we never want to see is clipping on the master bus. Even when none of our individual tracks are clipping, the sum of all of them playing together can add up to more than the master bus can handle.
This leads to distortion, not to mention zero headroom for the mastering process.
Ideally the master bus will average around -10dB and peak at -6dB at most.
If we follow the -18dB in and out rule, this shouldn’t be a problem, even with busier mixes.
And again, if it’s too quiet, just turn up your speakers/headphones.
Gain Staging Tips
- Gain staging means being mindful of and adjusting the clip gain of the audio in your mix (or when setting input levels for recording).
- Clip gain is the volume of the raw audio/the input level going into the first plugin in your signal chain. The fader controls the output volume of that track after all of the processing.
- The easiest way to gain stage is drop a clip gain plugin as the first insert on every track in your mix.
- Adjust the clip gain via the plugin to average -18dB.
- -18dB is typically the input level sweet spot on most plugins which yields the best results because of the analog references they were designed using.
- Adjust the output gain of every plugin to get that output level to average -18dB. This prevents a “louder is better” effect when you’re evaluating that plugin’s effect on your audio.
- Make sure that your master bus doesn’t clip. Following the above rules should address this problem before it becomes a problem.
- If your playback level seems too quiet after proper gain staging, simply turn up your speakers/headphones.


Pingback: How to Make a Mixing Template - Music Guy Mixing
Pingback: How to Compress Bass Guitar - Music Guy Mixing
Pingback: How to Record Acoustic Guitar - 13 Tips For a Perfect Sound - Music Guy Mixing
Pingback: My Vocal Chain - The Perfect Vocal Chain Order - Music Guy Mixing
Pingback: How to Use a Hard Clipper to Repair Clipping Audio or Get More Volume - Music Guy Mixing
Pingback: What is Normalize Audio - Should You Normalize Audio? - Music Guy Mixing
Pingback: What is an Audio Compressor - How Does Audio Compression Work - Music Guy Mixing
Pingback: The Best Mixer Settings for Vocals - Music Guy Mixing
Pingback: Make Up Gain - Should You Be Using it? - Music Guy Mixing
Pingback: Rap Vocal Compression Settings - The Best Settings to Use - Music Guy Mixing
Pingback: Mixing Vs Mastering - What's the Difference in Audio Production - Music Guy Mixing
Pingback: How to Compress Rap Vocals For Presence in the Mix - Music Guy Mixing
Pingback: Low End Mixing Tutorial - How to Get it Right Every Time - Music Guy Mixing
Pingback: Mastering Louder - How to Get a Louder Master - Music Guy Mixing
Pingback: How to Adjust Clip Gain in Your Mix (and Why Do It) - Music Guy Mixing
Pingback: How to Get Clear Vocals in Your Next Mix - Music Guy Mixing
Pingback: How to Create New York Compression in Ableton - Music Guy Mixing
Pingback: The Best Acoustic Guitar Settings - Onboard + in the Mix - Music Guy Mixing