
When I first started mixing about 15 years ago, my mixes fell into one of two categories: it was a harsh and overly bright mix, or it was a muddy mix.
If you have a problem with a muddy mix, you know the telltale signs. Nothing stands out, instruments get lost, and it just feels like there’s this haze hanging over the sound. This is compared to pro mixes which have a clarity in them which you chase but just can’t achieve.
Thankfully I figured out THE 5 reasons which always account for a muddy mix, so I thought I’d share them with you now so that you can get a clean sounding mix like the pros as soon as you finish reading this!
Muddy Mix (Causes and Solutions)

Low Mids Need a Cut
You might as well call the low mids the low muds in terms of frequencies as this is the area where the muffled, cloggy, and otherwise muddy sounds typically stem from.
Add dozens and dozens of tracks in the mix, and it’s no wonder your mix sounds like it’s playing from a bog.
This is the 300-600hz range, though it can vary a bit in either direction.
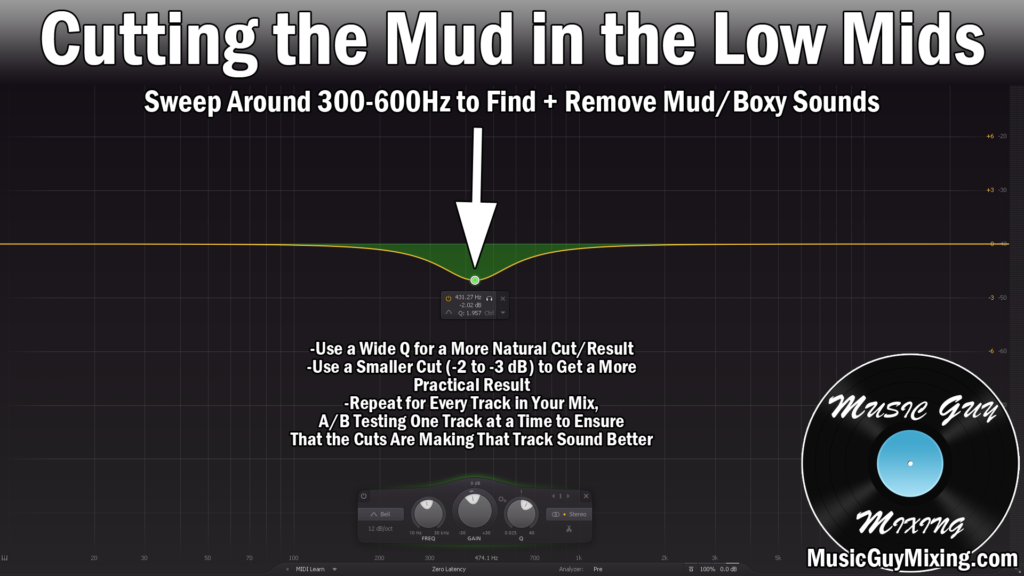
The fastest way to find the mud is to solo each track, add an EQ bell filter (see EQ filters for more information), and sweep in that 300-600Hz range.
I recommend rather than soloing the band itself within the EQ that you make the bell a cut of a few dB as you search for better clarity as you sweep.
Adjust the cut once you find the area to get the optimal sound, then A/B with that band on and off to determine if it’s an improvement.
In addition to cutting those low mids, you might also try a boost around 4-6k, or alternatively add high frequency information which wasn’t there before by way of an exciter. This works especially well in the mastering stage and is often used to liven up a dull mix.
Reverbs Need a High Pass
Reverb creates separation in our mix by utilizing depth in the stereo field. This in turn opens things up, giving more space for each track to exist.
You can use it on a track to make a different track sound more up front and immediate in comparison.
So it it’s good at creating space, how can reverb cause a claustrophobic, muddy mix?
The purpose of reverbs is to simulate the aural reflections you’d get in different sized rooms.
Just like when cutting the frequencies of the normal audio of the tracks themselves, the reverberated sound of these tracks features a lot of mud in that same 200-600hz area.
Lower than that, you can get a lot of boominess in the lower, bassier frequencies which will get in the way of the low end of your kick and bass.
Therefore, it’s best to high pass around 600hz to cut out all of the muddy, boomy low end on the reverb sound itself.
This works best when you’ve got the reverb on a send/return track of its own. Just drop the EQ after the reverb on that return track and use a band pass to filter out the lows/low mids as well as the high end.
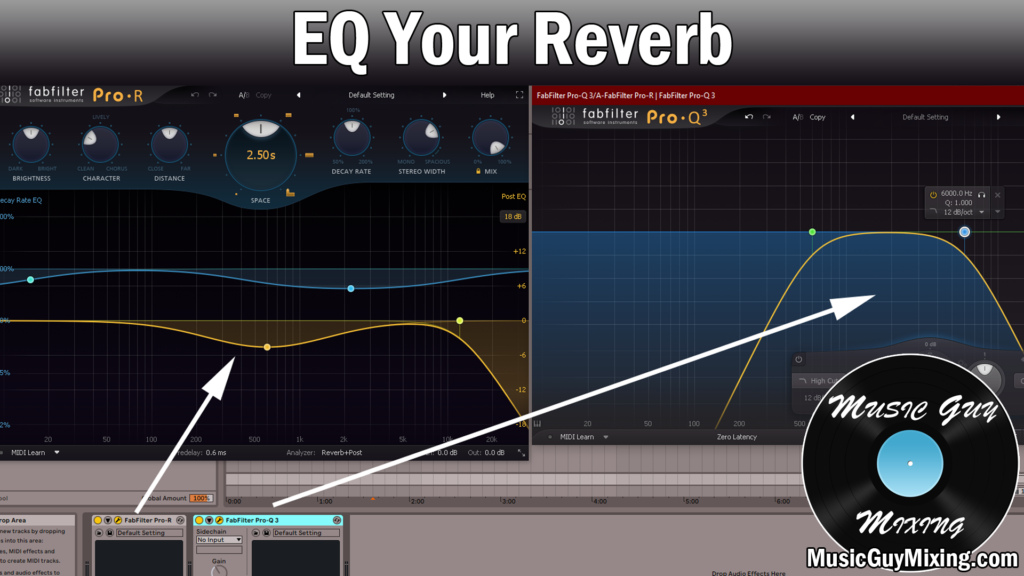
You can try the Abbey Road reverb trick which involved rolling off everything below 600Hz and everything above 6000Hz. The Beatles, Pink Floyd, Radiohead, and countless others used this trick to keep their reverb nice and controlled.
Low End is Cluttered
While we usually associate the aforementioned 300-600hz area is being the culprit when it comes to mud, a build up in the low end below this will cause a similar messy sound.
Outside of your bass and kick drum, virtually every other track in your mix can and should have a high pass filter around 100hz.
If you solo this frequency on most tracks, you might not even hear much or anything that low.
Add this up over dozens and dozens of tracks, however, and you suddenly have a boominess which is subtle but there and adding nothing to your mix.
I high pass obsessively in my default mixing template. Literally every non kick or bass track (and bus for good measure) has a high pass filter completely rolling off frequencies below 100hz.

This should be adjusted higher as each track requires.
You’ll be amazed at how much mud and boominess you can remove by doing this, making your mix sound cleaner and more professional in the process.
This is also a great way to get louder mixes, because a build up of the lowest frequencies remove headroom even when you can’t hear anything on the track that low.
Pro Tip – Control the bass of your instrument before you even hit record to get even better results:
- A lot of microphones have high pass/low cut settings right on them to ignore everything below a certain frequency going in.
- Amps obviously have EQ nobs for sculpting the sound and shaving off unnecessary lows.
- Synths both physical or virtual (most virtual instruments for that matter) have filter nobs to remove this, as well.
Reverb Too Long
We’re not quite done with reverbs which can clog up your mix in more ways than one.
The other, less obvious way a reverb can create a muddy mix is by leaving the tail or decay rate of the reverb too long.
Two things should determine the length of your reverb decay: BPM and number of tracks.
With faster songs you should utilize a faster/shorter decay time on the reverb because there’s typically a shorter break between sounds.
This is in contrast to a slower song, where you can afford to have a slower/longer decay time on your reverb tale to fill out more of the space without it extending into the next sound(s).
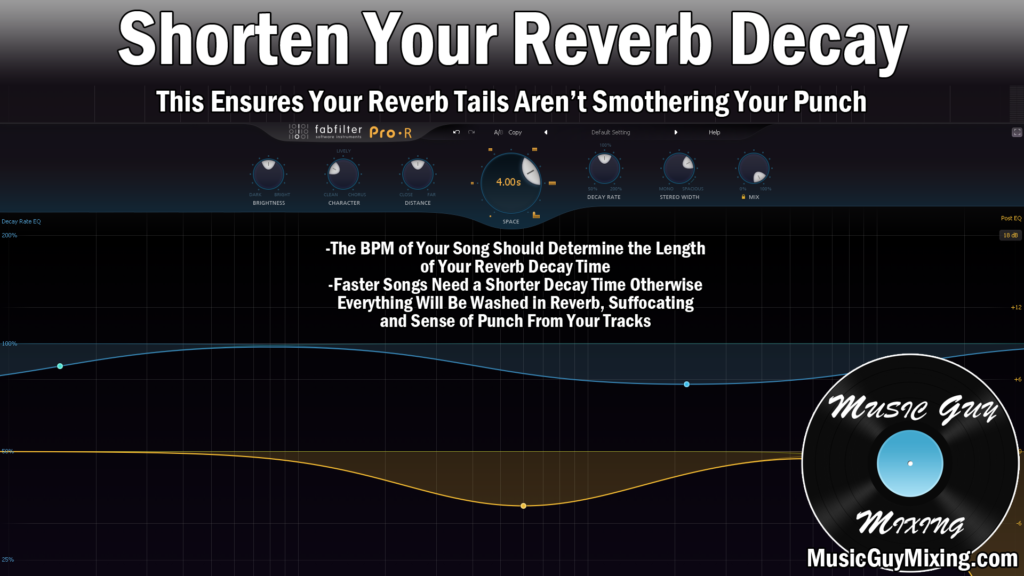
Aside from BPM, a mix featuring a lot of tracks should also feature a shorter decay time to keep from stepping on another sound.
Alternatively, when you have a sparser mix featuring less tracks, you can get away with longer decay times to fill out the sound.
While there are no perfect answers, you can time your reverb lengths by the BPM of your song.
AnotherProducer.com has a nice little tool where you can calculate the perfect times for your reverbs (including predelay) and delays.
Simply punch your mix’s BPM into the tool and it will tell you exactly how to time your verb and delays.
Too Many Tracks
This is a quintessential example of less being more.
If everything else is in check, sometimes a muddy mix just comes down to too many tracks competing for a limited amount of space.
I’m very guilty of this one myself, and this is especially true if you’re mixing your own music: a lot of us have a tendency of falling in love with every single track we record in our mix and consequently insist on including them all.
Between the center, left, and right… the front and back depth-wise… there’s only so much room to work every track in.
Creating a good mix is like solving an intricate puzzle or math equation. And it’s not just about spacial track situating but also ensuring that you don’t have too many tracks whose frequency cores are at odds.
Sometimes this means making difficulty decisions in removing a track altogether for the sake of a cleaner mix.
If you need encouragement, listen to the top 40 tracks now or at any point in the past. You’ll find that most of them feature very few tracks ever playing at once.
So while you CAN fit in two rhythm guitar tracks panned hard left and right and another two lead guitar tracks fit in between or on top of them then that doesn’t mean you should.
If this section (as an example) still sounds muddy after addressing everything else, try taking one of the rhythm and lead tracks out, and just have the remaining rhythm on one side and the remaining lead on the other to see how that opens things up and cuts the mud out.
Use Groups/Busing to Identify Problem Sections Quickly
This last one isn’t an offender so much as a tip on how to quickly find the mud in your mix.
I recommend using routing to separate/group the various tracks in your mix by type/instrument.
For example, I have all of the various drums in my kit on different tracks which route to a drum bus. I have all of my rhythm guitars going to a rhythm guitar bus, and the same with all of the leads. Midi instruments all have their own bus, as well. Each of these buses in turn feeds into an insrument bus.
I break down my vocals by lead and backing vocals which each have individual buses which feed into a greater vocal bus.
Why do this?
Not only does this help keep your mix organized and do processing on instrument types as a whole, it allows you to quickly isolate sections of your mix to drill down on problem areas quickly.
This certainly extends to finding the mud in your mix.
You can go one by one, checking each instrument bus to hear where that thickness or mess is coming from. It’s also helpful to isolate each group to make sure it sounds its best on its own to make it sound even better in the context of the mix.
Note that (obviously) the only thing which truly matters is how the mix sounds as a whole, but this isolation technique can help you hear problems you can’t as easily hear when everything’s playing at once, and that extends to mud.
Ideal Listening Environment
One last thing to a quick reminder that you can’t make good mixing decisions whether it’s about a muddy mix or anything else if you’re not listening to the music in an optimal environment.

This means:
- Have each monitor facing your head with tweeters (smaller speakers in each monitor) at ear level.
- Have an equal distance between yourself and each monitor. As an example, have 5 feet between each speaker and 5 feet between you and each speaker. An ideal spacing should create an invisible perfect triangle between you and the two monitors.
- If using monitors, have dampening material around the listening environment if possible. Acoustic foam is typically used to dampen reflections so that you get a more accurate idea of the mix. Without this in place, depending on the space you’re mixing in, you have a greater risk of hearing your room’s effect on the mix rather than strictly the mix itself. This will cause you do make decisions based on the wrong criteria.
- You should always use reference tracks for context to remind yourself what a good mix sounds like and how to find the mud in your mix. Focusing on your own mix for too long, you lose this context. Then inevitably once you listen to something else for the first time, you’ll be disappointed as to how far off your mix sounds.
- If you’re mixing on headphones, reference tracks are especially important because headphones make it even easier to mix in a vacuum and miss the mud. Bottom line, always use references!
Keep those tips in mind to find and correct the source of your muddy mix and finally achieve the clarity of the pros in YOUR mixes!
Pingback: Abbey Road Reverb Trick - Music Guy Mixing
Pingback: How to EQ Harsh Vocals to Smooth Them Out - Music Guy Mixing
Pingback: How To Turn Your Muddy Mixes Into Crystal-Clear Gems
Pingback: How to EQ Acoustic Guitar for a Perfect Sound Every Time - Music Guy Mixing
Pingback: How to EQ Kick Drum to Get it Perfect Every Time - Music Guy Mixing
Pingback: Best Reverb Settings for Vocals - Your Vocal Reverb Cheat Sheet - Music Guy Mixing
Pingback: Vocal EQ Guide - The Complete Guide to EQing Vocals - Music Guy Mixing
Pingback: Distorted Guitar EQ Guide - How to EQ Distorted Guitar - Music Guy Mixing
Pingback: How to Make Your Music Louder (Without Making It Worse) - Music Guy Mixing
Pingback: How to Deal With and Fix a Harsh Mix - Music Guy Mixing
Pingback: The Best Plugins For Mixing - Evergreen Edition - Music Guy Mixing
Pingback: What is a Noise Gate and How to Use One - Music Guy Mixing
Pingback: The 3 Types of Reverb - Which to Use on Each Instrument - Music Guy Mixing
Pingback: How to EQ Male Vocals - EQing Male Vocals Guide - Music Guy Mixing
Pingback: What is a High Pass Filter and What Does a High Pass Filter Do - Music Guy Mixing
Pingback: How to Mix Piano - 7 Tips to Mix Piano - Music Guy Mixing
Pingback: How to EQ Strings - Your Strings EQ Cheat Sheet - Music Guy Mixing