
Glue compression is a distinct type of compressor which is most effectively used on busses, including the master bus. Let’s talk about what glue compression is, how it differs from a conventional compressor, and when and how to use it.
What is Glue Compression

First, what is glue compression and what makes it different from “regular” compressors?
Like a lot of plugins, glue compressors are modeled after a piece of analog gear.
In this case, virtual glue compressors are emulating Solid State Logic’s analog bus compressor which itself was a component as part of the greater SSL 4000 G-Series Console.
The compressor was noted for its effective ability to create cohesion between the tracks on a bus or the entire mix, “gluing” them together, hence the name.
A glue compressor differs from other compressors in that it utilizes a voltage control amplifier (VCA) to control and compress the signal.
Unlike some other types of audio compressors, this type of compressor makes for a relatively clean and transparent compression, even when you’re feeding it a lot of signal.
This makes them ideal both for taming peaks and smoothing out audio which is a bit too dynamic.
As such, they’re workhorses and work especially well on busses, particularly when you want to add a little extra cohesion to your bus or overall mix on the master channel.
Best Glue Compressors
There are a number of solid options when you want a glue compressor.
My personal go-to and arguably the standard amongst VSTs is the Waves SSL G-Master Buss Compressor.
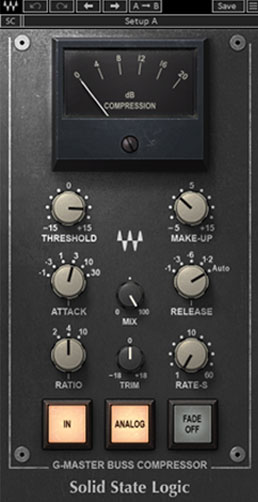
It perfectly emulates the aforementioned Solid State Logic hardware, even adding some of that analog color if that’s what you want via the “Analog” button. I like using this feature in particular on the master bus to give the entire mix some light saturation, unifying the sound beyond the compression itself.
This glue compressor also has a number of presets from Grammy winning and nominated producers, helping you dial in the sound you want that much faster with some great starting points:

All you need to do is set the threshold!
That said, the plugin is easy to use and the controls are pretty straightforward and similar to those which you’ll find on a standard compressor (see my audio compressor settings chart for more information).
Outside of Waves, there are plenty of good options. Most DAWs have serviceable stock glue compressors featured in their libraries nowadays.
Ableton Live’s “Glue Compressor” is the most famous example of a stock glue compressor. While the interface looks different, you’ll notice the controls are pretty similar to those of Waves:

Rather than giving you a slider like on a more conventional compressor, we’re locked into a static 2:1, 4:1, or 10:1 compressor ratio.
We have static positions for the attack and release, as well (including an automatic on the release). You can add a little soft clipping to help maintain transient punch, but other than that it’s just about where you want to set your threshold.
How to Use Glue Compression
Let’s dial up some settings for a couple instances when you might want to create a little extra cohesion in your mix.
Glue Compression on the Drum Bus
These settings work well for glue compression on the drum bus:

Threshold – Set this to help determine how much gain reduction you’re getting along with the ratio. If you just want to catch peaks, set it accordingly. Setting it lower will create more glue and a saturation like effect.
Ratio – A 4:1 ratio is a bit more aggressive when it comes to bus compression, but I find it works well on drums. Don’t be afraid to back it off to 2:1 if you don’t want or need that much glue.
Attack – Setting an attack time of 1ms is enough to preserve those initial transients of the snare, kick, and other instruments in the kit while then smoothing the combined signal out.
Release – I like the “auto” release setting on glue compressors in general because I’m typically using this on a bus, so the input signal is all over the place. The auto setting adjusts the release time to keep our signal well controlled without introducing pumping, noticeable compression.
Analog – As I mentioned earlier, this is a unique setting to the Waves SSL Buss compressor. When turned on, the analog setting imparts a bit of distortion which was a product of the analog gear this plugin emulates. If you want a bit of that harmonic saturation then enable this setting. I prefer to leave it off and use it uniformly on the entire mix if I’m using glue compression on the master bus which I’ll talk about in a moment.
Fade Off/Out/In – Another setting unique to the Waves SSL Buss compressor, fade off is related to the Rate-S dial and creates a fade out (or fade in) to the speed you set with the dial. It’s not relevant to the compression side of things, but it does a really nice and seamless fade, particularly at the longest (60) rate.
Glue Compression on the Master Bus
These settings work well for glue compression on the master bus:

Threshold – Once again, this dictates your gain reduction. If you want a bit more glue and energy from your track, set this a bit lower. Conversely if you just want to smooth out the peaks, set it higher.
Ratio – I always recommend being conservative with any master bus level processing, and a 2:1 ratio will accomplish this. Just like the threshold, if you want a bit more control and energy, you might want to go for a 4:1 ratio.
Attack – I like to push the attack back a bit farther to 3ms on the master fader to give those transients a touch more punch.
Release – Let’s stick with the “auto” setting for the release time once again.
Analog – Like I mentioned before, I like the analog setting on this glue compressor on the master fader to impart a little bit of those analog harmonics across the entire mix. It’s subtle, but it warms the mix up a bit.
Fade Off/Out/In – If you want a fade out in your track, consider using this and adjusting the Rate-S to taste.
Glue Compressor for Parallel Compression
You can use a glue compressor for parallel compression, as well.
Try these aggressive settings on an aux/return track for sends to absolutely squash whatever signal you send to it, then blend it in alongside your dry audio:

Threshold – Generally we’re setting this pretty low so we can make sure any and all signal we send to it gets essentially compressed to the same output.
Ratio – This is where we really get aggressive, pushing the ratio to the max at 10:1 which will make the output near uniform with anything we throw at it.
Attack – Let the dry instance of the audio represent the transients, we’re just looking for that compressed sausage here, so we want to start fast.
Release – A fast release generally works well for parallel compression to keep it responsive. Try experimenting with different options here.
Analog – This one (assuming you’re using the Waves G-Master) is preference. Since we’re blending it in and this signal is squashed, I don’t mind adding some more harmonics via the analog emulation.
Blend this in via a send on busses or even individual tracks to add some energy. This is more of a “feel it” rather than “hear it” situation, though you can automate it up to add some extra energy or interesting effects at choice times.
These are a few common scenarios where you might reach for a glue compressor, but don’t be afraid to try it on virtually any bus in your mix for a little added cohesion!
Glue Compression Tips
- Glue compression is a specific type of VCA compression which is based on the built in compression component on the SSL 4000 G-Series Console. It was discovered to be very effective on busses in particular for gluing together the contents of an instrument or greater mix bus to provide extra cohesion.
- You can use a glue compressor with more aggressive settings to tame an overly dynamic instrument, or more conservatively to “glue” the components of a bus or your entire mix together.
- Glue compression works especially well on the drum bus or entire mix bus, but give it a shot on any busses you feel are lacking energy or cohesion.
- Dial up more aggressive settings like using the 10:1 ratio and a lower threshold as blended parallel compression for any bus you want to blend in for more energy.
- Remember that less is more when you are using glue compression (or any effects) on an instrument bus or on the entire mix’s bus (minus parallel compression).


Pingback: How to Process Your Vocal Bus Chain - Music Guy Mixing
Pingback: Drum Bus Compression Cheat Sheet - The Best Settings - Music Guy Mixing
Pingback: Recording Drums With Two Microphones - A Complete Guide - Music Guy Mixing