
I’ve talked a lot about EQ recently including the best settings for every instrument in your mix in my EQ cheat sheet. The plugin I keep referencing whenever I talk about EQ is arguably my favorite plugin in my arsenal, EQ or otherwise, the FabFilter Pro-Q. Because it’s always the first plugin I recommend getting, I thought I’d actually break it down and talk about what makes this plugin so special in this FabFilter Pro-Q 3 review.
FabFilter Pro-Q 3 Review

Why It’s the Best EQ Plugin
The Pro-Q 3 is the best EQ for two reasons: its interface and its features.
The interface is what first drew me to this EQ plugin. The Pro-Q 3 has a large graphical display with the frequencies listed at the bottom and gain in dB listed on the right.
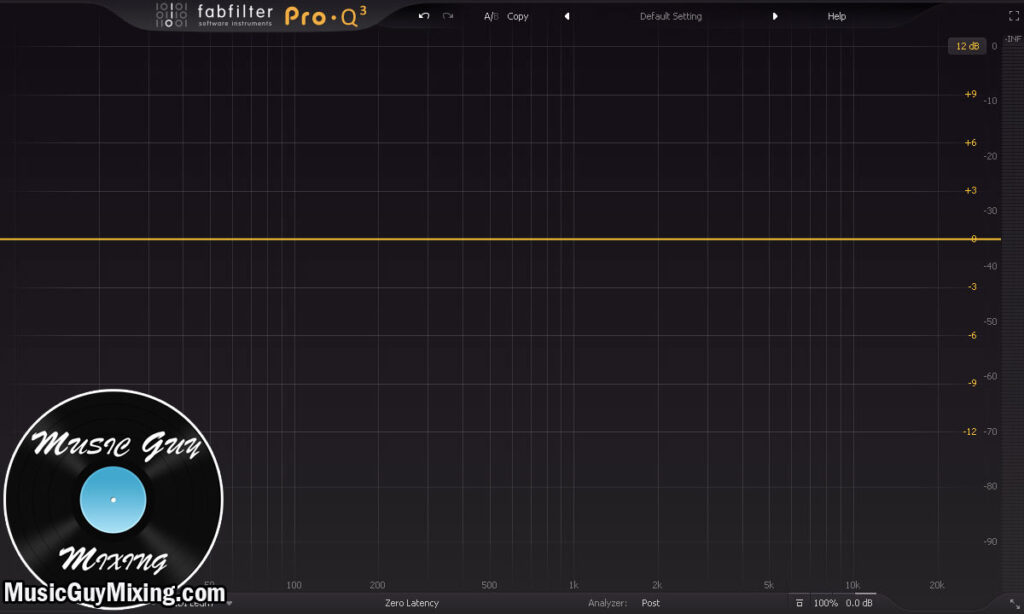
Note that you can click at 12dB to set the max display which effectively zooms in or out. There are options of 3, 6, 12, and 30dB, so you can adjust this accordingly whether you’re making larger or smaller boosts and or cuts.
Creating an EQ band is as simple as double clicking anywhere in the display. This will create an EQ band centered at that frequency with positive or minus gain, depending on if you click above or below the equator.
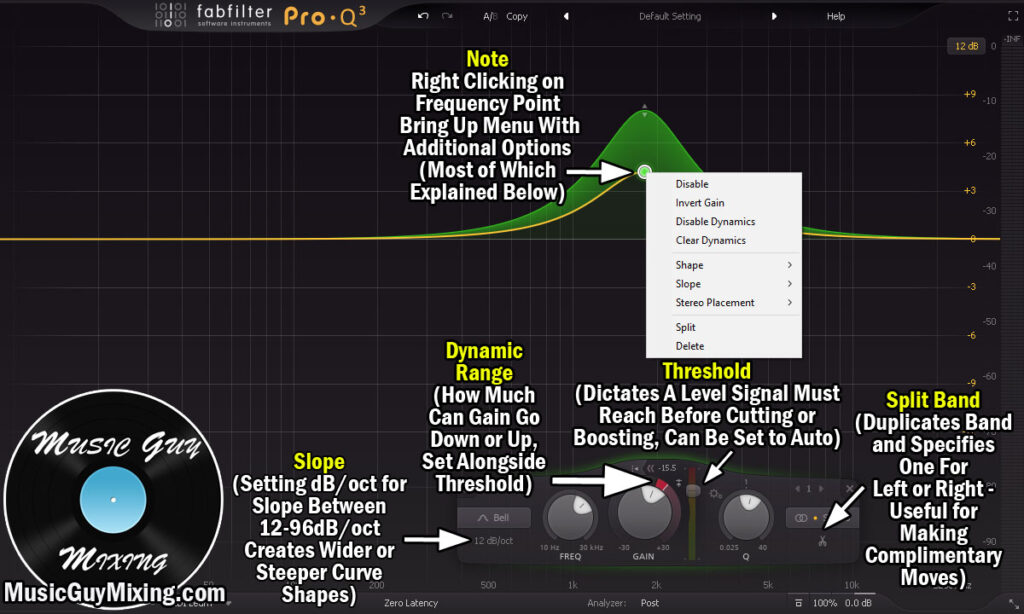
You’ll notice it also brings up a small control panel for that specific EQ band. If you have multiple EQ bands, simply click on the point you want to access the control panel for to bring it up.
Now let’s talk about the features in this FabFilter Pro-Q 3 review, because it’s got a lot of them.
FabFilter Pro-Q 3 Features
First, let’s talk about the basic settings which most EQs have. Specifically let’s talk about how the FabFilter Pro-Q handles/presents them.
This is what you’ll see if you create a frequency band anywhere on the display:

I talked about most of these basic EQ settings when I covered the types of EQ recently, but lets break each one down specific to the FabFilter Pro-Q 3.
Frequency – This selects the core of the frequency you want to affect. Other neighboring frequencies will also be directly affected based on the next setting, but this is the heart of where you want to add or remove gain.
Q (Bandwidth) – The Q on a parametric EQ allows you to widen or narrow the range affected relative to the frequency you just set. A bit counterintuitive, a lower number for the Q denotes a larger bandwidth. Conversely, a higher Q number denotes a narrower bandwidth, meaning less surrounding frequencies are involved. Wider/lower Q values sound more natural as more gradual roll offs sound more natural than aggressively cutting or boosting a tiny frequency.
Gain – This allows you to cut or boost but subtracting or adding gain to the selected frequency range. Note the Gear/Wheel icon between gain and Q. This is the Gain Q Interaction setting which, when ticked for your band, narrows the bandwidth when you add more gain, and widens the band with less gain. It emulates classic analog mixing consoles and can create a more natural result on your bell filters.
Band Type – There are many different types of bands you can create to filter frequencies. This setting allows you to change the shape of your band from a standard bell, high/low pass, high/low shelves, band pass, notching, and more. Refer to my overview of the types of EQ filters for more information.
Those are the basic/standard features on most parametric EQs, and they’re as easy to adjust on the Pro-Q as any EQ plugin you’ll find.
There’s plenty more you can do with this plugin, so let’s continue this FabFilter Pro-Q 3 review by getting into some of the features which make me love it.
Channel – Stereo is the standard setting, meaning any EQ bands you create will affect the frequencies across the entire stereo field for that track. This is the extent to which most EQs offer and operate in. The Pro-Q 3 offers the option to make any band specific to just the mid, sides, left, or right channel.
This can be helpful in a number of instances. If you’ve got a true stereo track with two different signals in the left and right channels, and there’s a frequency buildup or something you need to attenuate in one side over the other, simply create your EQ band to fix that section, then designate it to only affect the necessary channel.
The mid/side options are great for mastering an entire mix. If you’ve got too much low end in the sides, this can create a muddy mix or take away from the actual bass in the center. Creating a high pass filter specific to the sides allows you to roll off unnecessary lows, re-focusing the low end to the center and instantly cleaning up that mix.
With the ability to make any band specific to a certain channel, you can completely EQ your track, bus, or a master track within a single instance of the plugin.
Split – Splitting an EQ band is an extension of the channel feature. Clicking the scissor icon or right clicking a frequency point and selecting “split” from the menu creates a second instance of that band right on top, but makes one left and one right specific. This is an easy way to duplicate the same EQ band with the same settings if you want to make a complimentary move in one channel or the other.
Dynamic EQ – Just like you can make any band specific to a channel, you can make any band dynamic.
Dynamic EQ means that the amount of gain removed or added changes with the changing level of the signal, creating a “dynamic” or changing EQ cut or boost as the track plays.
This is ideal when you want to attenuate something which is only a problem sometimes without gutting that frequency altogether. If you have a problem which presents itself when the amount of level at the frequency gets loud enough, a dynamic cut is ideal.
A classic practical example is removing the plosives from a vocal. The “popping” sounds on certain consonants mostly crop up at 150Hz. A standard, constant EQ cut in this range would remove some of the fundamental body of that vocal (see my vocal EQ guide). Instead, we can create a dynamic EQ cut here and set the threshold to only trigger when we get a swell at that frequency range which a plosive will create.
The vocal itself is saved, and the plosive is tamed. Thanks dynamic EQ! Some EQs are specifically made to be dynamic, FabFilter Pro-Q includes it for free. And again we don’t need a separate instance of the plugin, just right click the band you want to make dynamic, select dynamic, set your threshold and gain reduction amount, and you’re good.
Slope – Measured in dB per octave (dB/oct), while Q dictates the width of the band, the slope dictates how steep the drop off is. The two work together to determine the degree of roll back to flat/zero gain change. Like with a lower Q, a lower dB per octave sound more natural for a more gradual, gentler roll off. I typically stick with the default 12dB/oct on most bands with the exception of some high and low pass filters when I want a starker drop off. Again, refer to my EQ cheat sheet for more information.
Linear Phase – Again, this is setting which some EQs specialize in whereas the Pro-Q 3 has it as a standard feature. By virtue of how they work, EQs can throw audio out of phase. Anytime you are pulling particular frequencies up or down, meaning not doing it uniformly across the entire spectrum, this creates slight timing delays which can mask transients (called smearing) and generally color your audio differently.
Linear phase works to correct the timing, putting the audio back in phase. If you’re having issues with this, particularly with true stereo material, experiment with the linear phase feature at the bottom of the plugin.
Note that phasing issues from EQ are more prominent and noticeable with more aggressive changes, meaning adding or subtracting a lot of gain to a frequency or frequencies. This won’t apply in most instances, but again, it’s there if you need it.
Pro-Q 3 Analyzer
This feature section needs its own section in this FabFilter Pro-Q 3 review, because there’s so much going on.
I always say that mixing is like fitting together the pieces of a puzzle. Every track needs to find its own space in the mix, and a huge part of that is frequencies.
The analyzer in FabFilter Pro-Q 3 shows you information on the frequencies of the OTHER tracks in your mix (assuming you have an instance of Pro-Q on each of them).
To get started, click on the button next to “Analyzer” at the bottom of the plugin to bring up a little menu.

Pre/Post – First, the “pre” and “post” buttons show the frequency form in the plugin before and after applying EQ changes. You can see the before and after by leaving both ticked, or you can just tick “post” to see the updated frequencies.
Tracks – Beneath those buttons, you’ll see a list of the other tracks in which you have instances of Pro-Q in your mix. You can label each one within your plugin to keep better track of which corresponds to which instrument. Each one shows a miniature frequency spectrum playing live for that track. This is helpful for seeing all the frequencies in your mix at a glance. I find it helpful to also see if I forgot to high pass any tracks in my mix. Additionally, we can use these in conjunction with the “Show Collisions” button we’ll discuss in a moment.
Click on any entry here and you’ll see the live frequency spectrum of that external track playing alongside the one you’re currently on. If you want to make sure the frequencies of two tracks are gelling together, there’s no better way than having their spectrums right on top of one another so that you can adjust accordingly.
Show Collisions – Tick this center button at the bottom and you can instantly see any other tracks in your mix (with Pro-Q on them) which have frequency conflicts with the track you’re currently on. These are represented by red, live in real time, as the external track plays. You can then click on that track just like I just mentioned so that you can make the necessary complimentary moves (again, see my EQ cheat sheet for the lazy approach to nailing everything EQ).
Freeze Peaks – The first button on the left freezes the highest points each frequency gets to in real time. This can help in highlighting frequencies which are jumping out and might need some attenuation.
Spectrum Grab – Hover over the spectrum at a certain point and the plugin suggests certain frequency points which are jumping out so you can easily create a band at that point.
EQ Match – This is what it sounds like. EQ Match analyzes the frequency spectrum of a piece of audio you specify. It then applies a similar pattern to your track which you can fine tune.
I’ve done this when I’ve had stems such as the isolated guitar track from a mix I like the sound of.
Make sure the input level of your track is close to the referenced track (or vice versa) to get the best results.
It can be hit or miss, but occasionally you’ll be amazed at how closely you can model the tone of an instrument purely through EQ matching. You can then save the snapshot frequency spectrum of the reference to apply to future tracks in a second.
I’ve done this with the aforementioned guitar tracks and apply them to my guitars. In the right circumstances, it works really well.
I recorded the exact same guitar part (same performance, key, notes) as the part I cloned, applied the matched EQ pattern, and played it back to back for a friend with the real thing. They literally couldn’t tell the difference. Thanks FabFilter!
Sidechaining – The other day I talked about dynamic EQ vs multiband compression. Sometimes you want to reach for a dynamic EQ, even when sidechaining, to get a more surgical reduction on your main track.
You’ll be happy to know that the FabFilter Pro-Q 3 allows you to sidechain a dynamic EQ band to any track in your mix.

Simply make a band a dynamic EQ band, set the threshold and dynamic range for the gain reduction (or expansion), and tick the side chain button between the gain and threshold sliders.
Oh, don’t forget to actually specify which track you want to sidechain your main track to. A classic is sidechaining the bass to the kick, so that the bass slightly ducks out of the way when the kick triggers.
A nice feature in Pro-Q 3 is that after you specify which track you want to sidechain to, it shows up as another option in the analyzer window. Click on it and you can see the kick’s (for example) frequency spectrum alongside your bass (for example). You can see the thickest part of the kick (even use the peak grabber to suggest it for you) and set the dynamic EQ frequency there.
Set the threshold and gain reduction accordingly and that kick will have some extra space when it plays without making a static cut into the bass.
Midi Learn – One last feature to mention, the “Midi Learn” button at the bottom left allows you to control any parameter with a midi controller. Simple enough.
Whew, there you have it, my favorite plugin. It’s not just one which I recommend putting on every single track in your mix, but the plugin itself encourages it by giving you more functionality when everything is connected.
FabFilter Pro-Q 3 Review
- The FabFilter Pro-Q 3 is easily the best EQ plugin on the market. It’s arguably the only one I recommend every mixing engineer have.
- This is parametric EQ, meaning it has all of the normal bells and whistles with a super intuitive interface.
- Aside from the standard features, you can EQ stereo, mids, sides, left, and or right channels only.
- You can also create dynamic EQ filters just as easily as a static/conventional one to regulate how much you cut or boost (depending on the signal).
- The Pro-Q 3 offers multiple linear phase settings as needed for more or less phase correction.
- The “Analyzer” feature enables you to see other frequencies in your mix in real time against the track you’re working on.
- This shows frequency conflicts so that you can adjust accordingly.
- The “EQ Match” feature allows you to analyze the frequency spectrum of another track then apply it to yours to accurately mimic the tone.
- This EQ plugin also offers the ability to sidechain to another track to dynamically adjust a frequency band based on an external source.


Pingback: How to Use Mid Side EQ - Music Guy Mixing
Pingback: How to Make a Mixing Template - Music Guy Mixing
Pingback: The Best Plugins For Mixing - Evergreen Edition - Music Guy Mixing
Pingback: My Vocal Chain - The Perfect Vocal Chain Order - Music Guy Mixing
Pingback: How to EQ Male Vocals - EQing Male Vocals Guide - Music Guy Mixing
Pingback: What is Dynamic EQ and How It's (Almost) Always Better - Music Guy Mixing
Pingback: Sidechain EQ Ableton Guide - How to Sidechain EQ in Ableton Live - Music Guy Mixing
Pingback: What is Sidechain EQ and How to Use It - Music Guy Mixing
Pingback: Audio Effects Explained - The Complete Guide - Music Guy Mixing
Pingback: Sidechain Compression Vs Sidechain EQ - Which is Better - Music Guy Mixing
Pingback: Master EQ Settings - The Best Settings for the Master Bus - Music Guy Mixing
Pingback: The Best Free EQ Plugin - Music Guy Mixing
Pingback: What is Linear Phase EQ - Should You Use It? - Music Guy Mixing
Pingback: How to Use Dynamic EQ for Situational Adjustments - Music Guy Mixing
Pingback: Best EQ for Drums - The Best Plugin and Settings - Music Guy Mixing
Pingback: Best Plugins for Mixing Drums (and How to Use Them) - Music Guy Mixing
Pingback: What is a Fundamental Frequency in Music - A Quick Definition - Music Guy Mixing
Pingback: How to Mix Bass and Kick - A Complete Guide - Music Guy Mixing
Pingback: Warm Vocal EQ - The Best Settings For Warming a Vocal - Music Guy Mixing
Pingback: What is Mid Side EQ (And When to Use It)? - Music Guy Mixing