
The master bus is the end of the line when it comes to your mix. If you practice good bussing techniques or even if you don’t (check out my mixing template), every track in your mix eventually flows to this one track in your mix which in turn feeds to your speakers or headphones.
At the end of the day, the master bus is still a track like any other which you can add processing to like any other.
As such, any processing you add to your master bus will have a much greater effect on your mix than anywhere else. With that in mind, you need to be careful in terms of what and how much you add (or take away).
Let’s talk about how to process your master bus in order of the signal chain, first to last.
Master Bus Processing

Like any other processing, I recommend putting EQ before compression, and that extends to the master bus, as well, so let’s start there.
Master Bus EQ (Low/High Passing, Match EQ)
The first thing I like to do is drop an EQ with a high and low pass filter. I did an entire article on the various EQ filters and when to use each one. In it I explained how a high pass filter and a low pass filter will cut everything below and above certain points, respectively.
You really shouldn’t need to make too many cuts on the EQ on your master bus. If any frequencies sound off, you should find the applicable tracks and adjust their EQs at the source.
This is again because changes made on the master bus affect the entire mix. So while you might be pulling out the frequencies that don’t sound good due to a particular track, you’re likely simultaneously pulling out frequencies important to another track.
With that said, small adjustments can still benefit or teach you something about your mix. Here’s a guide on master EQ settings which I recommend you try to see how they affect your mix:
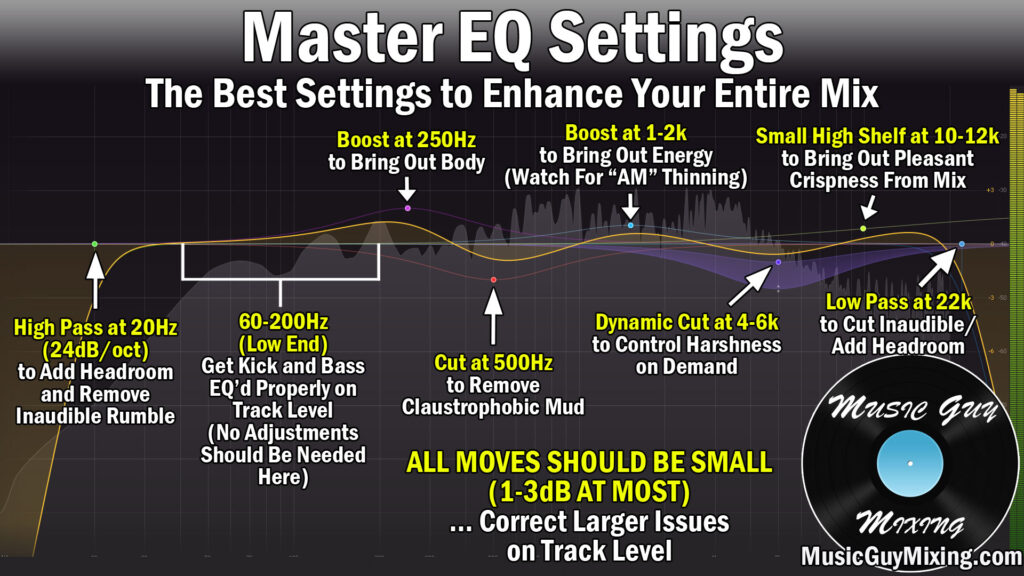
As you can see, I recommend any adjustments you do make on your master bus be small at 1-3dB at most. Again, if you feel any of these adjustments need more than that, that’s a sign that it’s something you should check out on a track level.
Multiband Compression
A multiband compressor breaks your mix into different sections by frequency and compresses each one by unique settings.
I like to slip a multiband compressor after my EQ to smooth out the different frequencies of my mix as necessary, giving me more control than a one-size-fits all compressor. While you can be a bit more aggressive with a multiband compressor than with a conventional compressor, you still want to keep gain reduction or boosting/expanding in each band to just 2-3 dB at most.
One setup I like in particular for the master bus is extremely light ratios combined with aggressive thresholds to just add a little bit of glue to each band.

With this setup you can swap the ratios on the two lower bands with the two higher bands if you want a warmer sound.
The attack should be slow enough that you hear the transients (initial higher frequency “hit” of the sound) uncompressed, and the release should be slow enough that it’s not pumping.
This will make your mix feel like it has a bit more presence and focus.
In other words, you don’t want to hear the compression happening, and transparency is key.
Saturation
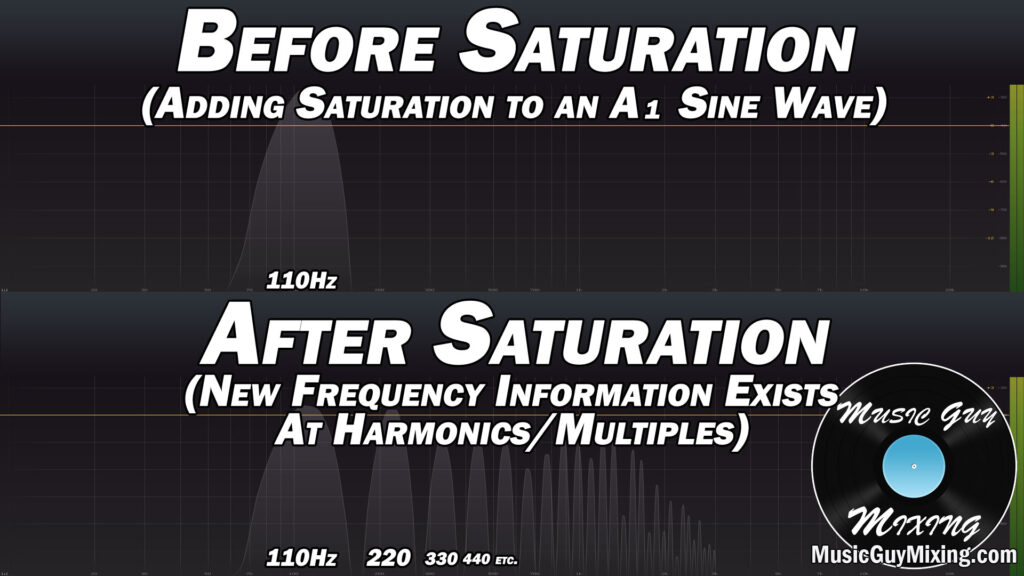
Saturation is kind of like a compressor which adds color via distortion to your mix. It adds harmonics above existing frequencies where there literally wasn’t sound before, thus creating a fuller sound. You can see saturation’s effect when applied to a basic sine wave with the harmonics created at the multiples of the initial frequency:
Mixing and mastering engineers use saturation to recreate the analog tape sound of classic recordings. I like the classic Decapitator from Soundtoys as my go-to.

One particularly effective use of saturation on the master bus is to use it to gently tame a bright mix and introduce more of that warmer, tape sound.
With Decapitator, simply dial in a bit of drive and adjust the wet/dry knob accordingly. You can even turn the tone knob a tick or two either way to adjust the brightness of the mix with subtlety.
I like the “Style” A on the mix bus as this is modeled after the Ampex 350 tape drive preamp to add a taste of that 1950’s analog recording color to my mix.
Once again with the master bus, less is more.
Stereo Imaging
Stereo imaging plugins work to expand or contract the stereo field at different frequency ranges.
I love Izotope’s free Imager plugin as it allows you to adjust the width of each frequency band individually.

I like to use Imager to expand the stereo size as the frequencies go higher. This helps to not only open up your mix but it creates a nice contrast while keeping the low end of your mix in the center.
You might try dropping one at the end of your master bus and seeing if you feel it adds to the mix.
Be conservative with this one on any bus you use it on as if you go too wide with any bands, things will begin to sound cluttered and you’ll lose the feeling of space you worked to create on a track level through panning and EQ adjustments.
Glue Compression
One final touch of compression to follow up the multiband compression comes in the form of a glue compressor.
I’ve already offered a layer of gentle taming to the mix overall using the multiband compression.
A glue compressor adds a hair of extra cohesion, and we can get a bit of coloring out of it, as well.
Just like with the multiband compressor, we want to keep the attack and release times slower and feeling organic.
On the Waves G-Master Buss Compressor, I like an attack of 3ms, auto release, 4:1 ratio, and setting the threshold to get around 3dB of gain reduction.
The “Analog” button adds a little bit of analog distortion/hiss which you can take or leave, but the rest of the settings work well on the mix bus to create a little extra cohesion and energy for the entire mix.

And again, we just want a slight amount of gain reduction, sacrificing a bit of the dynamics to better glue our mix together.
We want to feel, not hear, that extra bit of cohesion as well as the color this paints our mix with.
Pro Tip – Sometimes I add a second instance of of this glue compressor at the end of my chain and crush it, dropping the threshold, setting the attack to instant/all the way to the left, and max out the ratio. I then turn the “Mix” setting down to just blend in a bit of this for some subtle mix bus level parallel compression.
When blended in to taste, this adds a touch of added life in the form of subtle distorted energy to the mix.
Reverb
I used to use reverb on the master bus on all of my mixes. Eventually I got away from it to keep things cleaner, instead opting to stick to blending in reverb on a track level via sends.
Still, there’s certainly no rule against using reverb on the master bus. Even more than with the glue compression, a uniform amount of reverb across the entire mix adds a lot of cohesion and can help tie everything together.
The key yet again is to go conservative. Because we’re using it as an insert in this scenario (see inserts vs sends), the wetness control is the blend amount. As such, we generally want to keep the wet/dry to 10% or under. You should also use the on board EQ of your reverb if it has one like FabFilter’s Pro-R.
At the very least, most reverb plugins have dials for high and low passing the reverb part, so you can filter out all reflections below the mids and low-mids of your mix to keep things clean while still getting a taste of depth in that 600-6000Hz range, à la the Abbey Road Reverb trick.
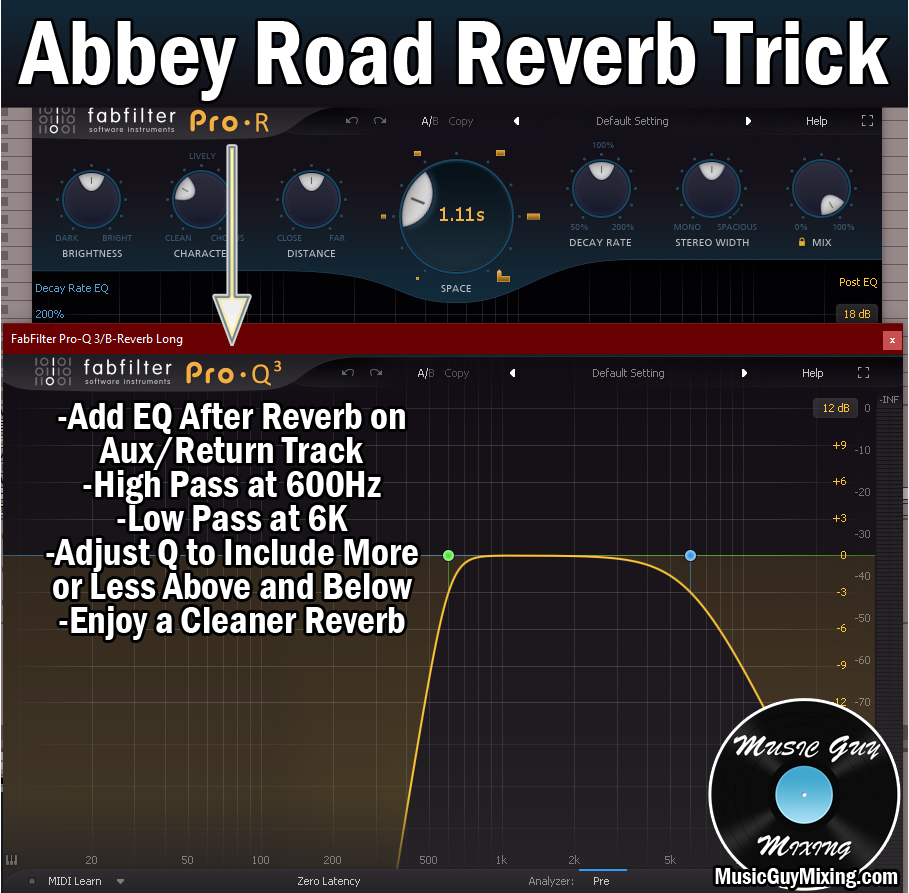
Try a reverb with a decay set to a quarter or half note with the BPM of your mix with the tail EQ’d like shown above, and around 10% wet to see how it sounds on the master bus. As always, if it sounds good, do it!
Limiting
I’ll mention this here because it’s synonymous with the mix/master bus and as such should be addressed, but you shouldn’t have any limiting on your mix bus.
A limiter is essentially a compressor used to get as much volume out of a track or mix as possible without audio clipping.
If you want the best sounding mix, an aspect of this is practicing gain staging in the recording and mixing stage.
Here’s my gain staging cheat sheet for a quick refresher on how to practice it in the mixing stage:
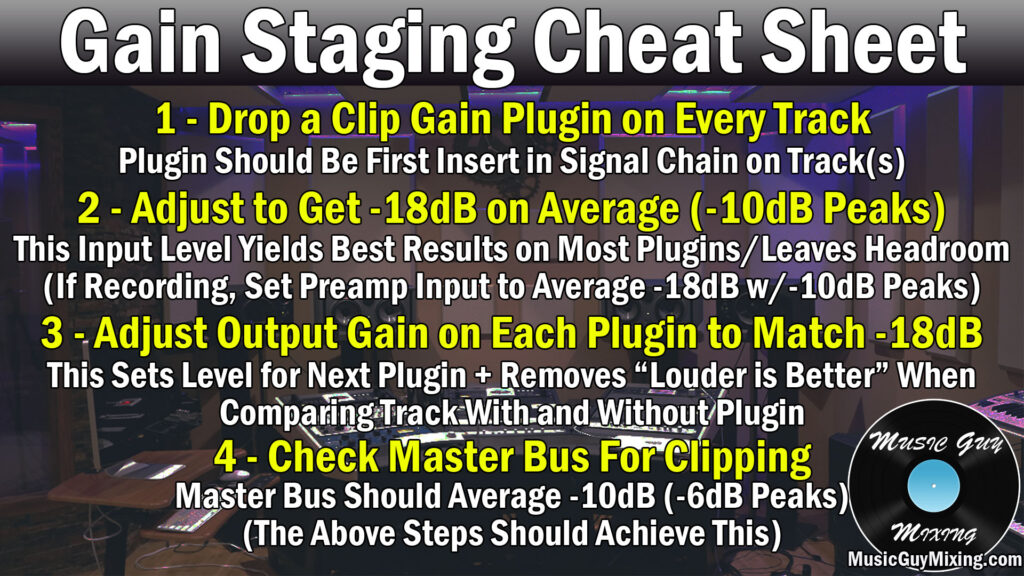
Gain staging helps you get the best results out of all of the processing in your mix and thus the best results out of your audio and mix in general.
It also helps to create headrooom on your mix bus as typically you’ll average a level of -10dB and -6dB peaks on your master fader (give or take – depending on the number of tracks playing simultaneously).
As a mastering engineer, I can personally attest that having at least 5-6 decibels on mixes I receive allows me to do a lot more with that mix in the mastering stage and deliver a much better finished product.
There’s absolutely zero reason to add a limiter on your mix bus. It limits (no pun intended) what can be done to enhance the mix in the mastering stage.
If your mix is too quiet while you’re mixing, just turn up whatever you’re listening on. Just make sure you turn down your reference track to match the volume of your mix!
That’s not to say that limiting has no place in mixing. It can be very useful on especially dynamic tracks which you want to keep up front or at a constant level like your kick, snare, bass, or even vocals.

I recently talked about how to use limiting as a mixing tool in my overview of what is a limiter.
Automation
Not necessarily a part of the master bus chain per se, automation helps to keep your mix fresh by changing certain elements as the song progresses.
I talked about this at length in my tutorial on mixing automation, but a couple parameters of your mix which you might try automating are the overall volume as well as the width.
Specifically driving up the volume by an extra decibel once that chorus hits or constricting the overall width of the mix on the verses to open it up to its full range on the chorus will make that chorus hit that much harder.
You can use automation to essentially create a chorus when the hook is lackluster or composition is muddled.
Conversely, you can enhance a great existing chorus by driving up that energy a bit more with some volume automation.

It’s all about the contrast of the before and after which makes automation a worthwhile final touch on a track or your entire mix to keep things lively and engaging.
Master Bus Tips
- Don’t be afraid to add processing to the mix/master bus. Remember that any processing here will affect the entire mix, so while this is helpful to create some cohesion, less is always more. The master bus should NOT be a substitute to getting everything right on a track level.
- Use the above master bus EQ guide to bring out more or less of certain elements at key frequency ranges.
- Multiband compression can be used to add a little life to your mix while bringing out more of the good stuff.
- Saturation can give your mix more of an analog and classic sound, not to mention gently nudge a brighter mix to a warmer sound.
- Stereo imaging on the master bus can be useful for adding a little width to the top end of your mix to better fill out an open mix.
- A little glue compression can add one last touch of cohesion to tie everything together in your mix.
- In the same vein, a touch of reverb at the end of your master bus processing will add a lot of cohesion to give every track in your mix a uniform amount of room sound. Just remember to EQ the tail to high pass out everything below 600Hz and generally keep the wet/dry to 10% or less.
- Don’t use a limiter on your master bus (unless you’re doing your own mastering and this is the last thing you’re doing to the mix). If your entire mix peaks louder than -6dB on the master bus without limiting, go back and check your gain staging for each track and bus in your mix.
- Automate the width of volume of the mix so that the verses are slightly quieter and more narrow before bumping the fader up 1dB and to full width on the chorus to create a little contrast and make that chorus hit harder.
Pingback: How to Use a Multiband Compressor in Your Mix - Music Guy Mixing
Very informative thanks !