
Ratio, threshold, attack, release and more! Audio compressors are designed to attenuate dynamics in audio, or the difference between the loudest and quietest parts. This gives the audio a more consistent level and with it a feeling of more energy. This audio compressor settings chart will address every typical setting you’ll find on a typical compressor and where to set them. Note there are different types of audio compressors, but regardless of which type you use, you’ll see at least some of these settings.
Audio Compressor Settings Chart
I’m using the FabFilter Pro-C 2 for this audio compressor settings chart because it’s kind of the swiss army knife of compressors. Because of its variety of models, you can apply it to virtually any instrument or bus to get virtually any effect you want.
First I’ll offer the audio compressor settings chart, then discuss each individual setting and where I recommend putting it.
Threshold
A compressor’s threshold setting determines how much of the input signal you want to be compressed. Unless you’re using parallel compression, you generally want to be using compression to get a more even signal.
As such, you typically want to set the threshold around the average level of your audio. This way it will smooth out the peaks especially but leave the quieter parts of your signal untouched. This is a good threshold for bringing a bit more cohesion to your audio.
If you want more dynamics, raise the threshold to capture less signal. If you want more energy and a more even output, lower the threshold to compress more signal.
Ratio
The ratio determines to what degree the signal which exceeds the threshold gets attenuated. Ratios are measured and displayed as 2:1, 4:1, 10:1, etc.

As I explained in my compressor ratio explained post, a higher ratio means the signal gets turned down more.
Specifically a 4:1 ratio means that every 4 dB which goes over the threshold gets reduced to 1dB on the output.
Incidentally, a 4:1 ratio is a nice average rate of compression to begin with.
Try applying this to most instruments and vocals you’re compressing and you’ll get good results (in combination with the threshold).
Knee
The knee on the audio compressor settings chart refers to how strictly the threshold is enforced. A hard knee means that the signal is untouched until it exceeds the threshold.

If you have a softer (higher dB) knee, then your signal will begin to get compressed as it approaches the threshold. The ratio will be low at first and get closer to the actual set ratio the closer the signal gets to the threshold.
I generally recommend a harder knee in the 0-6dB range but you can go softer to get a more transparent compression.
Range
The range in our audio compressor settings chart determines the maximum gain reduction that can be applied to the signal, regardless of the threshold and ratio and other settings.
If you want to cap the gain reduction for an especially dynamic piece of audio, this is where you can set that.
I generally recommend setting the range to the maximum so there’s no limit to the amount of gain reduction. Instead, you can let the rest of your settings dictate this.
Attack
The attack of the compressor determines how quickly the signal begins to get attenuated after it crosses the threshold.
Even with a low threshold and high ratio, you’ll get no compression if you set the attack too slow.
Experiment with an attack time between 1-5ms for the best results.
This allows the transients to be heard, allowing that track to cut through the mix, while still getting the benefits of the compression.
You might not think that the difference of a few milliseconds would make that big of a difference.
When you consider how much aural information is squeezed into each millisecond, it’s no wonder that even a slight adjustment in the time of any of the settings in this audio compressor settings chart can account for a bit change in the gain reduction and output volume.
Release
The release determines how quickly the signal is released from compression once it’s under the threshold again.
Set the release at 50ms as a starting point for a responsive yet natural release which doesn’t smother the next beat.
Hold
The hold setting on our audio compressor lets us artificially add in some time to the release.

Once the signal drops below the threshold, the hold time is enforced before the release time begins.
So if we set our hold time to 10ms, the compression holds at the same rate for 10ms before the release kicks in.
A bit of hold can actually make the compression sound more transparent/less noticeable.
Try setting your hold time to 5ms to pad that release time ever so slightly.
Lookahead
The lookahead helps to anticipate what’s coming up to better compress your audio.
This comes at the sake of processing power, but it can also yield a more natural compression which keeps transients intact.
Set your compressor’s lookahead to 2.5ms to get a nice balance between the benefits and minimal processor taxation.
Output/Makeup Gain
The output gain is as important as anything on this audio compressor settings chart because it allows you to match the volume pre-compressor. This is important for two reasons.
One, this means you can make an informed decision on the benefit of the compression instead of going with “louder is better”.
Two, this means you can keep the proper volume for the next plugin in the signal chain. Gain staging is important not just before your signal goes into the first plugin, but every single one in your chain after it (see my gain staging cheat sheet).
Ideally your average input level was -18dB and you set your output to match that. You should have an easier time keeping that average post compression with less peaks.
Audio Compressor Settings Chart Tips
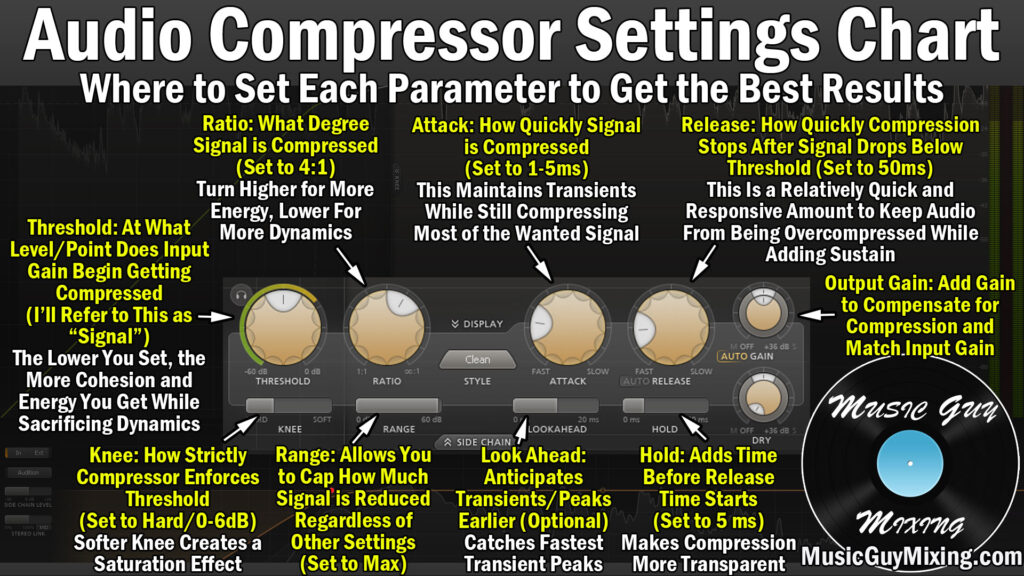
- The audio compressor has nearly a dozen important settings. I showed where to set each one in my audio compressor settings chart.
- Set the threshold at the average level of your track. Go higher for more dynamics, lower for more energy.
- Set the ratio at 4:1 as a starting point. Go higher for more energy and cohesion, lower for just a bit of glue and more dynamics.
- Set the knee somewhere on the harder side (0-6dB) to more strictly enforce the threshold. Set a softer knee for more of a saturation effect.
- Set the range to max unless you want to cap your gain reduction.
- Set the attack to 1-5ms to preserve transients but still get the benefits of your other compression settings.
- Set the release to 50ms as a starting point to keep compression responsive and not overly compress.
- Add a bit of hold time (5ms) pre release to make compression more transparent.
- Use 2.5ms of lookahead time to get smoother compression without sacrificing too much processing power.
- Match your output gain to your input gain to maintain proper gain staging and A/B the compression/bypassed without volume influence.
Pingback: What is the Automatic Compression Release - Music Guy Mixing
Pingback: What is the Compression Threshold - Where to Set It - Music Guy Mixing
Pingback: How to Use Compression on Bass - The Best Settings - Music Guy Mixing
Pingback: Hold and Release in Audio Mixing - What Is the Difference? - Music Guy Mixing
Pingback: The Best Audio Compressor for Mixing - Music Guy Mixing
Pingback: Free Compression Cheat Sheet from Music Guy Mixing Now Available - Music Guy Mixing
Pingback: The Look Ahead Compressor Setting - What Does it Do - Music Guy Mixing
Pingback: Ableton Stock Plugins Guide - How to Use Every Plugin - Music Guy Mixing
Pingback: Ableton Live Compressor - The Best Settings to Use - Music Guy Mixing
Pingback: What is Compressor Ratio - Defining the Most Important Setting - Music Guy Mixing
Pingback: Compressing Acoustic Guitar - The Best Settings - Music Guy Mixing
Pingback: Compressor Settings for Guitar - The Best Settings - Music Guy Mixing
Pingback: 5 Effective Tips For Using a Compressor in Mixing - Music Guy Mixing
Pingback: The Best Parallel Compression Settings to Use - Music Guy Mixing
Pingback: What Does a Compressor Do in Mixing - A Quick Overview - Music Guy Mixing
Pingback: The Best Vocal Compression Settings to Use on Your Vocal - Music Guy Mixing
Pingback: How to Compress Acoustic Guitar - The Best Settings - Music Guy Mixing