Whenever you mic and record two different instruments/sources at the same time, you open the door for bleed between the microphones. This can introduce phase issues, but just as annoyingly it can muddy up your mix. The drum kit is arguably the most common culprit for audio bleed because even if you’re not recording the rest of the musicians live, there’s always bleed between the drum mics. Let’s talk how to fix drum bleed in the mix.
How to Fix Drum Bleed

Let’s take a look at a few options for removing drum bleed, starting with using a gate.
Gating
The first and most obvious and effective way to fix drum bleed is to make use of gating on the individual tracks which make up your drum kit.
Gates are dynamics related effects which make use of a threshold like you’d see on a compressor. While the compressor uses a threshold to determine what volume the track needs to reach to begin compressing the signal, a gate uses a threshold to determine what volume the track needs to meet to open up, thus allowing that track to pass through and be heard.
While the gate is closed, the track is silent.
Below is a snapshot of some simple yet effective settings on how to gate drums you can dial into your gate of choice (pictured below is Ableton Live’s stock gate):

The threshold will vary depending on which track you’re applying it to; you want to set this to a few decibels BELOW the quietest instance of the drum in question.
So if your snare’s quietest practical hit in the performance is -18dB, set the threshold on the gate to -20dB or so with the rest of the settings. which ensure a clean open and close without any unwanted artifacts the listener will hear.
Admittedly this method is mostly only applicable when the drums were recorded to a number of different tracks using multiple mics – the more the better actually because that gives you more surgical control over the thresholds of each track’s gate to isolate them out from the rest of the kit.
When you’ve got that dedicated snare microphone and track in your mix, you know that the loudest audio that microphone is picking up is obviously the snare. As such, that -20dB (as the example) threshold ensures that the nearby hi-hat, cymbals, kick, even the toms won’t be loud enough to trigger that threshold and open the gate, so the only thing you’ll hear on this track once the gate is set up correctly is the snare.
Not only does this get you cleaner audio, but it ensures any processing you add to each individual piece in the kit gets exclusively applied to that track rather than some bleed on other tracks.
Speaking of which, check out my guide on how to mix drums for information on how to EQ or compress (for example) specific pieces in the kit.
Multiple mics gives you the best of both worlds as you get the studio level isolation of the gates but you can also blend in more or less of the overhead mic(s) to maintain that live energy of the room as you like.
High Pass Filters
When you’ve only got a few microphones, like a kick, snare, and overheads or room, high passing becomes more useful.
The kick is the anchor of your drum kit along with your overall mix itself. When your kick, and as an extension your entire low end, doesn’t sound good, the entire mix greatly suffers.
Without the option of gates for isolation, we can instead filter out frequencies on tracks we don’t need as necessary.
On our snare (as an example), this means applying a high pass filter to just below the body of the snare in that 70-100Hz range as demonstrated in my snare EQ cheat sheet:

This will simultaneously create room for the kick as well as remove drum bleed in frequencies we don’t need below the body which would just muddy up our snare.
See my drum EQ chart for the best spots to high pass on every track in your drum kit no matter how many mics you used.
You can actually likewise apply a low pass filter to your kick track to remove virtually all of the drum bleed, but then you’re sacrificing your transients. That said, you can make up for that with my trick for how to add audio transients by way of white noise which is a great hack for once again getting the best of both worlds without compromise.
Sidechain EQ
Another, less invasive solution is to make use of sidechain EQ to reactively carve out the frequencies of drum bleed on a different drum track but only when it’s playing.
This is best implemented when you’ve got a 2-3 microphone setup like before and again where gating isn’t an option.
It’s not as aggressive as using a filter to remove frequencies above or below a point altogether, and it’s not even as aggressive as a static cut because we’re dynamically cutting only when there’s a conflicting frequency.
For instance, dropping an EQ on your kick drum and creating a band at both 175Hz and 4000Hz, then sidechaining both bands to your snare and adjusting the threshold as necessary, you can significantly cut the body and punch frequencies of the snare out of your kick when that snare triggers, leaving these frequencies unattenuated when the kick triggers.
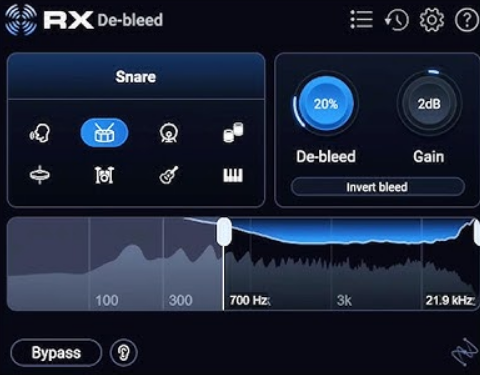
Izotope RX De-Bleed
Lastly, if you’re looking for an instant effective solution which doesn’t require much to any work on your end, use an automated, set it and forget it solution like Izotope RX DeBleed.
I use this on a variety of tracks in my mix as it has a lot of options, but this plugin has been trained on the sounds of each component in a drum kit, as well, and can isolate and remove any piece from any track you use it on:
While this solution is arguably the most effective way to clean up drum bleed, it’s obviously the one premium option on this list of what are otherwise stock effects.
It also has the ability to eat up your CPU which can make it a little difficult to mix in real time when it’s engaged, at least depending on how many instances of the plugin you have open.
Between gating, filtering, sidechain/reactive EQ, and even a specific tool for treating drum bleed, you should hopefully now be able to achieve much cleaner drums regardless of how many tracks you’ve got or the state of those recordings coming in!