
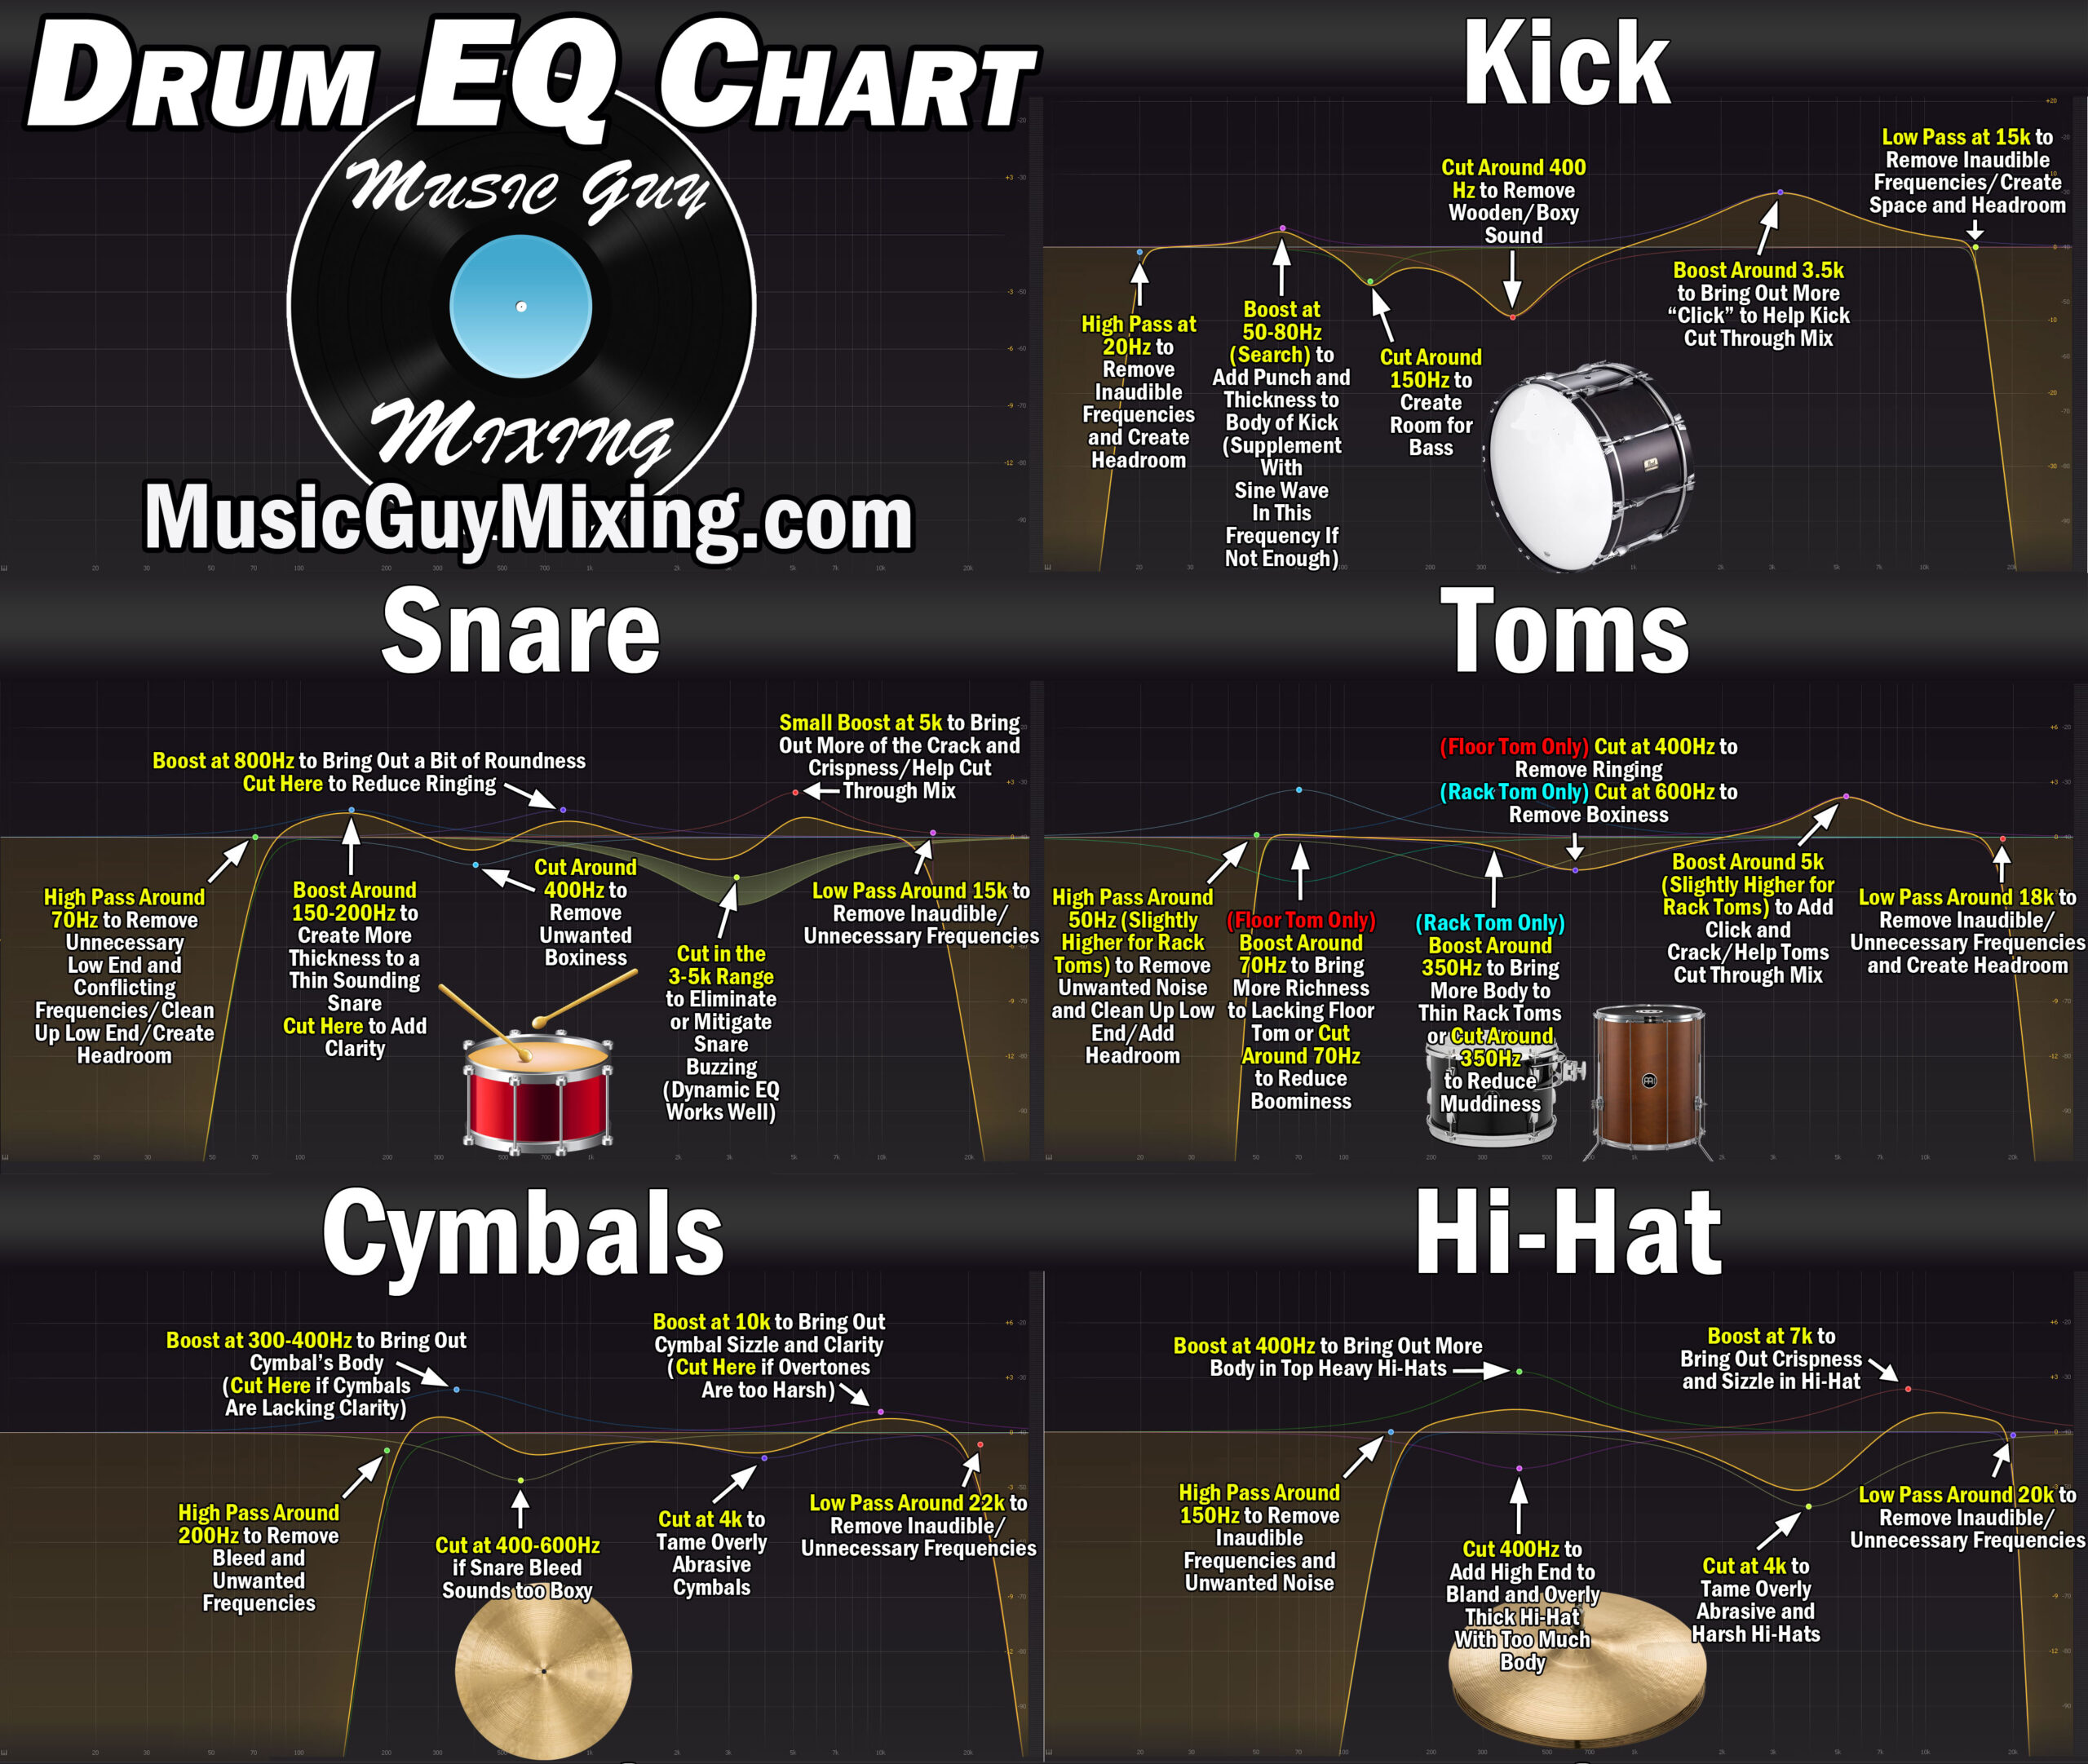
The drums are the backbone of your mix. It’s essential that they’re EQ’d properly (check out my drum EQ chart) to keep them clean but also compressed properly to keep them punchy and visible. With that in mind I’ve put together this drum compression chart which you can download and refer to on demand to quickly dial in the best drum compression settings every time.
Drum Compression Chart
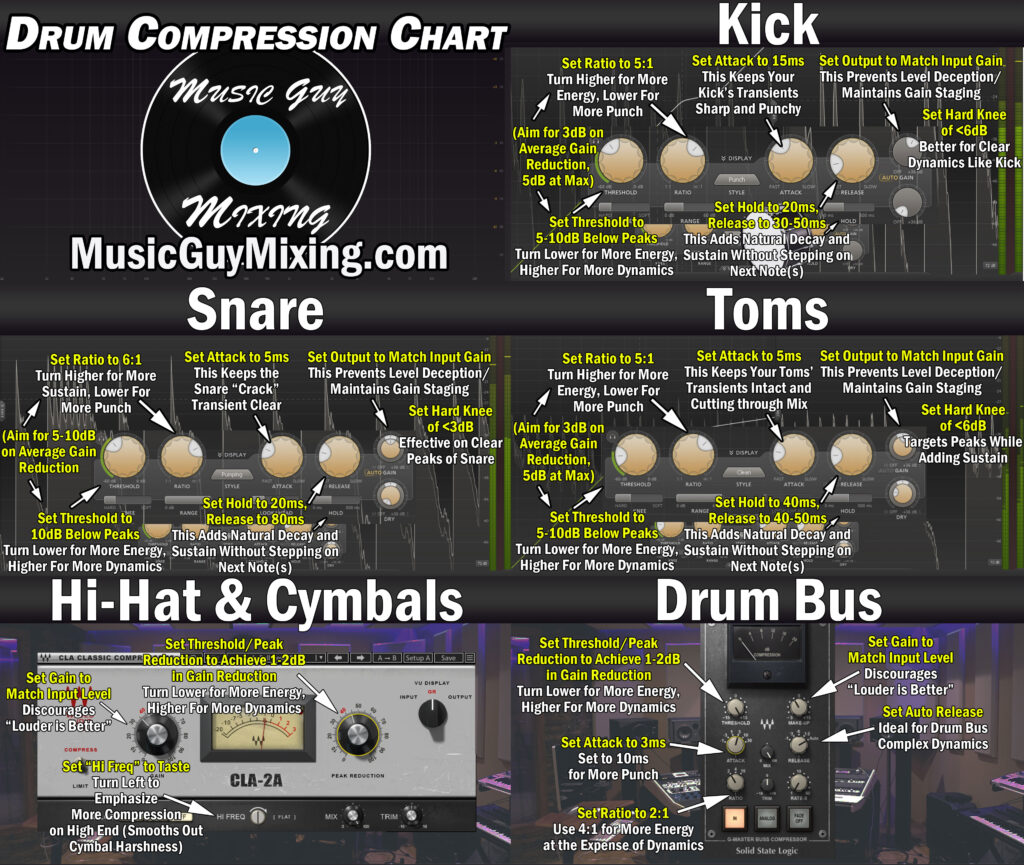
I’ll begin by sharing my drum compression chart before I cover each one individually in greater depth. Note that information is taken from my greater (free) compression cheat sheet – The Ultimate Compression Cheat Sheet.
Here’s the drum compression chart:
Now let’s get into each piece individually to explain why I recommended the settings I did on the drum compression chart.
Kick Drum
Kick compression is generally about maintaining the transients (see what are transients) of the click of beater on the drum on the front end and adding thickness in the middle and sustain on the back end:

Threshold
The peaks on a kick are generally pretty consistent.
With that in mind, I like setting my threshold on my kick compressor to 5-10dB below the peaks.
This ensures every instance of that kick triggering is going to be compressed.
Ratio
I generally like to be aggressive with the ratio on the kick, and will go with a higher ratio depending on the song and genre.
A 5:1 ratio is the low end of what I recommend; oftentimes I’ll set this between 5:1 and 8:1, depending on the kick.
Listen alongside the rest of your kick compression settings to determine if the kick is consistently present enough in the mix.
Generally 8:1 works, but if I REALLY want that kick in your face then I’ll use a limiter to just lock down and completely remove any expression from the kick to keep it up front. This works well in EDM, hip hop, even pop, so it really depends on your kick, the genre, and what’s best for the song.
Knee
With consistent peaks like that of the kick we can afford to go with a harder compression knee, thus strictly enforcing our threshold with our 5:1 ratio and ensuring it won’t compress the silence or too much bleed from the rest of the drums.
Working alongside the threshold setting we used earlier, a hard knee of 3-6dB will work well.
Attack
The compressor’s attack delays the compression by a few milliseconds. This lets that initial transient come through for a split second to help it cut through the rest of a busy mix. The compression then clamps down and reduces the dynamic range to give us that thicker sustain that we generally want.
15ms of kick compression attack is enough time to get that beater click to come through unabated while still enjoying the benefits of the compression.
Release
I like a hold time and release of 20ms and about 40ms, respectively on my kick compression.
This means that after the level drops below the threshold, the compression will hold for an additional 20ms before easing up over the course of 40ms back to the point of no compression.
Output
Just a quick note which I won’t repeat on the remaining pieces in this drum compression chart, it’s important that you set the output gain to match the input level.
In other words, whether you have the compressor on or off, the volume should roughly be the same. This keeps the kick at the best level relative to the rest of the mix as you had it but also maintains gain staging.
In case you haven’t been gain staging, check out my gain staging cheat sheet to ensure you get the best results from your plugins.
Moving on to the snare!
Snare
We more or less use snare compression for a similar end goal as with our kick. Want to maintain the transients, this time that “crack” of stick on skin, and to add fatness/roundness as well as sustain on the back.

Threshold
Likewise with the kick, the peaks on a snare are generally pretty consistent. These settings will more reflect that, so if you’ve got a dynamic performance with regards to your snare, you will need to account for that. Settings for quiet building drum rolls or quieter parts on verses, for instance, may need to be automated or compressed on a different track altogether.
Considering the snare is a bit more dynamic, I set my threshold a bit lower to 10dB below the peaks.
Ratio
It’s a similar idea with the ratio on the snare, as well.
Because it’s a bit more dynamic, my snare ratio is typically 6:1, though I may go up to 8:1 if I want a bit more energy and/or the snare isn’t up front enough after everything else for my liking.
Even more rare than I would with the kick, very occasionally I’ll limit my snare depending on the song or snare. If it’s a snare sample, particularly a synthetic one, I’m more likely to squash it via a limiter as I’m not as concerned about the natural character that I have with a recorded snare.
Knee
Once again we can go with a relatively hard knee of 3dB if not 6dB.
Attack
The transients of a snare are among the fastest you’ll find.
As such, a short and fast attack of 1-5ms works well on a snare to let that assertive transient crack through while filling out the rest of the sound via the compression.
Release
I like a hold time and release of 20ms and about 80ms, respectively on my snare compression.
As you can see, similar to the kick I like to pad that release time with 20ms of hold. I like a slightly longer release on the snare so we get more of a come down roll off back to its uncompressed state as opposed to the kick which I like to be a bit tighter.
Toms
Whether we’re talking floor or rack tom compression drums, we want to preserve those transients while getting more of the wholeness of the body to come through.

Threshold
The tom dynamics can be similar to the snare in that they’re generally consistent, but it depends on the performance.
I typically aim between 5-10dB below the peaks for setting the threshold on the toms.
If it’s a more dynamic performance, I’ll always err on the side of being more aggressive and go a bit lower. Like with the snare, you may need to split things up, depending on the performance.
Ratio
A 5:1 ratio generally works for the toms. If I want more energy then I’ll turn this up to 8:1.
If I want to keep more dynamics, I may knock it down to a 4:1.
Any lower than that and we’re turning the compressor more to a bit of cohesion adding glue.
Knee
Once again, as the tom delivers relatively consistent peaks I’ll set a hard knee of 6dB.
Attack
The toms’ transients aren’t quite as fast as the snare but a little moreso than the kick.
As such, I generally stick to a attack of 5ms for the sharpness of the percussiveness to come in ahead of the compression.
Release
I like a slightly longer hold time of 40ms with a release of 50ms on my tom compression.
This gives me a bit more lift on the back end of the toms, though I may dial this back for a faster tempo or performance.
Hi Hat
I love the expressiveness of the hi hat both open or closed. With that in mind, most of the time I’m not using much to any compression on them.
The two exceptions which I covered in my hi-hat compression tutorial are:
Multiband Compression for Taming Harshness
Hi-hats and cymbals in general bring excitement to your mix in the form of high-mid and high frequency goodness.
Sometimes a cymbal or its recorded sound (or a sample) can be too bright to the point of harshness (see my tips for taming a harsh mix).
In fact it’s not uncommon to apply a de-esser, a tool primarily meant to tame vocal sibilance, to tame the harshness in your hi-hat or cymbals.
De-essers are essentially just specialized multiband compressors which primarily target higher frequencies, so you can use a multiband compressor to smooth out harshness to make your hi hat a little more palatable. Incidentally I actually did a tutorial on how to make a multiband compressor a de-esser.
Simply set a band in the 2-5k region and set a ratio of 4:1 and the ratio to get a gain reduction of a few dB to smooth out any harshness you have here.
Optical Compression for Glue
Sometimes I’ll experiment putting an optical or opto style compressor on my hi-hat just to impart a touch of thickness.

Optical compressors like the Waves CLA-2A are famously transparent so you won’t notice much of a difference. They’re also dirt simple to use, typically just featuring a threshold and output gain knobs.
All the other audio compressor settings we normally think of when we think of compression are tied into and affected by the amount of signal included.
When compressing a hi-hat, just dial in the input level to get 1-2dB of gain reduction at most.
Overhead
The exact same thing I just mentioned for hi hats pretty much equally applies to the overhead mic’d cymbals. I like the expressiveness of them, plus they have plenty of natural decay which we don’t need to supplement with compression.
There’s also an additional curve ball which comes with compressing our cymbals – the overhead microphones pick up the entire kit in addition to the cymbals. As such, we likely to compress other elements of the kit, with it even with a well set threshold.
With all that in mind, I’ll often apply the same compression philosophy to my crash, ride, and splash cymbals as I do the hi-hats.

In other words, I may reach for a bit of multiband compression in the 2-5k range to smooth that out or some very light gain reduction from an optical compressor like the Waves CLA-2A.
Note that the “Hi Freq” dial on the 2A emphasizes compression a more on the high end frequencies when turned to the left.
I typically leave this in the middle on cymbals (including the hi-hat) to enjoy a bit of smoothing, sometimes using this to take the place of multiband compression altogether when it’s not presenting as much of an issue.
Drum Bus
Now that we’ve get each of the individual elements compressed, how about the drum bus itself? If you’re not using buses in your mix, check out my tutorial on easily making a mixing template in your DAW.
When it comes to compressing the drum bus itself, this typically takes two forms:
Glue Compression
As always when we’re applying any kind of processing to a bus to affect multiple tracks at once, less is more.
As such, I’ll typically insert a glue compressor like the Waves SSL G-Master Bus Compressor to make the sum of tracks coming to that bus gel a little bit better.

Here and similar to the optical compression I applied to the cymbals a moment ago, I’m just looking to get 1-2dB of gain reduction to make the drums feel more like a single cohesive unit.
Parallel Compression
Aside from the glue, I’ll typically have some parallel compression set up on an Aux/Return track.
Parallel compression works well when blended in to an entire drum kit for bringing some extra energy to the performance.
Here are some sample settings which work well for parallel compression, just be careful when setting the threshold if you’re using it for multiple tracks as is the case with Aux/Return tracks:

At this point you can just blend in as much or little of that squashed, crushed kit as you like via the send knob (see sends vs inserts).
Usually a good rule of thumb is to blend in just enough to where you can hear it, then dial it back a couple dB.
With parallel compression you usually just want to feel it more than hear it, but if it sounds good, go with it. The more parallel compressed drum kit you blend in, the more those cymbals will come to life and energy you’ll feel across the entire kit.
At this point your drums should be sounding a lot livelier, thicker, and cohesive as a unit.
You’ll notice a huge difference if you map every compressor you just added to a on and off toggle switch to split test.
Just remember the importance of gain matching so that neither the before or after compression drum kit should sound louder than the other.

Pingback: Drum Bus Compression Cheat Sheet - The Best Settings - Music Guy Mixing
Very useful and helpful. Really appreciate this.