
Percussive instruments like the elements which make up the drum kit can be tricky to EQ because they don’t reflect distinct notes, at least in the way that we think of them. Like any instrument in your mix, EQing drums is essential for cutting the bad and emphasizing the good. With that in mind, I’ve put together this drum EQ chart which you can download and refer to any time for an efficient shortcut to getting the best sound every time you sit down to EQ drums.
I’ll also address each piece individually to better explain why I recommend the cuts or boosts I do.
By the way, make sure you grab my free drum compression chart, too, to save time every time you compress your drums.
Now on to the drum EQ chart!
Drum EQ Chart
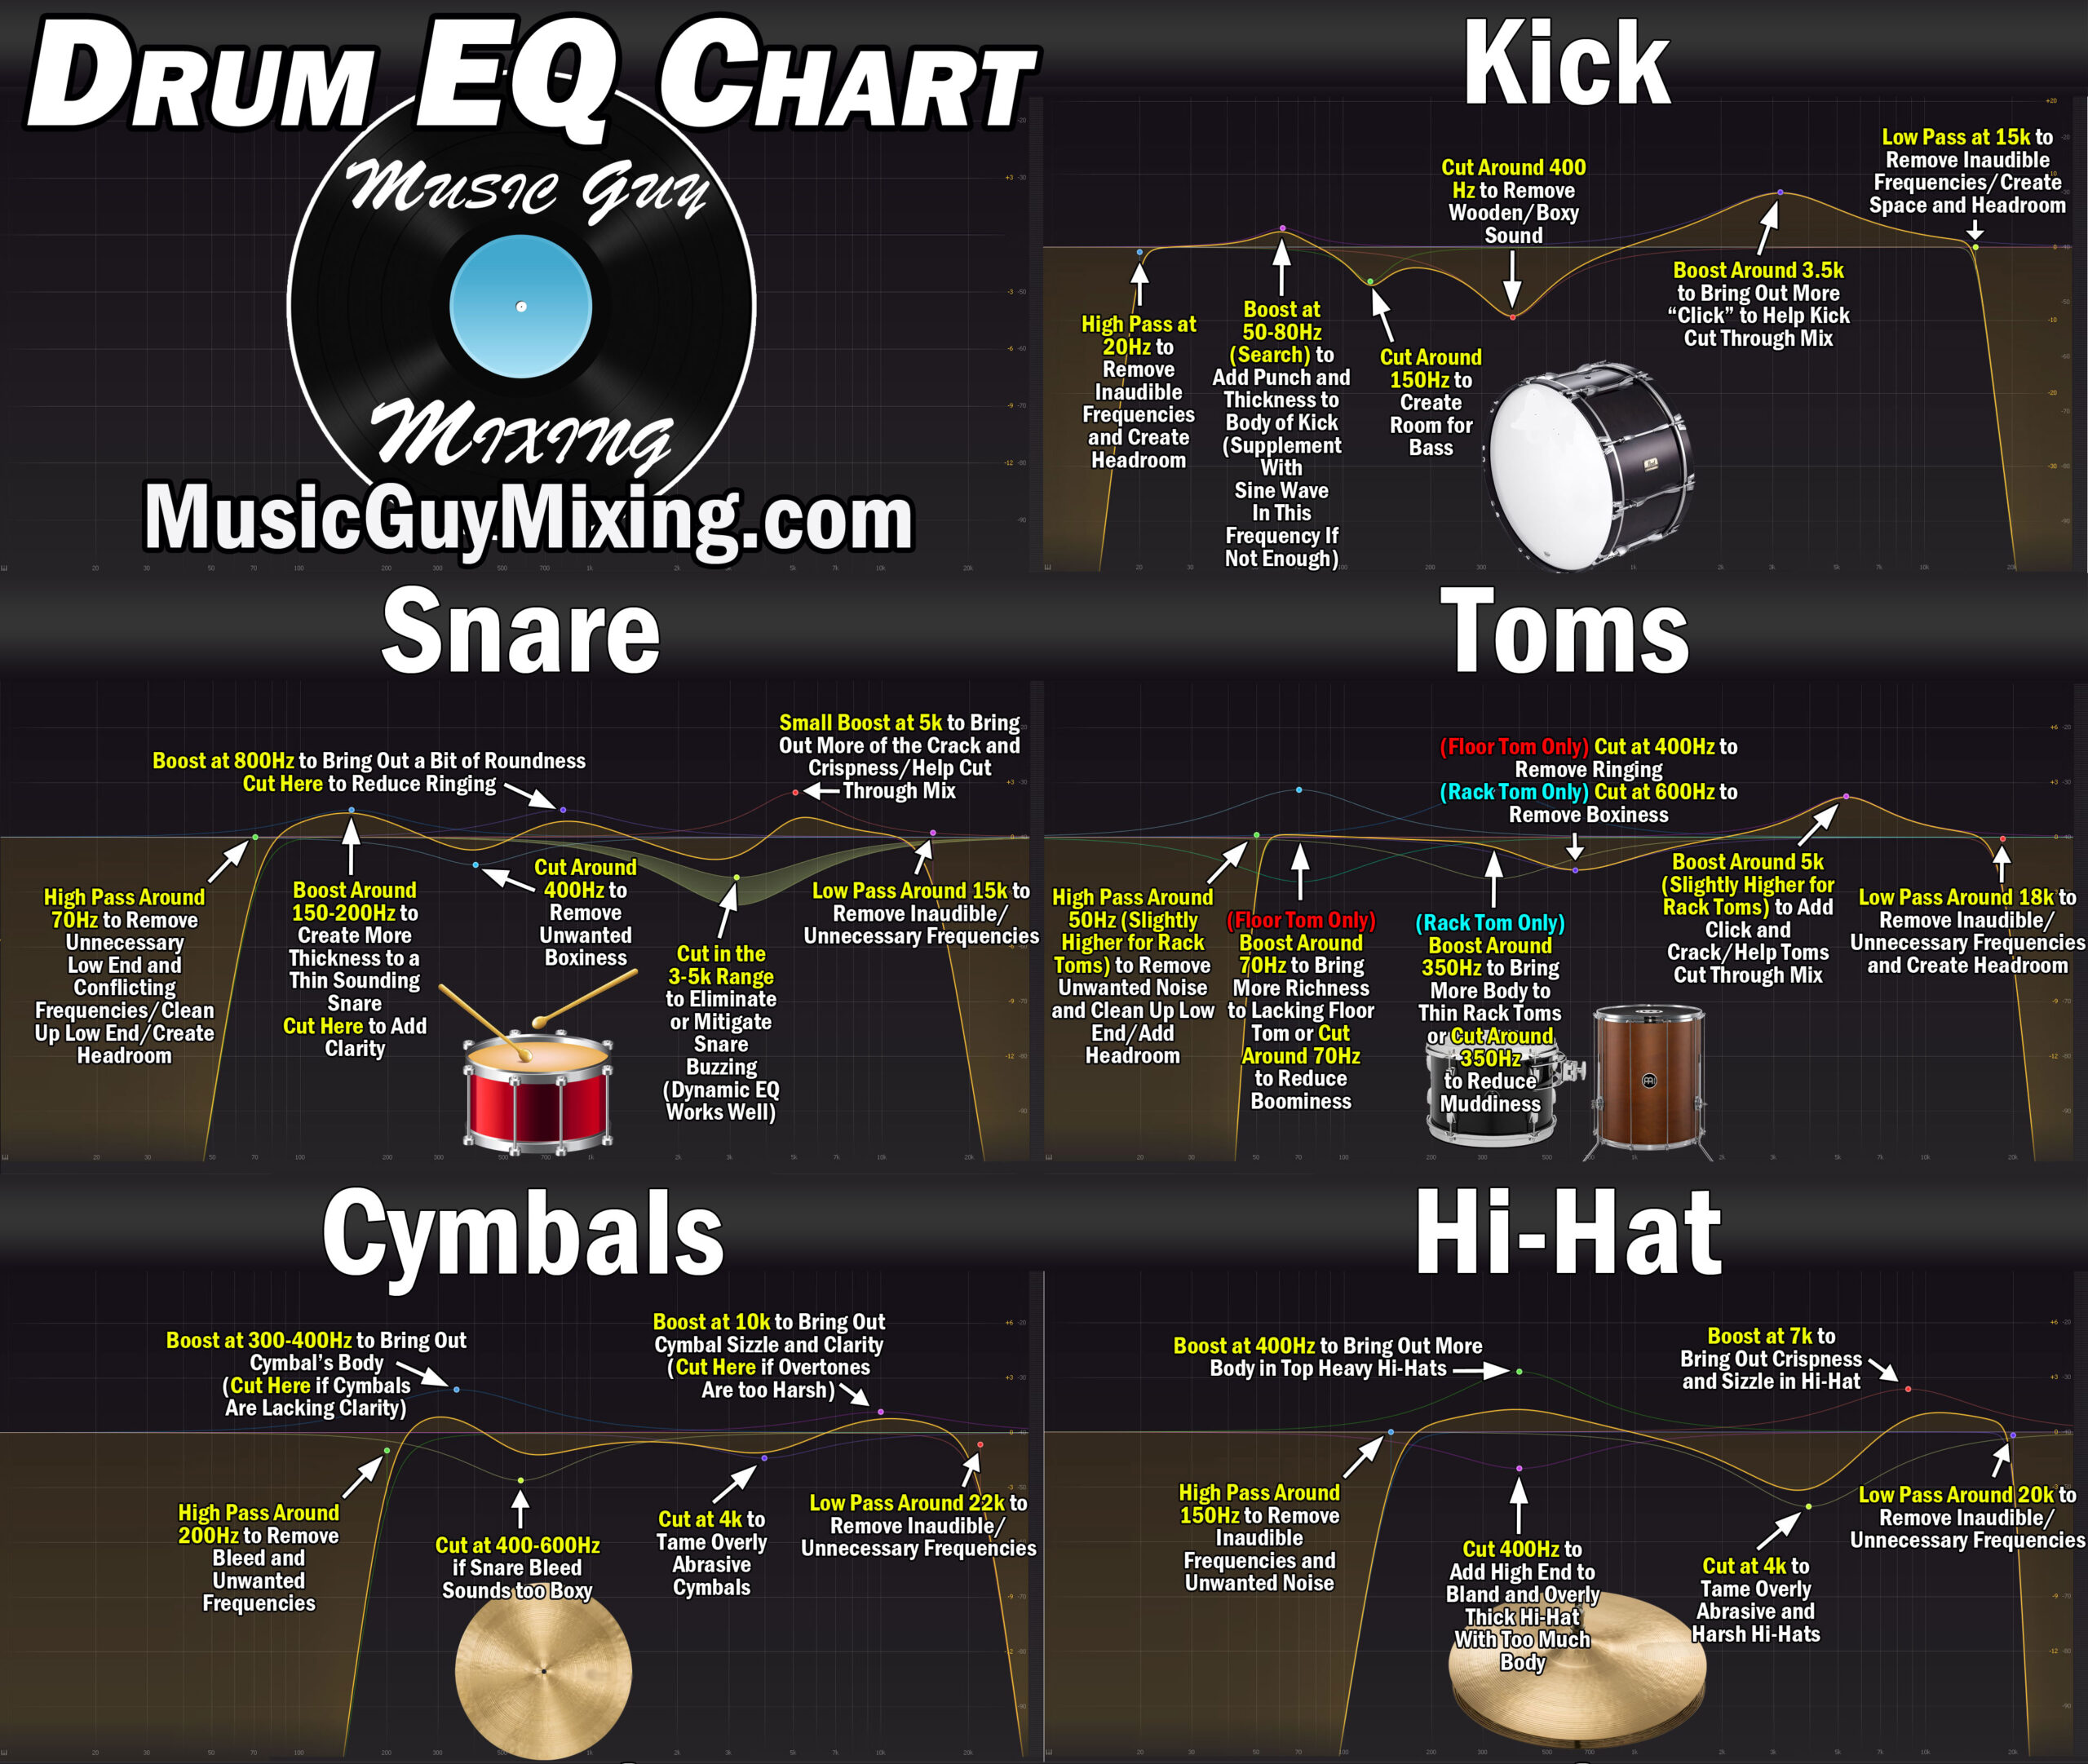
Here’s the download for my drum EQ chart so you can refer to it on demand. Note that this is taken from my greater “The Ultimate EQ Cheat Sheet” which can ALSO be downloaded for free on its page. Check that out as it offers EQ cheat sheets for EVERY instrument in your mix and again, it’s free.
Here’s the drum EQ chart before we get into each individual drum’s EQ guides:

Now let’s address each drum individually to explain every frequency to cut or boost, including what they do and why we’re doing them, beginning with the kick drum.
Kick EQ
Let’s begin with the kick EQ guide.
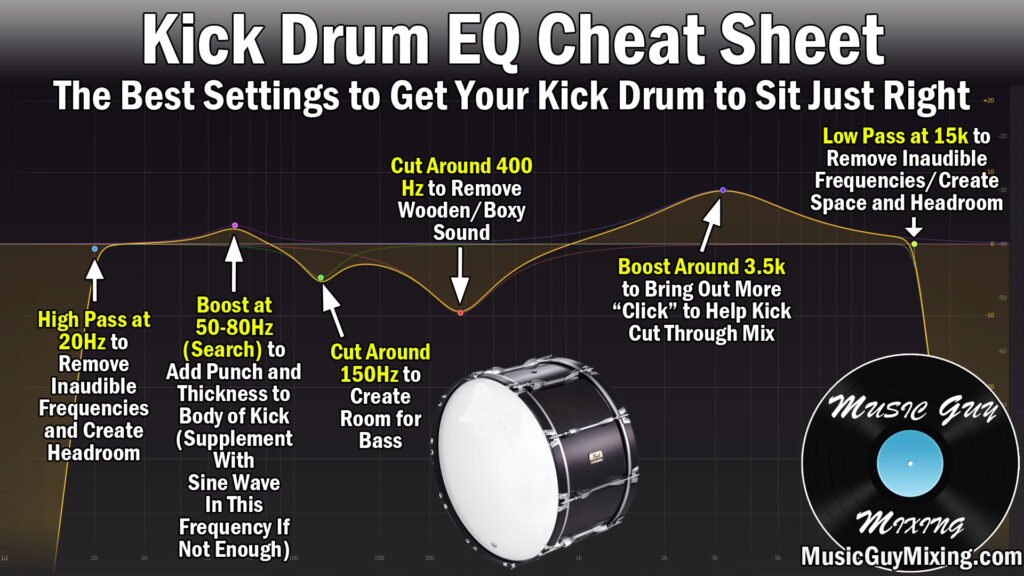
High Pass at 20Hz – High pass filters help to keep your mix clean because they filter out unwanted sound and create space in the low end of your mix.
Admittedly the kick EXISTS at the lowest point in your mix, but in the interest of creating some more mixing headroom, I still like to high pass my kick at 20Hz because there’s nothing happening here. Go with a slope of 24dB/oct or a bit more aggressive of 36dB/oct if you have good monitors or headphones to hear the low end.
Boost 50-80Hz (Search) – The fundamental of your kick, that’s the meat of the “thud” or really your mix’s anchor, exists typically between 50-80Hz. Sweet around to find the loudest point in this region and give it a slight boost.
If your kick isn’t thick enough, check out my sine wave kick drum trick to supplement a thin or weak kick.
Cut Around 120-150Hz (for Bass) – As I mentioned in my low end mixing tutorial, one of the keys to a clean and open low end (and with it, a clean and open mix), is to get your kick and bass to work together. Creating a little complimentary cut on the kick for the bass can be beneficial, but not as beneficial as sidechaining bass to kick, so check out my tutorial on that.
Cut Around 400Hz – A lot of the boxy sound which some describe as one of the contributing factors to a muddy mix exists in the 400-600Hz region. I find on the kick a cut in the 400Hz region works well.
Boost Around 3.5k – The transients of a track are the predominant, oftentimes percussive mid-high frequencies which precede the rest of the sound. On a kick drum it’s the clicking sound of beater against the outside of the kick. If you want more click, try a boost in this region.
Just like my aforementioned sine wave kick drum trick, I have a trick to add transients to your kick or any track in your mix, so check that out if the click on your kick is too round or dull.
Low Pass Around 15k – Similar to the low end roll off we showed at the start of this drum EQ chart for the kick, we also have nothing musical happening on the top end. Use a low pass filter around 15k to create a touch of added headroom without sacrificing anything tonally on your kick.
While it’s similar, I put together a specific live kick drum EQ guide, so refer to that if you’re EQing a live kick sound.
Snare EQ
Next let’s cover the snare EQ cheat sheet in depth. The snare drives the energy not only of the drums but the entire mix. Here’s where to cut and boost your snare:
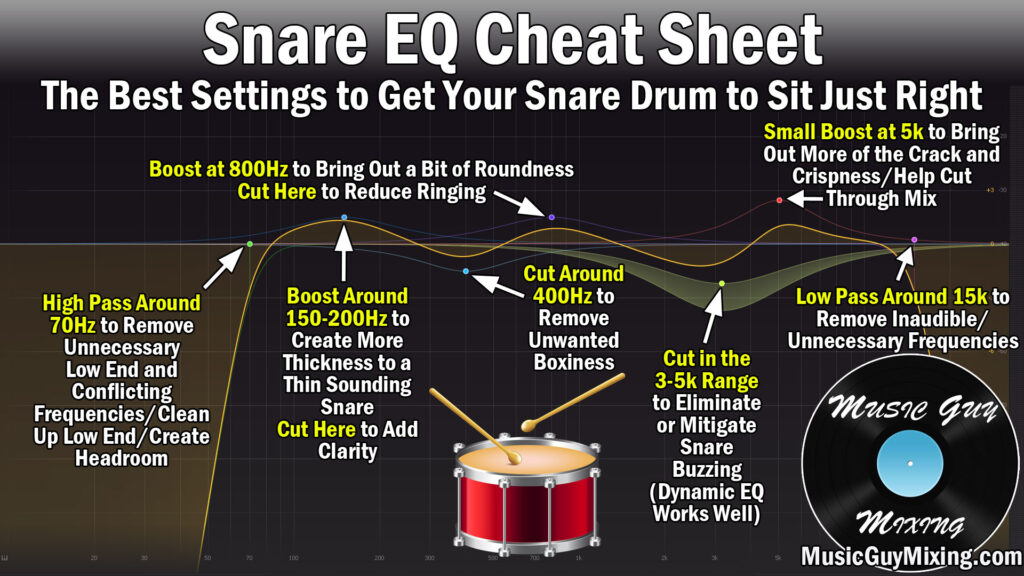
High Pass Around 70Hz – Like I just mentioned, it’s essential that you high pass virtually every instrument in your mix to create space for the kick and bass, not to mention get rid of up unwanted frequencies and sounds (or bleed in the case of a live recorded drum performance. By the way, see my tutorial on how to gate drums). Either a 12 or 24dB/oct slope will work for the remainder of your high passing on drums.
Boost Around 150-200Hz – We can bring out more of the fundamental fatness of the snare, correcting a thin snare or just bringing out more of the good stuff by boosting between 150-200Hz. If your snare is too dull or thick, try a small cut here instead.
Cut Around 400Hz – Another relatively low fundamental instrument, try cutting between 400-500Hz to also add some clarity. Before you cut in the fundamental I just mentioned, try a cut here to see if you get the clarity you want to better emphasize the higher frequencies via subtractive EQ.
Boost/Cut Around 800Hz – 800Hz is an important area on the snare. If you want to work in some added roundness, try boosting here. If you want to attenuate that problematic “ringing” sound which can plague some snares based on the tuning, equipment, room, etc. then try cutting here.
Cut in the 3-5k Range – Snare buzz is another problem which can present itself depending on a number of factors during recording. Cutting in the 3-5k range you can attenuate and smooth this out.
Small Boost at 5k – The transient crack of stick on skin is predominant around 5k. If you need more, try a small boost to help your snare better cut through the mix.
Low Pass Around 15k – Once again, there aren’t any necessary overtones this high up worth preserving. Cut here to dedicate high end frequency space to the instruments which need them like the cymbals we’ll get to in a moment.
Toms EQ
Whether we’re talking a floor or rack toms, this tom EQ guide answers how to approach both:
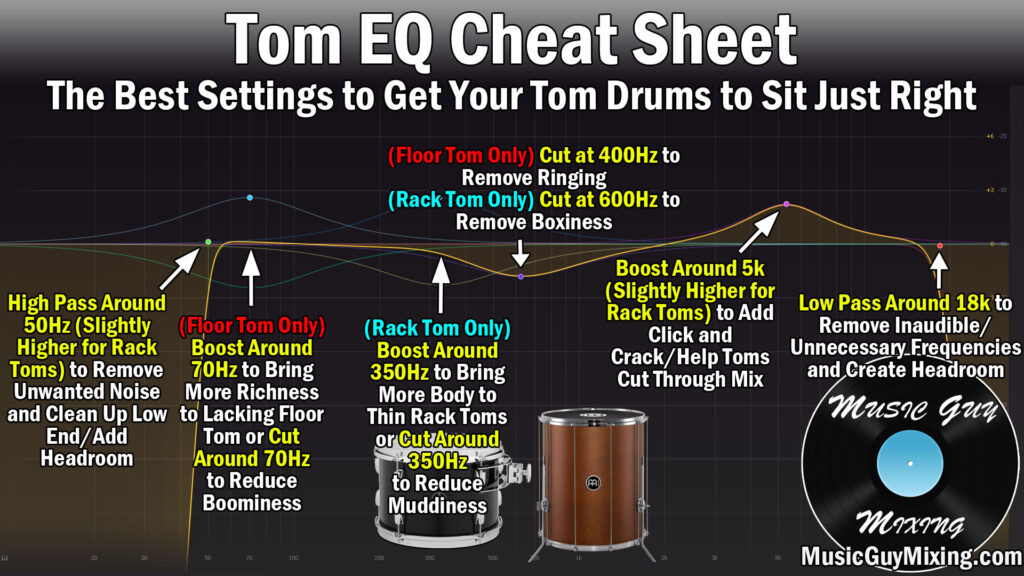
High Pass Around 50Hz (Slightly Higher for Rack Toms) – High pass your floor tom around 50Hz to keep it clean and create space. Aim a bit higher to around 70Hz for the rack toms. Oftentimes a good rule of thumb is to sweep up until you hear the sound change at all, then dial it back down 10Hz or so.
(Floor Tom) Boost Around 70Hz – The richness and body of your floor tom starts to assert itself around 70Hz in most cases. Cut or boost here to reduce boominess or add richness/body, respectively.
(Rack Tom) Boost Around 350Hz – 350Hz tends to be an important region for the rack toms, though admittedly this can vary depending on the size and tone. Regardless, find the fundamental of your individual rack and cut or boost here to reduce muddiness or add body and correct a thin sound, respectively.
Cut Around 400Hz and 600Hz (Floor and Rack, Respectively) – 400Hz is a good place to cut to reduce ringing on a floor tom. 600Hz is a good place to cut to remove boxiness on racks.
Boost in the 4-6k Range – To bring out the transient initial percussive sound of contact on our toms, try a small boost in the 4-6 range, favoring the lower end for the floor and higher end for the rack, once again.
Low Pass Around 15k – I went conservative in the above graphic; you’re generally safe to low pass at 15k or even lower on a floor tom.
Hi-Hat EQ
The hi-hat adds a similar energy as the snare, albeit at a higher frequency range. My hi-hat EQ cheat sheet covers all that and more:
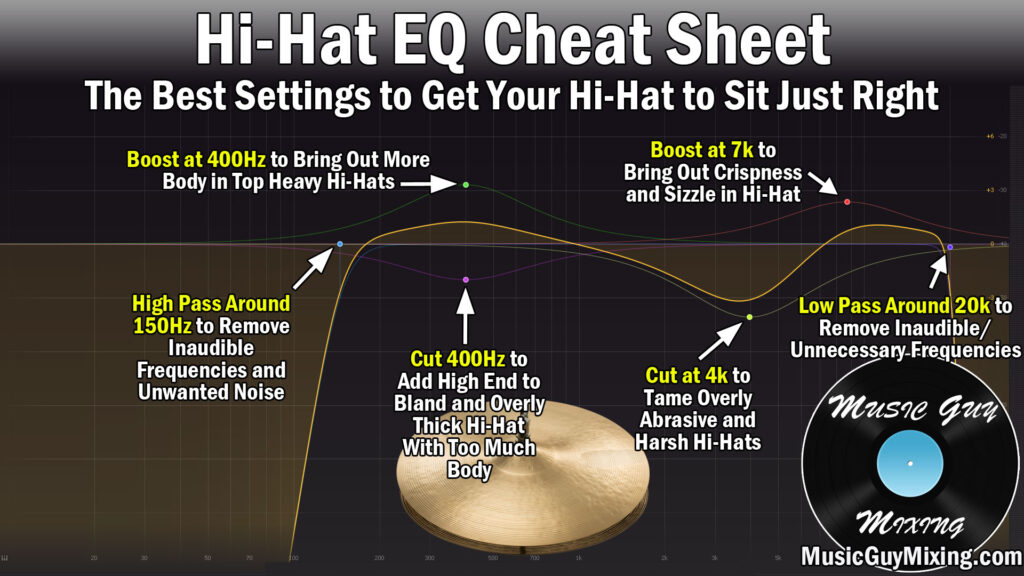
High Pass Around 150Hz – The body of a hi-hat doesn’t begin until much higher, so we can safely high pass a lot higher than we have been to this point in this drum EQ chart. An admittedly conservative 150Hz and below cuts out bleed, room noise, and unwanted noise. Monitor the difference as you sweep higher as we’ve done before to be more aggressive in your cut without sacrificing any of the low end of your hat.
Boost or Cut At 400Hz – Where we’ve normally been cutting, we can add body to a top heavy, meaning an overly bright hi-hat with a boost around 400Hz. This can sometimes be a quick fix for balancing out the tone of your hi-hat in the case of it being too top heavy.
Conversely, if your hi-hat is bland, too thick, and has too MUCH body, don’t be afraid to do a subtractive cut here at 400Hz to rebalance and better prop up the top end.
Dynamic Cut in the 3-5k Range – 3-5k can be especially harsh on human ears via a hi-hat, depending on the cymbal, the performance, and the room in particular. As such, cut at 4k to tame an overly abrasive and harsh hi-hat. Even better, do a dynamic EQ cut so that it cuts more out as necessary depending on the performance (such as how open the hat is at any given time when it’s struck).
Incidentally, check out my tips for dealing with a harsh mix to safely smooth out the greatest offenders in your mix.
Small Boost at 7k – I like to bring out a little more sizzle from our hi-hat with a small boost in the 7k region. This is a nice way to add some clarity without breaking your listener’s ears.
Low Pass Around 20k – Not surprisingly, we need to push our low pass filter higher on the high frequency rich hi-hat. As such, low pass around 20k.
Cymbals EQ
Cymbals add excitement and life to your entire mix, but like any high frequency rich instrument they can overtake the rest of the mix, cause unwanted harshness, or in the case of cymbals just be TOO splashy. This cymbal EQ cheat sheet breaks down the frequencies of your overheads:

High Pass Around 200Hz – Coming up a bit higher than the hi-hat with our high pass filter, I like to sweep but generally find 200Hz to be an acceptable place to filter out with a 24dB/oct filter to remove bleed and unmusical sounds.
Boost or Cut At 300-400Hz – The cymbal’s body begins around 300Hz on the low end. Similar to the hi-hat, if we want to add body then a small boost works here. Conversely, cut here if your cymbals are lacking clarity.
Conversely, if your hi-hat is bland, too thick, and has too MUCH body, don’t be afraid to do a subtractive cut here at 400Hz to rebalance and better prop up the top end.
Cut at 400-600Hz – Snare bleed is a fact of life when dealing with the microphones which are responsible for picking up the cymbals. Sometimes I’ll cut in the 400-600Hz region to clean up boxiness, NOT on the cymbals mind you but on the included snare. That said, it helps to add some pleasant contouring to the sound of the cymbals to make a small cut here.
Dynamic Cut at 4k – Once again, some cymbals can be abrasive in that 4k region depending on a number of factors, in which case a dynamic cut will help you manage and smooth that out as necessary.
It’s important to mention that you should always have reference tracks in mixing to keep your ears trained on your goal. Reference tracks are useful for identifying all kinds of problems in your mix, but they’ll especially tip you off to the fact that your mix might be TOO bright. Without reference tracks for context, you can go ear-blind to the harshness that your cymbals might have.
When played back to back with your reference track, you can quickly determine if your cymbals (not to mention the rest of your drums) are sounding good and even sitting well in your mix.
Boost at 10k – To bring out some clarity and sizzle, try a small boost around 10k. While not normally an issue, if the overtones above the problematic tones I just covered are too harsh, you might need a tiny cut to smooth this region out, as well. Again, it will vary from cymbal to cymbal depending on so many performance, equipment, and room factors.
Low Pass Around 22k – Virtually the highest low pass filter I recommend, place this at 22k. Technically this is above the point of human hearing perception, so a wide and natural slope of 12dB/oct is apt.
Once again, if you’d like to download my free and complete drum EQ chart showing how to EQ every practical drum in your kit, do so here:
And one last time, remember this drum EQ chart is taken from my greater EQ cheat sheet, so grab that for free for tips on how to effectively EQ every single instrument and track in your mix.
And for what it’s worth, I’ve also put together a comparable (and free) compression cheat sheet which contains in depth guides on compressing every drum in your kit and track in your mix, as well. Grab them both for free with the links above and save yourself a ton of time in your mixes while you’re learning AND achieving professional level results… at least with regards to your mix’s EQ and compression!


Pingback: Drum Compression Chart - How to Compress Every Drum Guide - Music Guy Mixing
Pingback: How to Mix Drum and Bass to Sound Their Best - Music Guy Mixing
Pingback: Best Plugins for Mixing Drums (and How to Use Them) - Music Guy Mixing