
A big room kick is all about the body but doesn’t sacrifice its transient punch to draw the ear to the roundness of the rest of the tone. Let’s talk how to make a big room kick in your next mix, all in the box.
How to Make a Big Room Kick
There are a few key moves in how to make a big room kick, so let’s take them one by one.
The Sine Wave Kick Drum Trick
The trademark of a big room kick is a nice thick, fat body. While this can be done with a small boost around 65Hz like I show in my kick drum EQ cheat sheet…
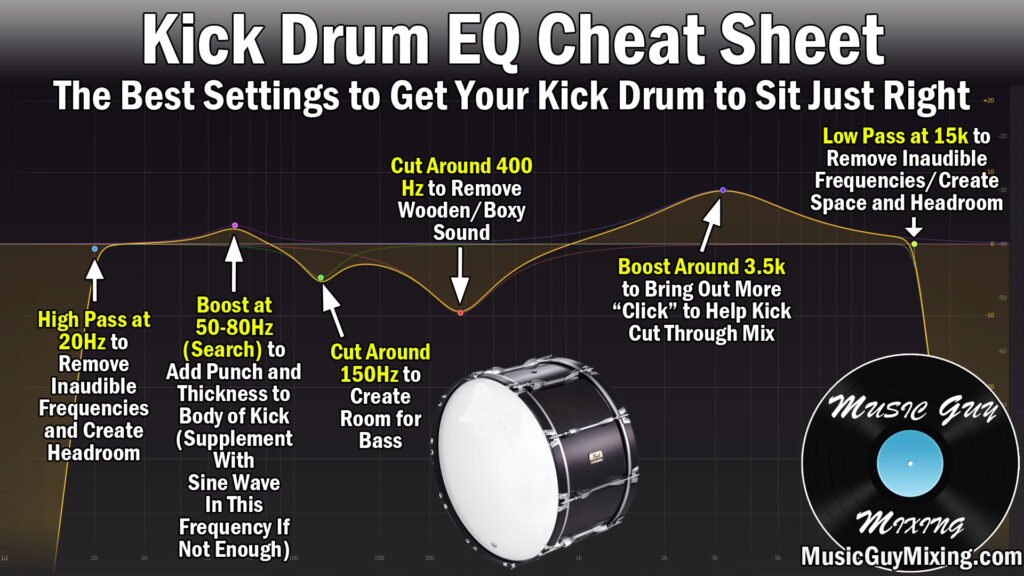
… I actually find that it’s more effective to supplement the body of the kick (like I mention in the above graphic).
This ensures we can bring in a nice clean sound that we want without muddying it in potentially bringing in some unwanted bleed or other room sounds which boosting via EQ on the kick risks.
If your kick was lacking that either based on what you recorded or the sample you’re using, you can supplement the body using the sine wave kick drum trick.
Step 1 – Create a Sine Wave Around 65Hz and Loop It
The sine wave kick drum trick works by mimicking the body of the kick and blending it in alongside to trigger when your kick triggers.
Every DAW is capable of creating basic sound waves by way of a stock oscillator instrument.
To create the sine wave kick drum trick, simply create a midi track and drop your DAW’s oscillator or specific sine wave “instrument” on that track.
Now create a low frequency sine wave and loop it.
The most common “note” to set the sine wave to is C2 which equates to a frequency of just over 65Hz. This is typically the same fundamental frequency of the body of a kick drum.
When you think of a kick drum’s sound, it’s a combination of the previously alluded to initial “punch” of the transient followed by the roundness of the body. That body is the low frequency thud which resonates around 65Hz.
You can either loop that sine wave or do what I commonly do which is creating a long single note which lasts the duration of the entire mix. I find this gives you a cleaner sound so you don’t hear or need to treat the initial transient of the sine wave as it loops each time.
This may or may not be a problem depending on the sine wave sound that you find in your DAW (whether it’s a preset or not, etc.)
Alternatively and if you wanted to, you could drop a compressor on the sine wave and set its attack to instant, dropping the threshold and maximizing the ratio. This combination helps to swallow up the initial transient so that it sounds like a long sustained rather than a loop.
Step 2 – Follow the Sine Wave Instrument With a Sidechained Gate
Once you’ve got your sine wave playing constantly throughout the mix, we need to control it so that we only hear it when the kick triggers.
This can easily be done with a noise gate – a stock plugin every DAW has which acts very much like a compressor with a threshold.
The difference is the track isn’t heard at all unless its level meets the threshold at which point the gate opens up and sound is allowed to pass through.
More to the point, they can also be sidechained to another source which the threshold applies to and effectively controls when we hear that initial track.
Gates have a lot of applications in our mixes, but in this case it’s to allow the sine wave to be heard when the kick triggers.
As such, the gate is on the sine wave but the “Audio From” should be the kick drum.
Step 3 – Adjust the Threshold, Attack, and Release Accordingly
Lastly, we need to set up the behavior of the gate.
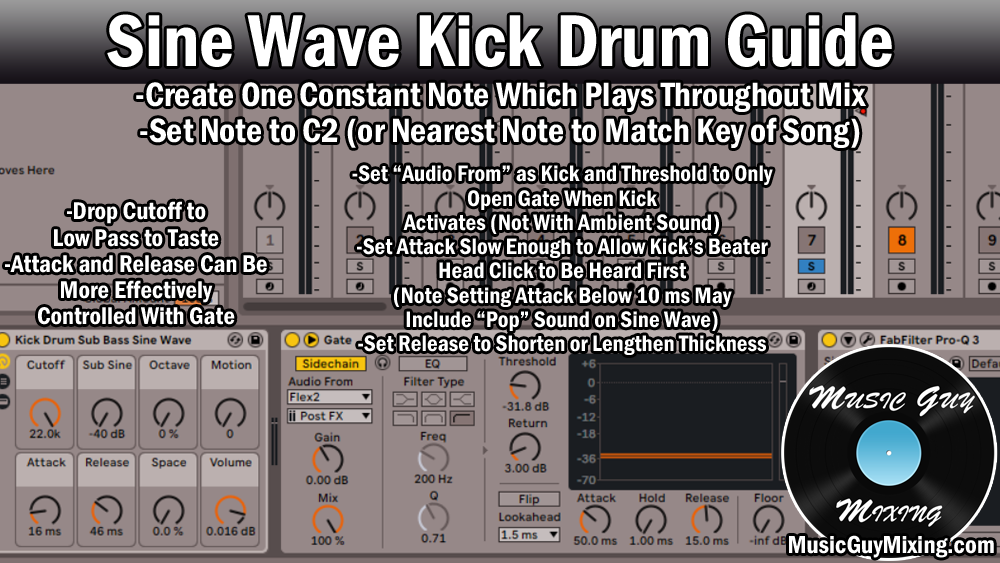
This first means setting the threshold to the quietest practical moment of the kick. Basically just find the quietest kick and set the threshold just below that. Setting it too low will cause the gate to accidentally open when ambient sound is enough to open that gate.
This isn’t an issue when your kick is from an isolated sample but more when you’ve got bleed like in the case of live recorded drums.
Incidentally, if your drums were recorded without a dedicated kick drum mic, make use of your gate’s high pass filter around 80Hz so that it’s only listening for frequencies below 80Hz to control its behavior. This will help it isolate the kick and separate it from the bleed of the rest of the kit, so only the kick itself will open the gate.
Regardless and getting back to it, setting that threshold accordingly ensures it only opens when the kick is playing.
You also want to delay that attack to at least 10ms or so. This delays the gate and thus the sine wave sound so that the initial transient punch of the beater on the skin of the kick (which would certainly open the gate) gets to come through clean and without competing with the sine wave. We want to hear the sine wave as part of the body, not suffocating the punch, and a short attack accomplishes that.
Setting the release to close that gate once again is mostly about feel as you don’t want it so short that it dies before the actual kick’s body, and you don’t want it so short that the listener hears it snap shut to abruptly cut it off.
In the interest of how to make a big room kick, you may want to favor a longer release so you get a thicker kick sound from that added sustain.
In the end, your sine wave kick drum setup should look something like this:
Step 4 – Blend the Sine Wave Level Accordingly
Tweak those three settings as necessary, then adjust the level of the sine wave relative to the kick to taste.
I normally encourage a more conservative blend for the sine wave for a more natural sound. As I usually describe it, it’s more about “feeling” the sine wave’s contribution to the body of the kick rather than hearing it.
In getting back to the point of how to make a big room kick, I would opt for a more aggressive approach and turn this up a few extra dB so that it’s clearly heard and missed when you mute it for comparison purposes.
The clean added body you get from this is huge in making a big room kick sound, so don’t sleep on this simple supplementary trick the next time you want a bigger sound.
Use Pultec Kick EQ Trick
Secondary to that, the pultec trick is always effective for further supplementing the meat of your kick.
This is a special analog modeled EQ plugin which allows you to simultaneously boost and cut the same frequency, and the results are especially effective when applying this to 60Hz on a kick drum:

Above pictured is the free PTEq-X, so grab this nice addition to your kick drum processing chain at no cost.
Drop this directly on your kick drum following your existing EQ and dial in the above settings. Even if you’re exclusively using it for this trick, it’s well worth it.
I like setting the boost and attenuation nobs each to 4, but you can go for a more aggressive adjustment on both (just make sure they’re equal for the full effect).
This adds a nice amount of thickness and energy to make your kick feel bigger in that low frequency body.
Add in Some Kick Reverb
Lastly, to make a kick feel bigger, you can add some kick reverb.
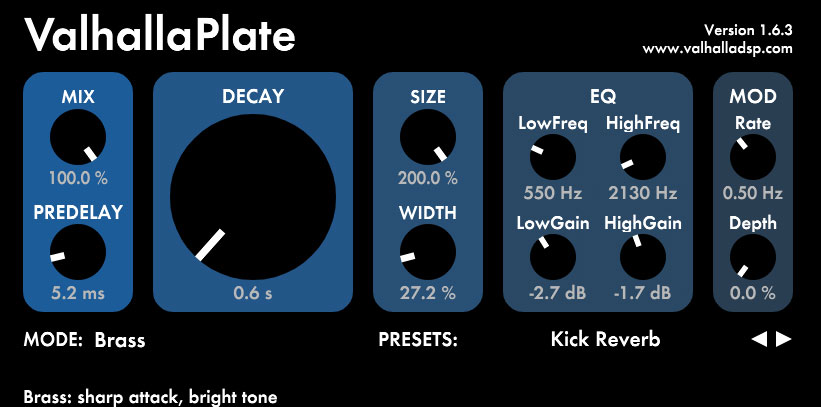
Below are my presets I like to dial in via an Aux/Return track with the ValhallaPlate plugin whose clean character works nicely in how to make a big room kick:
Alternatively and because we’re only using this reverb for the kick, you can drop the reverb directly at the end of the kick’s processing chain, albeit with a much lower Mix/Wet/Dry percentage.
Now exactly HOW big you want to make your big room kick can be adjusted by way of the decay for more of a tail and more of an effect. You can adjust the size and width to taste; typically when we think kick we think center and narrow, but if you want a bit more size, adjust these (or your reverb plugin of choice) accordingly.
How to Make a Big Room Kick
- Adding to the “meat” that is the body of your kick is the best way in how to make a big room kick.
- While you can boost your existing kick in its roughly 65Hz body fundamental frequency, you’re typically better off supplementing it with a clean low frequency sine wave.
- Drop a clean sine wave by way of your DAW’s oscillator and create a long solid or looping C2 note.
- Follow that sine wave with a gate directly on the track and sidechain it to your actual kick (whether it’s a sample, an isolated live kick, etc.)
- Remember to use the gate’s high pass filter and set it to around 80Hz if you don’t have an isolated kick on its own track – this ensures the gate only listens for the body of the kick to open up and allow the sine wave through.
- Use an attack of at least 10ms if not more to allow the actual kick’s transient punch to come through cleanly before the sine wave is heard to supplement the body.
- Drop a free pultec EQ plugin on your kick drum’s processing chain after the initial EQ and simultaneously boost and cut at 60Hz for added thickness and energy.
- Create an Aux/Return track an drop a reverb (plate works well) with a 600ms decay/time to give that kick more space in the room, adjusting the size and width to taste.
