EDM is a percussion and bass-centric genre and begins with the low end and goes out from there, but beyond that there are a lot of things you can do to get your EDM mix sounding its best. Let’s cover 11 tips for mixing EDM for better, professional sounding results all DIY.
11 Tips for Mixing EDM

Let’s more or less go in order from start to finish with regards to these 11 tips for mixing EDM.
Have Good Monitors and/or Mixing Headphones
Beginning with an obvious but very notable one, mixing EDM especially requires you to be able to accurately hear and decipher what’s going on in your mix’s low end.
While good monitors are essential for hearing your mix in an acoustic environment (see where to mix music), I find that it’s easier and more effective to check the low end and get that balance right using headphones which obviously have a good low end response. You don’t need to break the bank on a decent pair of mixing headphones – I’ve had the same pair of Audio Technica M50Xs for years.
Use Reference Tracks
Secondly, reference tracks are as invaluable in mixing EDM as any other genre, maybe more so as you can compare that low end and kick bass and sub balance to guide your mix accordingly.
Just take a professional mix/song which both you like the sound of as well as want your mix to sound like. Ideally you have a WAV of that mix to actually drag and drop into your mix for quick A/B split testing. I find this is more efficient than simply having that mix cued up on your music streaming service of choice.
Place that mix’s WAV on its own track, and set up a hotkey to solo it in your DAW to instantly reference it as you bounce back and forth. Just make sure you have it on an external track and one that’s not feeding into the master or any other busses which might affect its sound.
You can even put an EQ filter on it so that you can specifically monitor what its low end sounds like in relation to yours, something I’ll talk more about in a moment.
Regularly checking your reference track keeps you dialed in and focused on your goal at all times, so don’t sleep on the value of this tip in EDM mixing even if you’ve heard it many times before.
Gain Stage Everything at the Start
Before you do anything else, do yourself a huge favor and gain stage the tracks of your EDM mix. This is the process through which you adjust the gain of the clips of the tracks themselves or simply drop a gain plugin on each track before any other effects in order to get their input levels to an ideal level (if necessary):
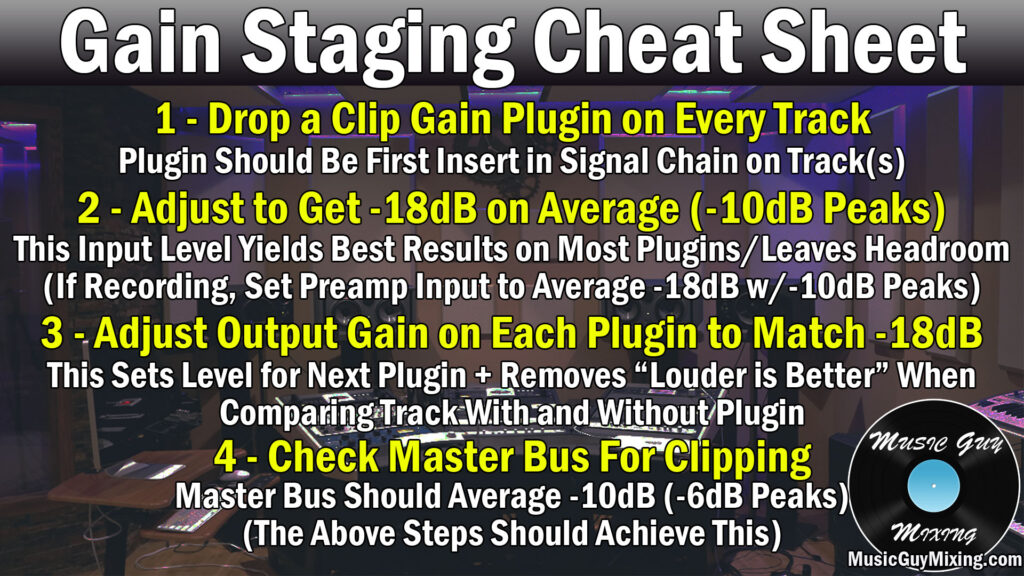
Ideally gain staging was observed during the recording stage so that anything which was organically recorded was recorded to aim for that -18dB average with -10dB peaks.
If you’ve got a lot of non-previously recorded midi tracks, you can easily adjust the levels of the instruments themselves to hit those targets.
Essentially gain staging is essential for both feeding optimal levels into plugins in your processing chains for each track to get the best sounding results. This applies to the start of your signal chain as well as throughout, so make it a point to adjust the output gain for every plugin post-processing to maintain gain staging.
Gain staging also keeps the overall level of your mix at a more responsible level so there’s plenty of mixing headroom to create a better sounding louder master when all is said and done, one which is completely devoid of clipping and other unwanted audio artifacts.
Sidechain EQ Your Bass to Your Kick
I’ve alluded to it multiple times, but the low end in mixing EDM is the most important aspect to getting your best possible sounding mix.
A big part of that is getting the kick and bass or sub bass to work cohesively together, and part of that is sidechaining your bass to your kick.
This involves dropping a compressor on your bass or sub bass (or both), accessing the sidechain area and designating your kick as the controller. This means that the threshold of the compressor is controlled by the kick so that when it triggers, the bass is compressed accordingly in those split seconds:
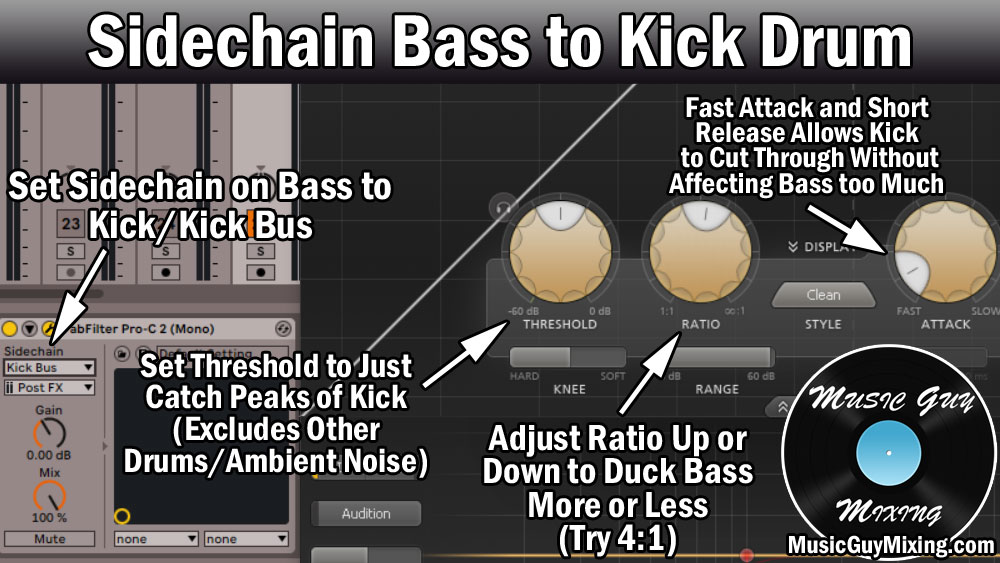
This ducks the bass out of the way to give the kick dominion over the low end’s frequencies for those split seconds when it triggers, giving you a much cleaner sounding low end and mix overall.
While you can use a compressor to do this, I oftentimes prefer a more surgical approach of just targeting the shared fundamental frequencies of the kick and bass or sub bass in that 50-80Hz range.
You can do this with sidechain EQ, using an EQ plugin which has dynamic band control like my favorite FabFilter Pro-Q 3 or a free option like the best free EQ plugin in TDR Nova.
It’s virtually the same process as we once again activate the sidechain for the dynamic band we’ve created at the fundamental frequency of the kick (typically around 60-70Hz) and adjust the band’s threshold to get the amount of ducking that we want accordingly.

My low end mixing tutorial is especially apt for a low end essential genre like mixing EDM and covers a number of the aforementioned tips, as well as a couple we’ve yet to get to:

High Pass Everything
Speaking of that low end guide, another essential part of getting your low end sounding its best is to free up those fundamental frequencies across your entire mix for just the instruments which need them in the kick, bass, and sub bass.
This means we should drop a high pass filter on virtually every single track in our mix in order to remove non-musical or nonessential frequencies as well as noise from the majority of our mix.
A high pass filter is just that – a filter to remove everything below a certain point while allowing the higher frequencies about that point are untouched:

As mentioned in the graphic, 100Hz is a good starting point for most tracks. We can actually go decently higher on a lot of tracks and types of instruments.
A good rule of thumb is to set it around 100Hz and sweep up until you hear the sound of the track noticeably change, then roll it back by 10Hz or so.
Not only will this clean up your low end, but this helps to clean up mud across your entire mix as I mention in one of the many ways to clean up a muddy mix.
This helps your EDM mix hit harder across the low end, mids, and higher frequencies.
Sum Your Kick and Bass Together
I mentioned using a reference track to get an excellent and practical taste of what your low end should sound like, especially isolated when you apply a low pass filter around 200-300Hz so you can exclusively reference the low end of your mix versus the reference track.
This helps you strike the right balance in particular in setting the levels of both tracks relative to one another, especially after you’ve got the aforementioned sidechain processing working.
Once you’ve got that balance, I like to create a bus which has the kick and bass (and/or sub bass) flowing into it, summing them together.
This allows you to bring the most essential component of your entire EDM mix up or down as necessary.
I also like a little glue compression works on this bus with a 4:1 ratio to do just that in gluing these two together to get them to gel better together. Set the attack to around 3ms with an audio release and a threshold to achieve 1-2dB in gain reduction max.
It’s likely that your DAW features a VCA style compressor like Ableton Live’s “Glue Compressor” – one Ableton’s stock plugins which is perfect for creating that cohesion.
Use Aux/Return Tracks for Cohesion
Speaking of cohesion, in EDM mixing I like to use a number of Aux tracks (return tracks in Ableton) in order to apply the same effect(s) across multiple tracks.
This kind of macro-level parallel processing can be used in a number of different ways.
We have a more practical “effect” like parallel compression which simply allows us to thicken out and add energy which is blended in to multiple tracks to taste.
Just create an Aux or Return track in your DAW, drop your compressor plugin of choice on it, then dial in these parallel compression settings:

Now it’s just about turning up the respective send dials for any tracks you want that extra push to taste.
A nice effect for creating cohesion, though, is parallel reverb dropped on an Aux or Return track. Drop your reverb plugin of choice on one of those tracks with these best reverb settings:

A lot of plugins allow you to set the predelay and size/time settings to match the BPM of your song like the pictured FabFilter Pro-R 2 to keep the timing tight and in sync.
When we apply this to multiple tracks in our mix, it gives them the effect that they were all recorded/exist in the same space, giving our EDM mix a wonderful sense of natural cohesion.
It always bears worth mentioning that when you’re using any effect on an Aux/Return capacity that you need to turn the Wet/Dry parameter to 100% wet so that the send dials are exclusively blending in the effect rather than any more of the dry instance of any tracks. In actuality, it’s the send dials which now control that wet dry blend for their respective tracks.
Use Sidechain Reverb
Another key to EDM mixing is keeping everything clean while still enjoying some reverb size on the backend which we can do with sidechain reverb.
This means including reverb on a track but ducking it out while the audio itself is playing. Once the audio stops, the tail of that reverb asserts itself, keeping the audio itself clean while giving you some added length on the backend or simply an interesting aesthetic bump to your track.
I like this on my snare in EDM mixing in particular, used with subtlety, to add a little sustain on its tail.
To do this, Aux/Return tracks aren’t always practical because I’m typically dialing in the settings for a very specific track. This certainly applies to the threshold on the compressor itself which is being controlled by the specific track I’m creating this for.
This is why I prefer creating an audio effect rack in the case of Ableton, allowing you to do unlimited parallel processing on the track itself as an insert:

Here I’ve dropped a reverb plugin followed by a compressor on my lead vocal, then grouped them together to create an audio effect rack. I then create a second “chain” to represent the “dry” instance of my audio so that the parallel reverb setup has its own chain. The compressor is using the track its on as its threshold, but by virtue of the setup of the audio effect rack, it’s just affecting the impact and behavior of the reverb.
I can adjust my sidechain reverb’s influence on my vocal now by simply adjusting its respective gain control, typically dropping it by 10dB as a starting point then blending to taste (I’ve got it at -8dB in the example above).
Refer to my tutorial on sidechain reverb for a more thorough explanation and walkthrough of the process, but it works nicely on certain tracks, especially those with very simple dynamic behavior like the aforementioned snare.
Mix in Mono
I know, I know, probably a roll-your-eyes-tip here but mixing and referencing your EDM mix in mono is essential for identifying frequency conflicts so it’s well worth mentioning.
As a general rule for mixing all genres, I’ve got my audio panning guide which gives suggestions for how to separate the different instruments in your mix:

This isn’t just for creating a nice, wide mix, but it’s for separating instruments which share similar fundamental frequency ranges. Sometimes you just can’t separate tracks in your mix, however, like in the case of the kick, bass, and sub bass which is why we needed to make use of sidechain compression or EQ earlier.
Mixing in mono forces every track to the center, allowing you to:
Identify and Resolve Frequency Conflicts
Identify and resolve frequency conflicts. I just mentioned this, but when you have two tracks panned in the same area which share the same frequency range, you’ll find one or both of them aren’t hitting as hard in the mix as you’d like or expect. This is much easier to identify in mono. Separating these by moving one to the other side, pushing it farther back by way of inserted, tailored reverb specific to that track, or using sidechain processing will help resolve that issue.
Create Better Depth
Create better depth. I just mentioned reverb, and when you have everything on top of each other, you can more effectively use reverb to separate those tracks. Remember that the better your EDM mix sounds in mono, the dividends it pays means your mix will sound even better in stereo.
Identify and Correct Phase Issues
Identify phase issues. Any source which is recorded with more than one input simultaneously opens the door to potentially being recorded out of phase as the audio is received at slightly different times. Even a difference of a few milliseconds can show up in the mix. In a mono mix, you can hear the effects of phase issues as one or both tracks will sound weaker or muted altogether in the case of phase cancellation. Be especially aware of any sources which were recorded with two or more inputs at the same time when it comes to phase issues, and see my tutorial on how to get in phase audio.
Experience Your Mix How People Will Hear It
Experience your mix how many people will hear it. While we’d like everyone to hear and experience our mix in an ideal setting, that’s rarely the case. People listen to music in all kinds of environments and on all kinds of setups. It’s rare when someone is sitting right between a part of quality speakers to take in your mix as intended. The better your mix sounds in mono, the better prepared it will be to be played in any and all setups and situations.
The long and the short is reference your mix in mono from time to time. Similar to having your reference track on a hotkey, have a utility style plugin on your master bus which allows you to force your audio into mono with a hot key to check it on and off.
Process Your Master Bus for Cohesion
I talked earlier about using reverb as sends in order to create cohesion as you’re putting multiple tracks in the same room with that same setup.
Somewhat in the same vein, any and all processing you apply on a master bus level will create cohesion by virtue of uniformly affecting every track simultaneously.
I put together an entire overview on how to process your master bus, and a few options include:
Multiband Compression
While I’ll talk about a single, across the frequency scope compression option in a moment, multiband compression can create a little glue to achieve roughly 2dB or less per band:

As you can see, it’s all sub 2:1 ratios, so we’re talking just a subtle kiss of smoothing across the entire spectrum.
One advantage of multiband compression on your master bus is you can swap out the recommended ratios of the mid and high-mid bands in order to get a brighter or warmer sound as you like, lightly inching the overall profile of the entire mix to taste.
Saturation
With regards to slightly nudging the entire profile of your mix, a bit of saturation can warm things up on the master bus, as well.
Here are the settings I like on the mix/master bus:

As with any processing on the master bus, subtlety is the key and a little bit goes a long way. No filtering is being done here obviously, just a touch of drive, and the mix percentage is around 35% which seems like a lot but with the rest of the settings being close to non-factors, it works well. This gives your mix that touch of analog warmth which a lot of EDM mixes are lacking or in need of.
Alternatively, you can tweak the “Tone” knob (in the case of Decapitator – part of why I love it) to gently nudge the mix into warmer or brighter territory, as well.
Glue Compression
A VCA compressor is ideal for unity and cohesion. I especially love the Waves SSL G-Master Buss Compressor on my master bus in that role in either a 2:1 or 4:1 ratio to achieve 2-3dB in gain reduction on the peaks by way of the threshold with a 3ms attack and auto release:

We even have the “Analog” button for a bit of that low-level analog noise if you like (I typically leave it off, but it’s there).
Reverb
If you go for a pair of reverb plugins, one shorter and one longer on your Aux/Return tracks, you might apply my best reverb settings from earlier here, albeit at a much lower Wet/Dry percentage.
whenever I use reverb on the master bus, I keep that percentage below 10%, if not below 5%. Make sure to high and low pass it, as well. The Abbey Road Reverb trick works well in this context:
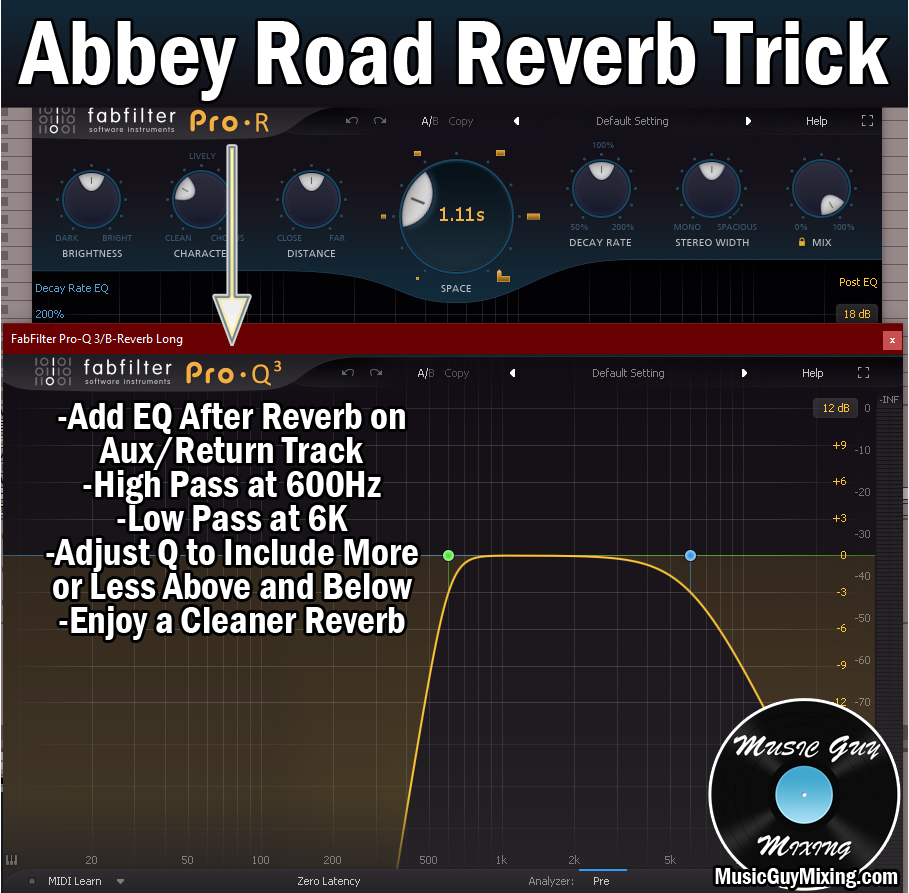
This helps to keep the low end and those mud-leaning low mids especially clean.
Stereo Imaging
Stereo imaging plugins like Izotope’s Imager allows you to easily manipulate the width of your EDM mix by band:

While you likely don’t want to affect anything below 100-200Hz, I like a touch of width in the higher frequencies for a subtle touch of added clarity like shown with the settings above.
Again, whatever processing you add to your master bus, remember its effects will be much more palpable than if you added the same effect to an individual track or smaller bus, so keep it conservative.
Reference Mix in Different Environments and Settings
Lastly, I talked about this when addressing the importance of mixing or checking your EDM mix from time to time in mono, but people will be hearing your mix in all kinds of environments and through all kinds of setups.
Therefore, it behooves you to reference or play back your printed mix in all kinds of settings. Listen to it in the car, listen to it on your phone (with and without headphones), listen to it on different speakers all around the house or apartment.
You never know when you might hear something in one setup which you didn’t hear anywhere else which you can take with you when you get back into the mix for an adjustment.
Just remember when you listen to your mix in each environment that you listen to reference tracks in that same environment, especially if you think you hear something popping out that you weren’t hearing elsewhere.
Odds are it’s a product specific or unique to that setup and you’ll hear something similar on the reference track so that you know it’s not a legitimate issue in your mix.
But there you have it, 11 tips for mixing EDM which you can bring into your next mix for getting instantly better sounding results.