
While mixing in mono is a great way to address frequency issues to get a cleaner, more open mix, panning takes this to the next level. Every time I sit down to do a mix, these are the general audio panning rules I follow to get a wide open, spacious, clean sound.
Audio Panning Guide
This audio panning guide can be used as a great starting point for your mix. Afterwards I’ll go through each instrument type to explain where I recommend panning them.

Drum Panning
Like with most mixes, I typically start with the drums. This establishes the rhythm and backbone of your song so I like to make sure the drums are EQ’d (see how to EQ drums) and panned properly.
I did an entire drum panning guide, but here is the overview:
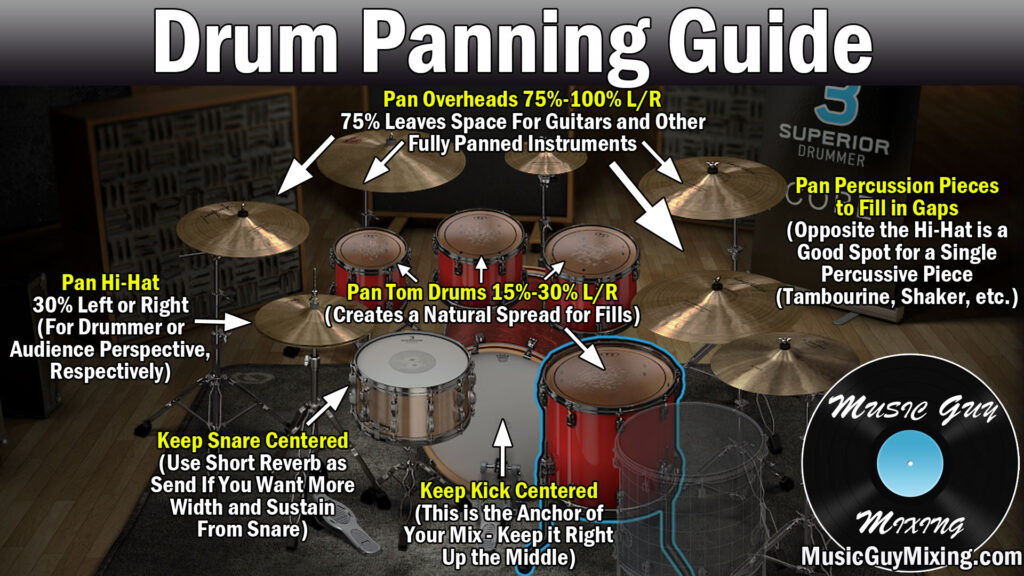
Kick
You want your kick right down the center.
Low end heavy instruments like kick and bass in general should always be in the middle of the mix to keep everything grounded.
Snare
The snare is also essential for keeping time and driving your mix forward, so we want this panned in the center, as well.
Hi-Hat
The hi-hat works well when panned 30% left or right.
Which side depends on taste. If you want a right handed drummer’s perspective then you’ll want this on the left. If you want it from the audience perspective to simulate how it would be live, you’d pan it right.
One of the most important rules with audio panning is you want to achieve balance with your panning. If you’ve got something which is high-mid frequency heavy on one side, you probably want to balance another high-mid frequency heavy instrument on the opposite side.
Because we’re starting with the drums, the decisions we make here like with the hi-hat will affect the rest of our decisions. At the moment just decide which side you want the hi-hat on (30%).
Listen to some of your favorite songs as references to hear how others pan their hats. This is good advice for panning in general.
Toms
I like to create a little natural stereo spread by panning the toms 15-30% around the center, one side to the other.
When we get a tom fill, you get a cool natural stereo effect of hearing the size they cover in the mix.
Overheads
Speaking of natural width, the overheads give our mix a lot of stereo space.
I like to pan the overhead pair typically 75% on either side so the cymbals contribute to that stereo field.
You can go wider, but I oftentimes like to save to extremes for guitars and other instruments.
Percussion
Tambourine, shakes, conga drums, whatever you have, I typically like to balance this against the hi-hat on the opposite side. We can pan these after everything else in the mix and just try to fit them in wherever we have space leftover.
Bass Panning
There’s not really any surprises or anything flashy here. I just mentioned we want to keep our low heavy instruments like the kick and bass in the center.
Whenever the bass is off center, I find the mix tends to lose focus.
Make sure you know how to EQ bass and how to compress bass guitar so that it’s sitting just right in the middle alongside the kick.
Vocal Panning
How you pan your vocals depends on how many vocals you’re working with.
Lead Vocal
The most important elements of your mix should always be in the center. One last time (I promise), this is your kick, snare, bass… and of course your lead vocal!
The lead vocal should almost always be right down the middle.
The exception?
When you’ve got double tracked vocals and want to pan each one hard left and right. This is a very specific aesthetic which I covered in my tutorial on how to mix double tracked vocals.
Backing Vocals
Backing vocals are when we can create a little space with our vocals.
I did an entire guide on panning backing vocals; here’s an overview:
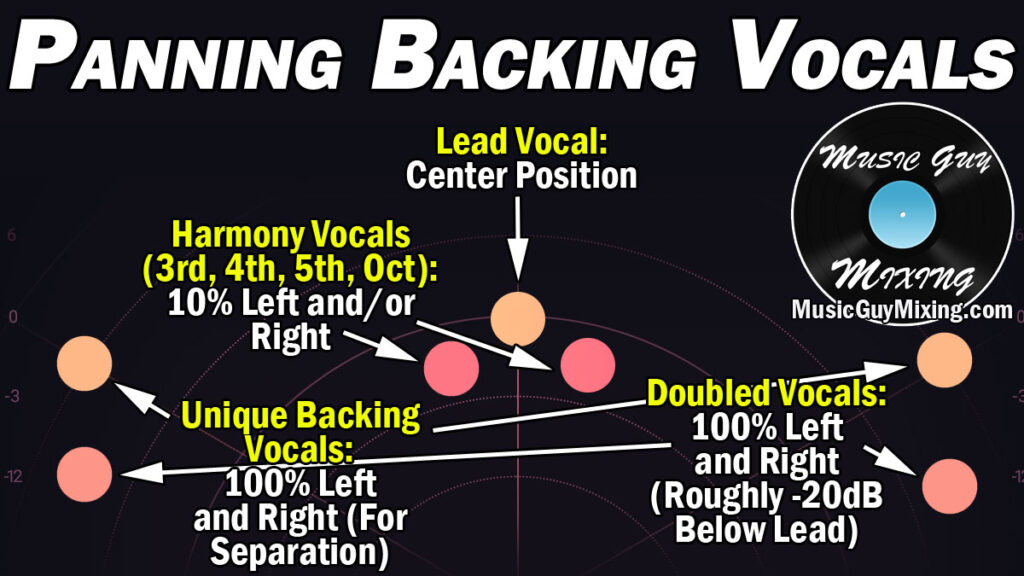
Harmony Vocals
Harmonies are vocal melodies which match the timing of (typically) the lead vocal but hit different pleasing notes in the same scale, commonly 3rds or 5ths.
The beauty of harmonizing vocals is in how they blend with the lead.
I find that if you pan harmonies too far off from the lead, you begin to lose the effects of that blend.
As such, I recommend panning your harmonies slightly off center. This creates a little space to give the lead vocal dominion over the center while keeping that lovely blended effect.
Doubled Vocals
Again, I covered this in my guide on double tracked vocals, but if we’re not doing the aforementioned hard panning of the lead on either side, I like to bury my doubles (ideally triple tracked vocals so you have two doubles of the lead) hard left and right, 20dB UNDER the lead.
This creates a subtle but useful thickness and width for the lead vocal in more of a sense, less heard effect.
Unique Backing Vocals
Unique backing vocals I also like to pan wide and far from the lead. Oftentimes these vocals are in a similar register as the lead. Without stepping on that lead and to create as much separation to give this unique part its own space, I like to pan this relatively hard left or right.
This is context based, so it depends on what else you have going on and if you have multiple unique vocals going at once, but the more separation you can create, the less chaotic it will be when you have multiple vocals at once.
Guitar Panning
Once we get into guitars, we start to get more into the “to taste” realm of panning. I’ve also already panned the drums, bass, and vocals at this point, so I’m starting to get to the point of filling in spaces where I have them.
Rhythm Guitars
Panning rhythm guitars hard left and right is a tried and true method. This works well with double tracked guitars playing the same part to create width and thickness in a wall of sound.
This ALSO works well if you’ve got two guitars playing different parts for rhythm.
Lead Guitars
Lead guitar is a subjective term. If we’re talking a solo, I like the lead guitar in the middle. This is typically assuming there’s no vocal playing and we’re in an instrumental moment.
In this case, the solo guitar is taking the place of the lead vocal and as such should take center (or just off center) stage.
If it’s more of a riff, I’ll fit this in roughly 50% left or right. This is context based, so it depends what else is playing at that time.
You can play a guitar playing riffs against the hi-hat, meaning you’d pan it on the opposite side at roughly the same position. You can also play it against another guitar playing riffs.
Again, if we have two or more instruments working in similar frequency ranges which is certainly the case with two guitars, we need to keep them spaced apart in the mix to keep them from stepping on each other which can cause a muddy mix.
Piano Panning
Piano is one of the instruments where the panning comes down to how you recorded it and the context of the mix.
If you have a relatively sparse mix, like a typical Adele mix where it’s percussion, piano, and vocal, the piano would ideally have been recorded in stereo so you can utilize the natural width of the 88 keys of the piano, panning the microphones hard (or close to hard) left and right.
Conversely, if you’ve got a busier mix and that piano is more of a supporting piece, you’ll want to pan it somewhere between center and one side.
If you have a stereo piano track in this case you may want to reduce the width of it using an Ableton Live Utility style plugin because a cluttered mix doesn’t have room for a stereo piano.
You may also need to EQ your piano more tightly to accommodate the rest of the instruments in your mix in this case.
Synth Panning
While we’re at it, the same rule applies to a synth. We all love a lush and wide synth pad on its own, but in the context of a busy mix this can quickly clutter everything up to a fault.
For more of a synth lead, I follow the guitar panning guide, basically putting a lead in the center and a riff midway on one side.
Hopefully you’re getting the idea that outside of the more common and important elements of our mix in the drums, bass, and vocals, much of the audio panning is situational.
The more tracks you have, the more calculated your audio panning decisions need to be.

Pingback: How to Mix Acoustic Guitar - The Perfect Sound Every Time - Music Guy Mixing
Pingback: Snare Reverb - The Best Snare Reverb Settings to Use - Music Guy Mixing
Pingback: 7 Tips For Mixing Snare Drum for Better Results - Music Guy Mixing
Pingback: 5 Stereo Imaging Techniques to Improve Your Mixes - Music Guy Mixing
Pingback: Bass Guitar Frequency Chart - Every Important Frequency to Know - Music Guy Mixing
Pingback: Guitar Frequency Range Chart - Every Important Frequency to Know - Music Guy Mixing
Pingback: How to Mix Guitar - My Guitar Mix Chain for the Best Results - Music Guy Mixing
Pingback: How to Get More Mix Width - Wider Mix Tips - Music Guy Mixing
Pingback: How to Set Your Mixing Levels - The Perfect Balance - Music Guy Mixing
Pingback: A Guide to Mixing Kick and Bass - How to Get It Right - Music Guy Mixing
Pingback: What is Stem Mastering (And Why You Might Want It) - Music Guy Mixing
Pingback: Where to Pan Acoustic Guitar in the Mix For Best Results - Music Guy Mixing