Anytime you capture the same audio source with two or more inputs, you’re potentially inviting phase issues into the equation. Let’s talk how to get in phase audio and point out how to recognize the telltale signs of OUT of phase audio.
What is In Phase Audio

In phase audio means that the audio of two or more tracks which are representing recordings of the same source, albeit through different means of recording/capturing it, are in sync with regards to the peaks and troughs of the waveforms of both tracks.
As I just mentioned in opening, using two or more means of recording the same audio simultaneously leaves the door open for phase issues, meaning the two tracks can be out of sync.
What accounts for this? As I covered in my overview on what are phase issues, these occur because sound doesn’t travel instantaneously. While it moves incredibly fast, or roughly 343 metres per second, the difference of a foot or even a few inches between two microphones relative to their source can result in a tiny difference in the smallest increments of sound, samples.
Here is an illustrated representation of the waveforms of two tracks representing the same recorded source, albeit with two different inputs/microphones:
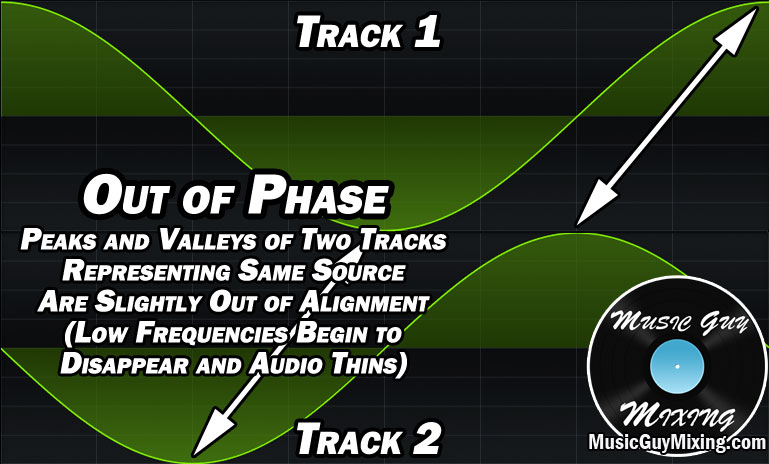
As you can see, the peaks and troughs/valleys of the waveforms are slightly off sync with one another. This manifests as lower frequencies beginning to disappear, thinning the combined audio when the two tracks are played together, particularly when played back/mixing in mono.
Fortunately, there’s something we can do to get in phase audio when it’s slightly or completely off (as in the case of phase cancellation).
How to Get In Phase Audio
First, it’s an important reminder to remember to check your audio’s phase anytime you have two or more tracks representing the same recorded performance.
Examples of commonly out of phase audio include:
- Using two or more microphones to record an acoustic guitar.
- Using two or more microphones to mic a guitar cabinet.
- Using two or more microphones to record a drum kit.
- Using a microphone and a DI track in the case of guitar, bass, or other instruments.
- Recording one or more singers with multiple microphones.
When you know you’ve multiple tracks representing the same source, it’s a good idea to force your entire mix to mono on the master bus (see how to check your mix in mono).
Solo one of the affected tracks, then add in the other track(s), paying attention as you do it to hear if or how the tone changes.
If it gets darker which isn’t just a product of the other track being darker on its own or sounds thinner all of a sudden, that’s a telltale sign of a phase issue.
If the audio is muted altogether when you add in that second track, that’s a sign of phase cancellation, meaning the peaks and valleys of the audio are completely 180 degrees out of alignment, thus cancelling one another out, resulting in silence:

If you’ve got phase cancellation, you can simply invert the phase which flips the waveform by 180 degrees, so the peaks are where the valleys were and vice versa.
In the case of 100% phase cancellation, this will perfectly align the one track with the other, resulting in a much brighter and more powerful combined sound.
If it sounds like it MIGHT be getting a little darker when add in the second track in listening in solo, but you can’t rule out the possibility of the other track just being darker in nature, there’s zero shame in using your eyes.
Put the two tracks next to one another then zoom in and look at their waveforms to see if their peaks and troughs are in sync. Ideally track one will be peaking at the same point as track 2.
This is what in phase audio looks like when zoomed in all the way to see the individual waveforms on a sample to sample level:

Specifically I like to go to the very start of when the audio begins to play so I can be sure both tracks are in sync at the RIGHT time and not just incidentally aligning in the area I’m looking at midway through the track.
While you can use a tool like Waves’ InPhase for this

… it’s very simple to just, if they’re out of sync at the start, to just manually pull one track a millisecond or two in either direction to be in sync with the other track.
You’ll notice now if you play it back and undo/redo the change as it plays, the tone will go from darker, duller, and thinner to brighter and fuller as you engage that adjustment.
Repeat this process on any and all examples like those I cited above to quickly get your audio in phase in your mix.
Remember that it doesn’t just apply to sources recorded with multiple microphones; DI versus miked audio is oftentimes out of sync so it deserves to be checked just as if you did record that source with two or more mics.
After repeating this process on all instances of sources simultaneously recorded with multiple inputs in your mix, if you quickly undo then redo those changes while playing back in mono in particular, you’ll notice a HUGE difference in the clarity for the better across your entire mix.
So next time you don’t take the time or feel like taking the time to check for phase issues on the in, know that you can address and fix these potential issues after the fact, getting your audio in phase in seconds!
Incidentally, it’s a good idea to always check for phase issues after the fact regardless, even if you were conscious of this while setting up the mics before recording.