
Reverb is an excellent effect to simulate depth in your mix which wasn’t there during the recording. We can use it to create space, resulting in a larger and more open mix. If I can only have one reverb for my entire mix to send tracks to, these are the best reverb settings I’ll take every time for any mix.
Best Reverb Settings
So when I say the best reverb settings, I’m talking practical settings you can dial in to any reverb to get good results across your entire mix. Note that every reverb varies in the onboard parameters it features. Specifically when I share what I believe to be the best reverb settings, the ones I have saved as a preset to bring into every mix of mine, I’m using my favorite reverb, FabFilter’s Pro-R 2 to demonstrate it. Your settings may vary slightly, particularly the ones for adjusting specifics for the color of the reverb, and while I offer some tips below, this can be adjusted to taste.
The most important parameters are the universal ones featured on every reverb like pre-delay, size/decay, width, (and as an aside, filtering the reverb).
With all that in mind, here are my favorite reverb settings, the ones I begin (and sometimes end) with in EVERY mix I do:

Let’s go through each of these settings ones at a time to better explain why I recommend what I do, what you may need to change in your mix, etc.
Size/Decay
This is typically the most instrumental of all of the reverb parameters. Sometimes it’s called “Size”, sometimes it’s called “Decay”, in the case of Pro-R 2 it’s referred to as “Space”. This is because it’s setting the type of room you’re emulating via the reverb.
Around the dial, Pro-R 2 even gives you, rather intuitively, different sized buildings. The more the turn the dial to the right/clockwise, the larger the buildings get as we’re emulating larger and larger spaces.
Larger spaces are represented by longer decays/larger numbers in seconds on reverbs because it takes longer for the sound waves to reflect off of the walls in a larger space.
Typically and practically, we want a decay time on virtually every reverb we use between 0.5 and 2 seconds. Anything longer than that and you’re getting into very specific and unrealistic sounding effects which are more for ear candy, vocal throws, things like that.
As you can see, I like the relatively longer time of 1.85 seconds as I find this longer tail gives my tracks an extra bit of pleasing depth.
This is an excellent point to mention that we’re using our reverb in this context as a send rather than an insert.
In other words, we’re creating an Aux/Return track (the name will vary between those two depending on your DAW), dropping our reverb with these settings on it, then blending in the amount of that reverb we want on each track in our mix to taste via their respective “Send” knobs.
Not only does this allow us to vary as much of this reverb as we want from track to track, but it allows us to blend in that SAME “room” sound to every track in our mix if we so choose. This gives every track which we blend this reverb into a sense of cohesion, making them sound more like they all exist in the same space which makes the entire mix sound better.
I generally blend in reverb with subtlety in this way, so even a relatively longer decay and reverb fade of 1.85 seconds works well.
If that decay feels too long in your mix, try halving it to roughly 0.95 seconds as this essentially aims for more of a 1/2 note in length.
You can match up your decay time mathematically to fit your song’s BPM using this calculator which tells you the exact time whether you want it to match a quarter note, half note, or full bar.
If it feels like the reverb is standing on top of the next word (in the case of vocals), next hit (in the case of a snare – though I have a specific snare reverb settings guide), then try for one increment smaller in the context of your song’s tempo.
Pre-Delay
Pre-delay on reverb refers to the amount of time before that reverb triggers. Putting this at the minimum time means there’s zero separation between your dry audio and the reverb signal. It’s important to use some pre-delay on your reverb as this helps create that separation and some contrast between the dry and wet instances, not to mention it helps to preserve.
More than that, the pre-delay helps to characterize the size of the room as a longer pre-delay means it takes longer for that sound to be reflected in that room and return to you, thus emulating a larger room.
As far as the best reverb settings goes, I typically aim for somewhere between 8 and 20 milliseconds, favoring the lower side if I’m going for a decay time closer to 1 second and the higher side if my decay is closer to 2 seconds.
It’s worth noting that the calculator I linked to also tells you the what pre-delay to set if you want to match the timings of your reverb to your song’s BPM/tempo.
Color/Tone
This is the most subjective and varying parameter(s) on your reverb. Most reverbs feature some controls to tweak the character, color, and or tone of your reverb. I prefer to keep my reverb sounding clean tonally, but not to the point of thinning it out.
Specific to the FabFilter Pro-R 2, I like a “Character” of 61%, “Thickness” of 21%, “Distance” of 41%, and “Brightness” of -34% to accomplish this.
All of this together helps to keep the reverb natural sounding while giving me that clean but solid sound.
Filtering our reverb also plays a huge role in shaping the color.
Filters
Regardless of the settings you just dialed in, it’s important that you low pass and especially high pass your reverb in order to avoid one of the major causes of a muddy mix.
I generally stick to the Abbey Road Reverb trick which is a technique popularized by the engineers at Abbey Road in the 1960’s who worked with the Beatles and countless other popular acts.
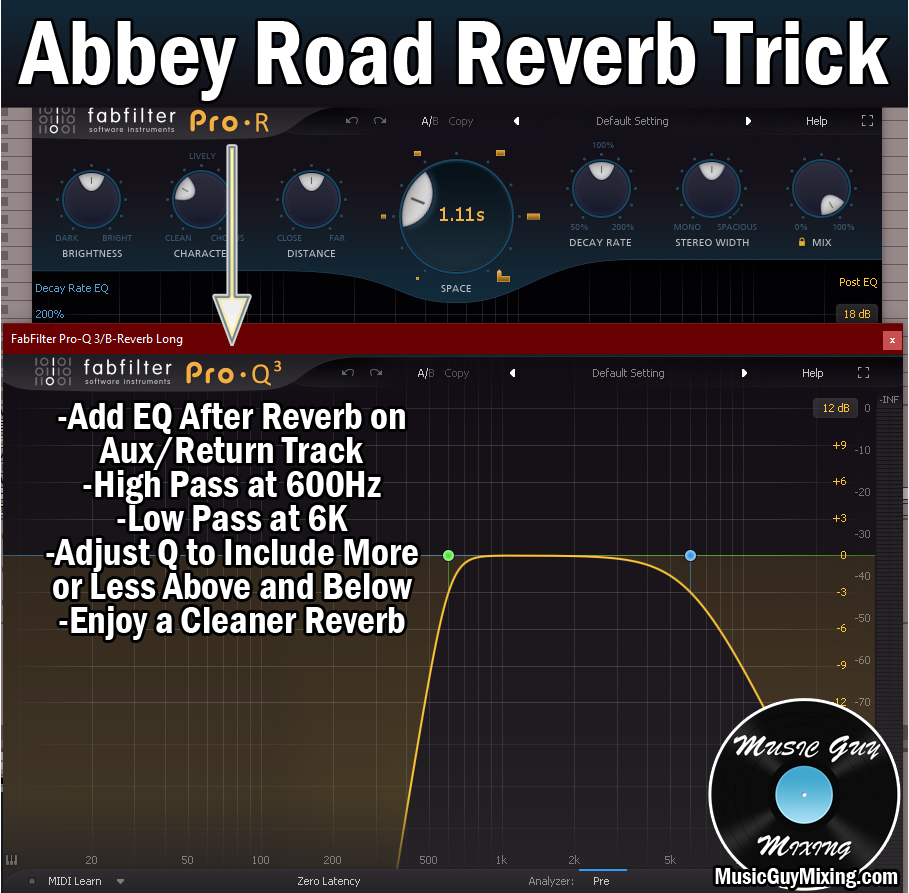
The trick involves applying EQ to your reverb, filtering out everything below 600Hz and everything above 6000Hz.
When I want a little more warmth to the reverb by shifting the whole thing down 10% lower, or 550Hz to 5500Hz as the active range of the reverb.
If your reverb doesn’t feature onboard filters, you can just follow up the reverb with an EQ on that Aux/Return track in your DAW to add the filters there.
Width
The width of our reverb is just that – how much space left to right our reverb occupies in the stereo field. I should note that different reverbs treat these percentages differently.
Specifically in the case once again of FabFilter’s Pro-R 2 which I’m using, 50% is true stereo and going all the way up to 200% places the reverb entirely in the side channels.
Setting your reverb’s width will generally be to taste; for me personally I like aiming for around 60% (as it relates to Pro-R 2). If you’ve got a really busy and dense mix, you may need to dial this down.
Conversely you might decide a nice wide reverb sounds excellent even in your dense mix which doesn’t have a lot of space. It really is to taste, so adjust accordingly in the context of everything playing, particularly after you’ve gotten your Send/blend levels sorted for every track.
Mix/Wetness
To kind of tie these best reverb settings all together, it’s important to remind you that when you’re using your reverb as a send on an Aux/Return track like I’ve detailed above that you set the Wet/Dry knob to 100% wet.

When we’re using Aux/Return tracks, we always want to set any effects to 100% wet because the Send knob for each and every track in our mix is acting as the Wet/Dry knob for that effect, relative to each track.
If you would normally only want 20% “wetness” of your reverb on a particular track in your mix, just blend in that equivalent amount until it sounds right via the sends knob – it’s the same concept.
While I just detailed what I believe to be the best reverb settings, I should point out that I oftentimes like to use two different room reverbs (see types of reverb) for two different purposes – one for a short brighter reflection and one for a long darker reflection.
They work together to create the width and depth that I want in the end, and to that end we can actually duplicate the above settings on a second Aux/Return track and halve them all to create a shorter/brighter reverb.
We can then save the longer reverb for key points in the mix, like when the chorus hits, to add additional depth. This not only contrasts beautifully with the relatively more “shallow” reverb of the verse, but it creates more emphasis during that key point in the song.
I go into detail on this in my guide to vocal reverb, demonstrating how to use two reverbs to create a kind of natural mix automation, giving us more options and keeping our listeners more engaged throughout the entire mix.

Thank you. I enjoyed reading your reverb Post. I’ll apply it to my music Projects
Regards
Malcolm Lewis
Pingback: Chorus Vs Reverb - How They Differ and When to Use Each - Music Guy Mixing
Pingback: How to Use Reverb on Piano for Depth and Fullness - Music Guy Mixing
Pingback: How to Use Return Tracks in Ableton Live (And Why Do It) - Music Guy Mixing
Pingback: How to Get a Warm Mix - 5 Tips - Music Guy Mixing