Sidechaining your reverb can help keep the track(s) you’re applying it to clean while still getting the benefits of the size on the back end. Let’s talk what is sidechain reverb, why you should consider doing it, and most importantly hot to sidechain reverb in your next mix.
What is Sidechain Reverb

When we’re talking about sidechaining something, anything, in your mix, we’re talking about controlling it using an effect whose parameters are controlled by something else.
Typically when we’re talking sidechain reverb, we’re talking about ducking out the effect of the reverb while the audio we’re applying it to is playing.
As I’ll cover in a second when talking about how to actually sidechain reverb, this can be done with compression to keep the audio you’re applying it to clean when it initially plays. When the audio finishes, the compression releases and the reverb asserts itself, giving that audio the sense of more size.
Sidechain Reverb Vs Predelay
In talking about reverb, I’ve talked in the past about how one of the main parameters on any reverb is its predelay.
This offsets the reverb for a set period of time after the initial dry audio plays and is important for keeping the transient punch:
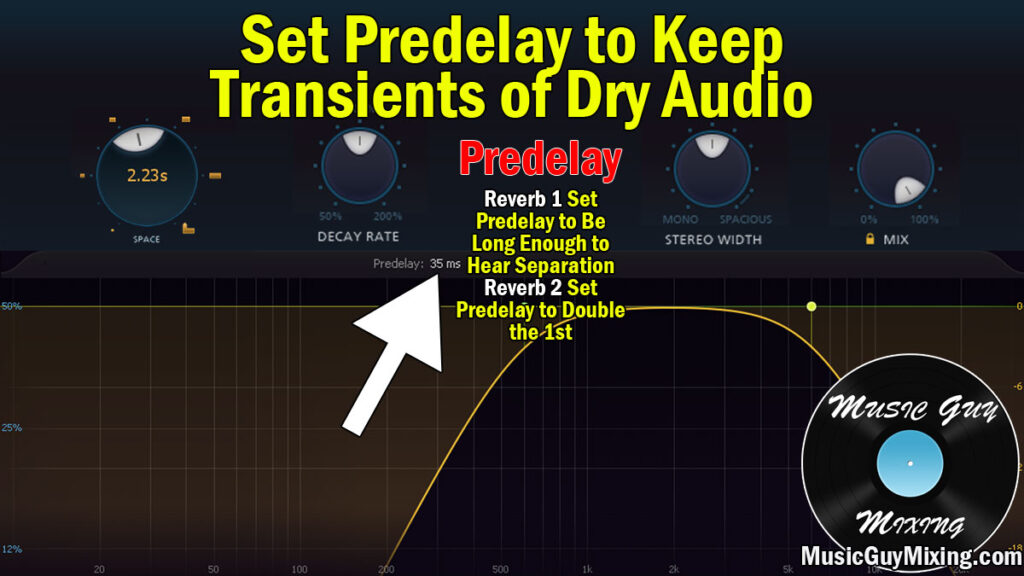
While this keeps a track present in the mix, it won’t completely duck the reverb out of the way while the audio is playing, nor it that its intended purpose. If you want to keep your dry audio completely dry (and clean), you need to sidechain your reverb.
How to Sidechain Reverb
The typical way to sidechain reverb is to put your reverb on a dedicated Aux track. Also known as a Return track in Ableton Live, this allows you to insert your effect(s) of choice, then apply it to multiple tracks using their corresponding send dials (see how to use aux sends).
In the case of sidechain reverb, you’d follow up that reverb with a compressor on that Aux/Return track. You’d then sidechain that compressor to the track you’re applying it to, setting the threshold to a level so that the compression triggers (on the reverb) whenever that track you’re applying the compressor to is playing.
In Ableton Live, you’d tick the arrow in the top left of the compressor to reveal the sidechain feature, tick “Sidechain”, then specify the track you want to apply the reverb to and thus duck the behavior of the reverb as the “Audio From”:

You’re typically going to want to dial up the ratio, drop the threshold to well below the lowest point, and pair those with a fast/instant attack and short release (we’ll talk more about the settings in a moment).
All that’s left is to adjust the respective send dial accordingly to get the amount of the reverb following the dry audio that you want.
The thing to keep in mind with sidechain reverb is that it’s typically track specific; you can’t apply it to multiple tracks using the same reverb because different tracks will have their own dynamics. This makes it impractical to apply to multiple tracks which is why you might prefer not to create a dedicated Aux track for application to a single track.
With that in mind, note that you can also do all of this as an insert on the track itself, inserting the reverb and compressor as a sort of parallel processing, though the method will vary from one DAW to another.
In Ableton Live, you can create an “Audio Effect Rack” in the insert area of any individual track.
To use sidechain reverb on one track in particular (like your lead vocal, for example), you’d insert your reverb plugin of choice followed by a compressor.
You’d then highlight/select both effects in the rack, then right click and select “Group” or just type Ctrl+G to automatically create an audio effect rack.
Tick the lower right button to expand the “Chain” area, then right click in the area and select “Create Chain”.
Now rename the new entry/chain as “Dry” and the one with the reverb and compressor on it as “Reverb” or “Sidechain Reverb”.
Other than that, you would adjust the new “Reverb” chain’s fader to get the blend that you want. It should look something like this (the reverb listed is the FabFilter Pro-R):

Everything else is the same; set up your reverb to taste and the compressor with the following settings (including the audio from as the track that compressor is currently on):
Threshold
In the context of sidechain compression (as in sidechain reverb), the threshold is using the “Audio From” track’s volume
The threshold determines what level the track you’re applying it to needs to reach before the reverb will be compressed. In a normal setting, I’d set the threshold to roughly the lowest practical point in the audio.
When we absolutely want to make sure the reverb isn’t heard until the dry audio ceases, we want to set this even lower, roughly 10dB or so below the lowest practical point. The knee will play into this, as well, in a moment.
Ratio
The ratio is the degree to which the audio which exceeds the threshold gets attenuated. If you completely want to get the reverb out of the way, set the ratio to its max to truly muffle it while the dry audio is playing.
Knee
The knee determines how strictly the threshold is enforced. The softer/higher the knee, the more that compression will begin before that threshold is met, albeit at a lower ratio. A maxed out knee with a maxed out ratio and a very low threshold is a good combo for sidechain reverb.
Attack
With sidechain reverb, we generally want that compression to begin as soon as the dry audio sounds in order to immediately choke out the reverb, so setting this at or near its fastest setting works well.
Release
The release is how long it takes for the compression to ease up after the threshold is no longer met. This is the parameter you’ll likely need to adjust to find the sweet spot to get the natural fade in of that reverb tail to taste, so start at instant and begin to dial it back until you find the right time.
You can manually adjust the output gain, or just turn up the “fader” of the “Reverb” chain to get more of the effect on the tail when the dry audio isn’t playing.
Regarding the reverb itself, this is completely to taste. While my best reverb settings work as a catchall for conventional reverb use, I typically go for a much longer time/size/space/length than I normally would to get the effect I want but again, this is to taste.
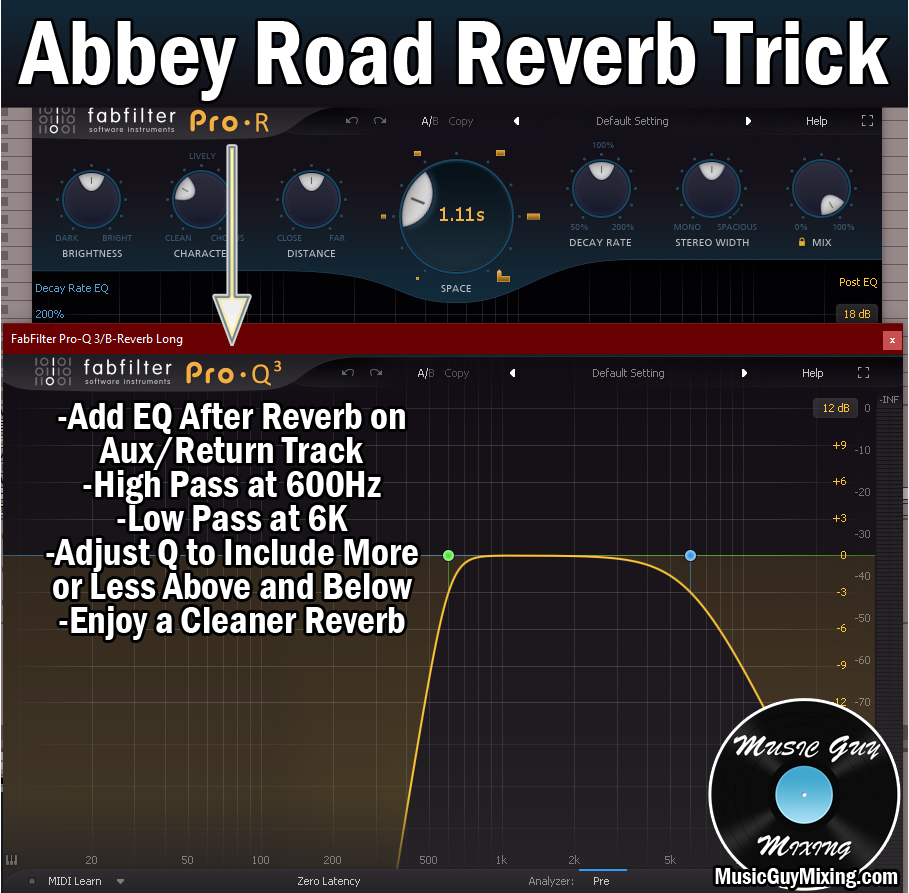
One last thing to mention is that you can skip the compressor and still keep your dry audio clean while enjoying the reverb tail with a reverb like FabFilter Pro-R 2 which has an onboard “Ducking” feature:

Turning this up will suppress the reverb while the track it’s on is playing. Turning it all the way up will completely silence the reverb until the “dry” audio ceases at which point you get that swell of the tail.
This is a much simpler way to get the exact same effect of sidechain reverb without the hassle.
However you implement it, try working in some sidechain reverb to keep your audio clean while achieving some size on the back end, not to mention create some interesting aesthetic effects – it all depends on how much of that reverb you want to use.