
Most of us use a combination of our DAW’s stock plugins as well as third party plugins. I know that’s certainly the case for me with my DAW of choice, Ableton Live as their stock plugins are better than most third party premium plugins in a lot of niches. One of my favorite Ableton stock plugins is arguably the least glamorous of the dozens of tools which come with the DAW – the Ableton Live utility plugin. A Swiss Army knife of sorts when it comes to plugins, let’s talk how to use this in your next mix.
Ableton Live Utility Plugin
Whereas most plugins have multiple features, they typically have one dedicated purpose. Equalizers allow you to adjust the frequencies of your audio to sculpt the sound or tone of your audio. Compressors allow you to reduce the dynamic range of the volume of your audio to achieve a more average and reliable volume.
The Ableton Live utility plugin has a number of features built into a single plugin which has multiple purposes and can be used to achieve a number of different effects.
Here is a snapshot of the features and what each can be used for:

With that overview, let’s take a deeper dive look at each parameter on the Ableton Live utility plugin one at a time and talk about how they can be used to enhance your mix.
Gain
Let’s go clockwise beginning with the top right where you’ll find in the “output” section you have “Gain”.
This changes the output gain of your audio clip(s) on that track which this plugin is inserted on.
This is not to be confused with the volume fader on the track itself. While turning down this gain dial turns down the volume just like turning the volume fader on the track, we can use the location of this plugin in our processing chain to adjust the volume of the audio at that stage.
As with any plugin, the order or location in the processing chain where the Ableton Live utility plugin appears matters.
Ableton applies effects left to right, so if we insert the utility plugin first ahead of any other effects/plugins THEN turn down the gain dial, that’s the new volume we’re feeding into that next plugin.
So if we insert a compressor immediately after the utility plugin, the compressor’s threshold will be affected by the gain cut (or boost) we created by way of that utility plugin’s gain dial.
This is incredibly useful for establishing gain staging on any and all tracks in your mix, establishing a much more responsible and optimal level to feed into the first plugin in your chain.
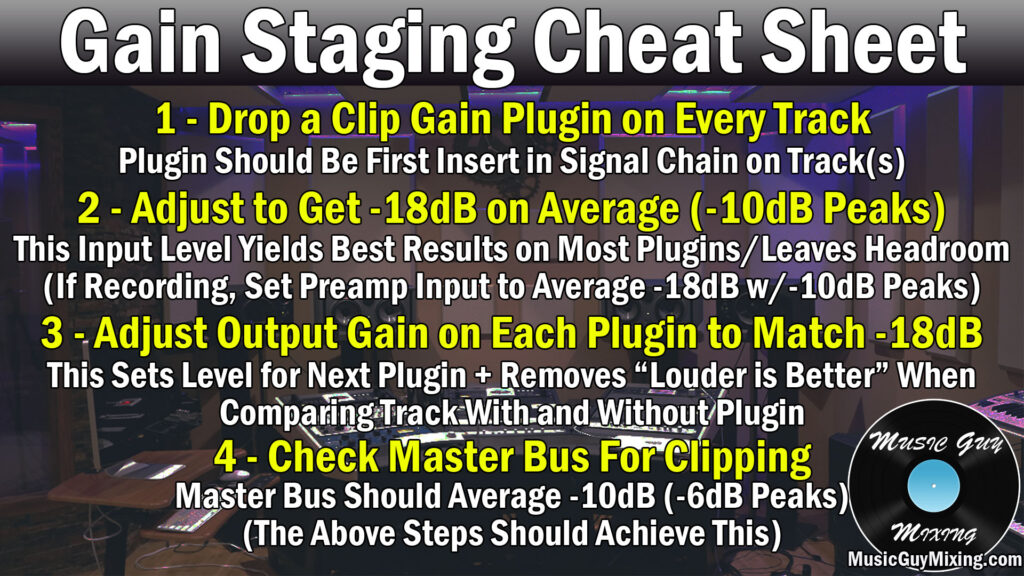
This is useful when you’re working with audio tracks which weren’t recorded with gain staging in mind and as such come in either too quiet or too loud.
While most plugins have an output gain dial of their own, you can always insert another utility plugin to follow any plugins which affect the volume by way of their processing but don’t have an output gain of their own.
I mentioned the volume fader a moment ago. This is effectively the final output volume of that track, post-all effects and processing.
While we can apply volume automation using the volume fader, I find it’s much more efficient to apply it using another instance of a utility plugin at the END of our processing chain, after any and all effects.
This allows you to program in whatever automation you want whether it’s for a track or a bus, but while leaving that fader free to easily turn up or down if you need to make a macro volume change for a track relative to other tracks.
This is much easier than if you want to adjust the fader’s volume when it’s already got automation on the fader itself, forcing you to go into arrangement view, selecting the entire volume span, then pulling all of those automation points up or down at once.
Panning
The “panning” parameter is more straightforward as this allows you to affect the placement of that track in the stereo field. Leaving the dial in the center keeps the audio centered whereas pulling it left or right moves it more to the left or right channels, respectively.
Similar to the gain parameter, this is situational specific relative to the location of that adjustment in the processing chain. Theoretically you could force your audio to one channel or to favor one channel and process it, then move it back with a subsequent utility plugin for some interesting effects.
Regardless, this is another way to adjust the stereo field placement of your audio just like the panning slider by the fader on the track itself, albeit from one moment to the next on a more granular level in the processing chain.
Mono/Bass Mono
The “mono” parameter is also straightforward; this forces any stereo information on that track to the center. Regardless of what stereo information was on that track naturally, it will now sound the same and balanced in both channels.
Note that there’s also the “bass mono” parameter beneath it which, when engaged/ticked, it will exclusively force the frequencies below the cutoff point you designate to the center, removing the sides.
One practical application of Ableton Live’s utility plugin’s “bass mono” parameter is when you have an entire drum performance recording on one or multiple tracks but without having the kick drum isolated on its own track. Alternatively, you might have a drum performance on multiple dedicated tracks, but you want to isolate and force the kick drum bleed on them to the center, taking it away from the sides.
The fundamental frequency of the kick drum is typically in the 60-70Hz range give or take, so you can conservatively set this a bit below 100Hz in that case to achieve that goal and keep your kick in the center where it will be there to anchor the mix for the listener no matter where they’re listening in the live stereo field.
Width
The width dial allows you to shrink or expand the track’s size (width) in the stereo field. Note that this only applies to stereo tracks, but you can use this to automate the width of the track, bus, or entire mix as the song progresses.
I’ve done this on the master bus, holding back the full width of the song inherent on the individual tracks, until that chorus hits. This makes that chorus feel bigger and hit the listener’s ear harder.
It’s just another example of the importance of utilizing automation to keep the mix interesting and the listener engaged, and it’s a relatively easy one at that.
Check out my complete overview on mixing automation for more tips.
I’ll just include this here, but you can use the drop-down menu above the “Width” control to only pass the left or right channels or swap the stereo information in the left or right channels.
Phase Control
The phase control buttons allow you to invert the phase of your track’s audio.
Anytime you’ve got the same source (whether it be a vocal, guitar, etc.) which was recorded by two or more inputs (microphones, direct-in, etc.), you run the risk of the phase of the track’s being slightly out of sync with one another.
This is because the difference the placement of equipment as well as the input type itself can cause small differences in terms of when that audio is actually captured between them.
The result is phase issues, where the combination of the two recordings of the same source sounds weaker than if they were perfectly in sync. equipment and placement
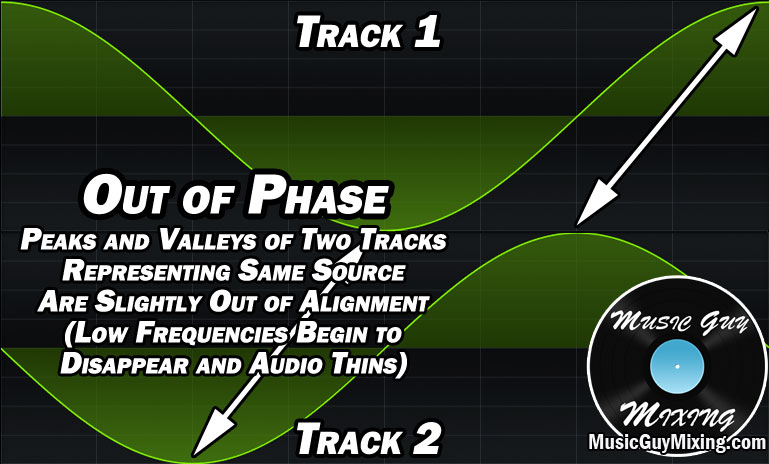
Dropping an Ableton Live utility plugin on one of the two out of phase tracks (or a single stereo track – depending how you recorded the source) and ticking the necessary left or right phase buttons is a quick and easy way to get your audio in phase, partially correcting slightly out of phase audio.

In the case of phase cancellation, this will completely fix things as this flips the phase of the track or channel it’s applied to a full 180 degrees.
Ableton Live Utility Plugin Reviewed
After all of that, you can understand why I like to refer to the Ableton Live utility plugin as something of a Swiss Army Knife.
The Ableton Live utility plugin can:
- Allow you to achieve and maintain gain staging in your processing chain.
- Automate the level of your track, bus, or entire mix to add some life to that aspect while keeping your faders clean for fast adjustments.
- Adjust or automate the panning at any stage of your processing chain.
- Force your mix or a certain low frequency cutoff point to mono.
- Adjust or automate the width of your track, bus, or entire mix to control the energy of and emphasize the biggest moments of your mix, keeping the listener engaged.
- Address and correct phase issues, keeping your stereo audio sounding full.
Those are the majority of applications for one of the more unassuming yet sneakily useful stock plugins which comes with Ableton Live.
On top of everything else, it’s one of the lowest impact plugins in terms of consuming system resources, so don’t sleep on it!

