The number one request I get either from clients for my mixing or mastering services is some variation of “make my music sound professional”. If you’re recording, mixing, or even mastering (or all of the above) your music, there are a number of relatively easy steps which go a long way toward that end. Here is my list of ways for how to make your music sound professional to work into your next song or project.
How to Make Your Music Sound Professional

Let’s go in order from the recording to the mixing to the mastering stages of audio production for how to make your music sound professional. If you’ve already recorded your music, then keep those tips in mind for next time.
Get the Best Sound Before You Hit Record
It’s a cliche, but the better something sounds going in, the better it will sound in the final product. To put it another way, the less adjustments you need to do to a recording in the mixing stage, the better it’s ultimately going to sound in the end.
I’m going to lump a number of individual tips on how to make your music sound professional within this larger point, but this includes:
Record in an Ideal Space
I’ll talk more about the ideal space for audio production a bit later, but generally speaking a larger room carries less noticeable reflections.
You’ll see singers doing vocals in a closet in a lot of movies and TV shows, but if the walls aren’t properly treated, you’ll get a ton of unflattering reflections building up on the recording so it sounds like it was recorded… well in a closet.
Bigger rooms tend to have less noticeable reflections, but sound proofing foam is a popular choice to capture and kill reflections so you get cleaner recordings, particularly in smaller rooms.
I’ll talk more about microphones in a moment, but in the case of recording with a microphone, you should audition different spots in your room. You might listen with headphones while you move the microphone and singer/instrumentalist to different spots to find the spot which sounds the best to you.
Additionally, you can make a surprisingly effective makeshift vocal “booth” out of a box with its insides covered in foam with a microphone popping through the bottom. You can find slightly more professional versions of these for sale online, but this is a low cost, DIY, and effective way to turn whatever environment you’re recording in into a suitable room for recordings.
Another DIY tip for recording with an amp is to build a little pillow fort in front of/above the speaker to dampen reflections.
Mitigate Outside Noise
In the same vein, removing as much outside noise from the environment before you hit record goes a long way in cleaning up your recordings even before you mix.
While tools for cleaning up audio have come a long way, the best of them come at a premium price tag, and they’re still no substitute to recording clean audio.
Note that by outside noise, I’m just referring to the things you can control. This includes:
- Moving the computer farther away from your microphone or throwing a towel over it to muffle its fan.
- Turning off the AC, heater, humidifier, etc. while you record.
- Using good cables which are in good shape to minimize electrical noise.
All of this helps to lower the noise floor so you won’t have to worry about any processing you add while mixing drawing attention to the unwanted noise.
EQ Your Amp to Get the Best Tone Going In
I mentioned recording with an amp earlier, so this is a good point to emphasize the importance to set the EQ controls on your amp to get the tone you want at the start.
I did overviews on how to EQ your guitar amp as well as how to EQ your bass amp to get the sound you want going in.
Never RELY on fixing something in post when there’s a chance to address it ahead of time as the results are never as good.
Record a DI Track
Even if you record via an amp, simultaneously also recording a DI track using a splitter gives you the option to re-amp your recording later.
Speaking of which, also consider my comparison on recording DI vs amp as each method has its pros and cons.
Recording via an amp obviously boasts more of that classic sound and works in the sound of the room:

… but recording DI is more versatile in offering you more options later and eliminates a lot of the issues and concerns about a lacking recording environment:

Not only is it cheaper, but it’s faster, more practical, quieter, easier, and doesn’t require any room treating at least from whatever you’re recording via that amplifier’s perspective.
Use the Right Microphone
While a Shure SM57 is a versatile and very affordable microphone which sounds solid on amplifiers, using the wrong microphone for vocals will yield an emphasis on or dearth in certain frequencies.
Most of the more affordable vocal microphones you can get for $200 or less are typically lacking in the low end which can make your vocals sound weak and lacking in body.
I did an entire overview on the best vocal microphone, so refer to that for excellent sounding options for every budget.
Use Proper Microphone Placement
While microphone placement for vocals is straightforward (you just sing into the microphone… staying relatively still in front of it), miking an amplifier is a very different process.
I did an entire overview on how to mic a guitar cabinet, so I’ll refer to that for a quick refresher:

Essentially the more centered your microphone is with the speaker and closer it is, the brighter, punchier, and drier the tone will be. Alternatively, moving the microphone farther away from the center of the speaker whether it’s to the left or right or simply farther from the amp itself will yield a warmer, darker tone which has more of the sound of the room for a touch of natural reverb.
Miking a bass amp is a similar process:

It’s more commonplace to record bass DI vs an amp, but if you do record a bass amplifier or cabinet, use the above tips to get the tone you want going in.
Gain Stage (Before AND After Recording)
One last word on how to make your music sound professional at the recording stage is to use proper gain staging when setting your preamp and microphone levels.
This simply means aiming for an average level of -18dB while you’re singing or playing the instrument being recorded:
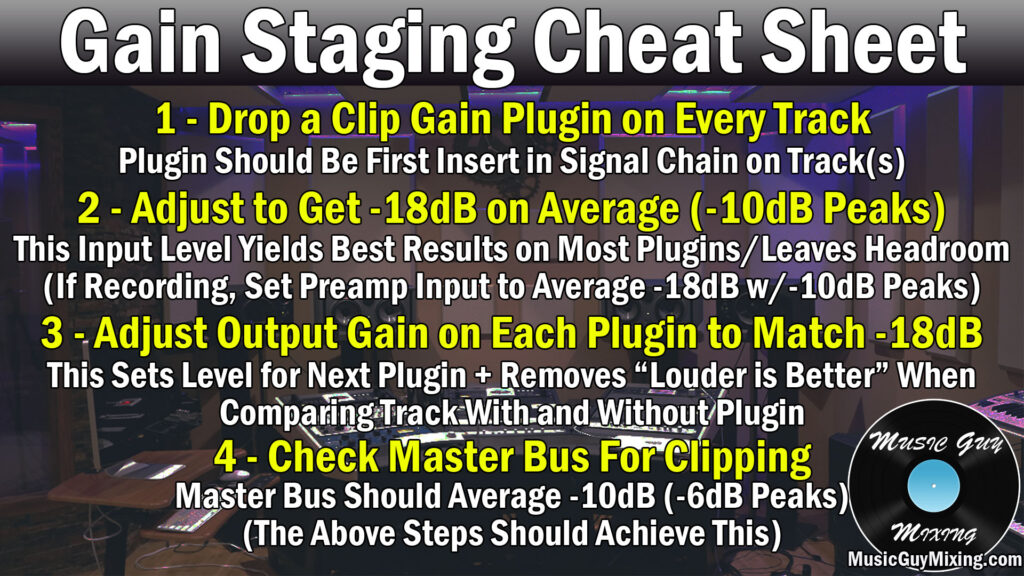
Do a scratch recording of whatever you’re tracking, then adjust the gain on the preamp up or down as necessary to average that -18dB with peaks around -10dB at most.
If you’re mixing audio you’ve already tracked, you can adjust the gain on these tracks in your DAW to achieve the same effect.
I like to begin my processing chain of every track in my mix with a gain/utility plugin to adjust it accordingly if the tracks weren’t properly gain staged when they were recorded.
One last word on gain staging – remember to adjust the output volume on every plugin on every track to ensure you get the same level out as you had going in. Most types of processing have some kind of influence on your track’s volume, especially compression, so use the output gain control which exists on most plugins to ensure the volume going out ultimately hasn’t changed as a result of the processing.
This will feed an optimal level into the next plugin in your processing chain, yielding better sounding results.
Just as importantly, this will keep the many tracks in your mix at responsible levels and will allow you to create a better sounding, louder final master when all is said and done.
Let’s now transition entirely into tips on how to make your music sound professional in the mixing phase.
Mix in an Ideal Space
I alluded to this earlier, but it’s essential that you mix your music in a space where you can get an accurate idea of what your music actually sounds like.
If you’re mixing in an untreated closet like I described with the vocals earlier, you’ll hear a lot of reflections which will give you a false sense of what you’re mixing. The result is you’ll make decisions to address things you’re hearing which will make it sound worse for normal listening environments.
There is, as it turns out, a “perfect” environment to work in as I covered in my overview of where to mix music:

Essentially the best environment for mixing music is:
- A room with the “golden ration” of 1 x 1.6 x 2.56 in terms of height, width, and length, respectively.
- A room with treated surfaces with sound absorbing foam to reduce reflections.
- Creating an equidistant triangle in terms of distance both between the distance between both speakers and you (say 3 feet between each speaker and 3 feet between you and each speaker).
- Setting the height of the speakers so that the tweeters are at your ear level.
I should also mention that may want to invest in a pair of mixing headphones to get an accurate depiction of the low end as it’s more difficult to hear this on most affordable studio monitors.
Incidentally, I did an entire comparison of headphones vs speakers for mixing, so refer to that for more information, as well.
Use Reference Tracks When You Mix
One of the most important tips I can share for how to music your music sound professional is to use reference tracks while you’re mixing.
This means routinely playing/checking the song you want your mix to sound like when all is said and done. This helps keep your ears and mind trained on the ultimate goal and keeps you from mixing in a vacuum.
I find that this is especially important with regards to the track level setting, EQ, and to a lesser extent the reverb and depth elements of your mix.
You can think that your mix sounds great on its own after working on it for an hour without taking a break and checking your reference.
Then when you play the song you’re aiming for, you discover it sounds appreciably warmer or alternatively brighter than your mix. Maybe the drums are a lot more visible in the reference track, the vocals are more blended in with the instrumental, etc.
I like to drag the recording of the reference track I’m specifically targeting into my mix and assign a hotkey to solo it so I can quickly listen to it on demand.
Just make sure that you don’t route it to the master bus as we don’t want any master bus processing affecting the sound of the reference.
Just as importantly as reminding yourself of what you want your mix to sound like, a reference track can remind you what a good mix sounds like in the environment you’re mixing in. It can even help when you’re adjusting your tone or sound during the recording phase.
Have your reference track on a hotkey so you can quickly A/B back and forth between your mix and the professional mix and do it regularly, regardless of what aspect you’re working on.
EQ and Compress Effectively
The two most important types of processing in audio production are undoubtedly equalization/EQ and compression.
EQ allows you to sculpt and adjust the frequencies of your tracks to remove what’s not working and leave or emphasize what is.
The easiest way to explain how to effectively use EQ in your mix is to link to my EQ cheat sheet you can grab on here for free. With clearly labeled graphics, it shows the exact frequencies to cut or boost on every type of instrument and vocal track in your mix to quickly get the best sound.
It also explains why I’m recommending each move and what each move is doing. Putting all of these moves together helps to create a jigsaw between the many tracks of your mix so that they avoid conflicts and work together to create a cleaner, more open mix.
Compression, on the other hand, allows you to control the dynamics of your track to bring a bit more control to the peaks and achieve a more reliable level. This brings more energy to that track and keeps it more present in the mix.
Once again, the easiest way to explain the best way to use compression in your mix is to link to my compression cheat sheet which you can also grab for free on here.
Like the other cheat sheet, this has unique graphs for every instrument and vocal in your mix which shows where to set every parameter to control the dynamics effectively across the entire mix without sacrificing punch or removing dynamics entirely.
High Pass Filter Everything
Speaking of EQ, it’s well worth mentioning that one of the most important ways to make your music sound professional is to high pass filter every track in your mix via your EQ.
A high pass filter is a slope which rolls off/silences every frequency BELOW a certain frequency point, allowing the higher frequencies to pass through:

High pass filtering every track in your mix:
- Cleans up low end rumble and unmusical and unwanted frequencies which aren’t contributing to a track.
- Creates space for the bass, kick, sub-bass, and every other instrument which needs these frequencies.
- Creates mixing headroom for a better sounding, louder final version of your mix and master.
Even the low end tracks can benefit from high pass filtering and low frequency EQ cuts…
Get Your Low End Right
One of the most difficult aspects of the mix to get right and one of the typical causes keeping a mix sounding pro is the low end is a mess.
Frequency conflicts, meaning two or more tracks which share a very similar fundamental frequency range, lead to one or more tracks competing and typically getting lost in the mix.
Normally the way to deal with this is create space between those two tracks by sending them far apart in the stereo field with panning.
When it comes to the bass and kick drum this isn’t possible as these are two instruments you want dead center.
As such, I like to sidechain my bass to my kick to duck out the bass when that kick triggers:
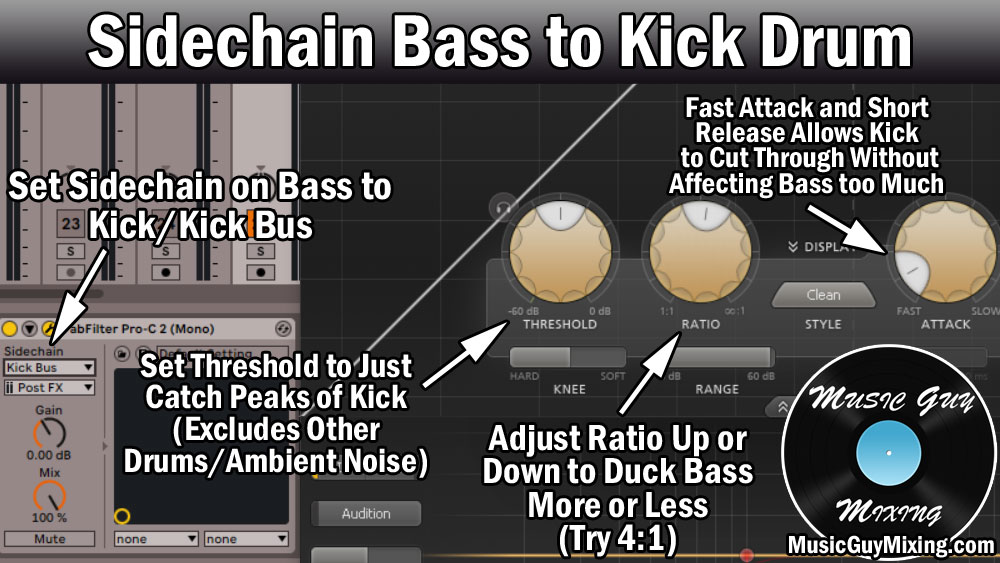
Sidechain EQ with a plugin like FabFilter Pro-Q 3 is even more targeted so that you only cut out the fundamental of the kick (typically around 65Hz) on the bass when that kick triggers:

While this goes a long way, refer to my complete tutorial on low end mixing for more tips on getting the low end sounding its best.
Using Panning and Reverb to Create Space
I just referenced this, but another of the keys for how to make your music sound professional is to take full advantage of the full stereo and depth field of your mix.
This avoids frequency conflicts to create a more open sounding mix.
I put an entire audio panning guide for your entire mix which is a nice blueprint and starting point for instantly creating space in your mix based on avoiding frequency conflicts:

Not only does this avoid frequency conflicts, it simply reflects popular moves which create a larger, more open sounding mix.
While panning is about taking advantage of the two-dimensional width of your mix, reverb is all about taking advantage of the three-dimensional depth so everything isn’t on the same plane.
I like to create an Aux/Return track and drop a reverb on it with my favorite, best reverb settings (shown here with FabFilter’s Pro-R 2, then blend this in on a track to track basis to taste.

With all of the tracks in my mix sharing the same reverb settings, albeit at different amounts, this creates a sense of continuity across the entire mix. This helps the entire mix sound like it was recorded in and exists in the same space, even when it’s a hodgepodge of random tracks being recorded in different environments.
Beyond this, check out my many reverb tutorials for more tips on how to best include reverb in your mix.
Gate As Necessary
In audio mixing terms, a gate is a type of processing which silences a track unless its threshold is met, meaning the volume of that track reaches a certain point. Once the threshold is met, it opens up and the audio is able to pass through normally:

Effective use of gating across your mix helps to remove noise you couldn’t address in the recording stage, making it a great way to clean up your mix.
I put together an overview on the best noise gate settings for vocals to clean them up (not to be confused with my guide on how to remove vocal breaths):

It also works well to remove bleed on instruments recorded simultaneously, like drums.
This is important when you add processing like EQ and compression to say your kick drum and don’t want that processing to be applied to say a snare or the cymbals which bleed over and get caught by that kick drum microphone.
The kick is going to be the loudest source on that kick drum mic, so setting the threshold just below the quietest instance of the kick ensures we’re only hearing the kick on that track and muting everything in the background when the kick’s not playing.
Remember to put the gate at or near the start of the signal chain so every subsequent plugin in the chain is only processing the post-gated kick.
Preserve or Add Transient Punch
One of the terms we use in audio production is “punch”.
As I covered in my overview on what does punch mean, this refers to a track which has clear transients – those high frequency percussive sounds of a track which precedes the rest of the sound.
The classic example I like to give is that “crack” sound of stick on the surface of a snare. Taken on its own, it sounds like a shot of white noise before the rest of the fullness and roundness of that lower range and mid-range of the snare comes through.
Transients draw a listener’s ear to a track to keep it visible in the mix. This is important, particularly in a denser mix with more instruments fighting for visibility.
A punchy mix is transient rich with all of the instruments asserting themselves.
To preserve audio transients, it’s important that you don’t set your compressor’s attack too fast/instant. We want to let the transient punch of most tracks in our mix to pass through uncompressed; adding in a little attack to delay the compression allows the transients to come through before the rest of the sound of the track is compressed a few milliseconds later (once that threshold is met).
I cover this in depth in every compression guide in my aforementioned and linked to compression cheat sheet, but it’s worth mentioning that’s why adding in a little attack is important.
In addition to boosting your track via EQ in the transient rich frequency range of that track, you can also artificially ADD audio transients to most tracks in your mix.
I put together a tutorial on how to preserve or even add audio transients, so check that out for the keys to creating a punchier mix.
Clean Up the Mud
One of the things keeping most songs from sounding professional is the abundance of mud across the mix.
Mix mud can come from a number of contributing sources, many of which I’ve already covered.
A couple I haven’t yet covered include paying attention to the 300-600Hz range on most tracks in your mix:
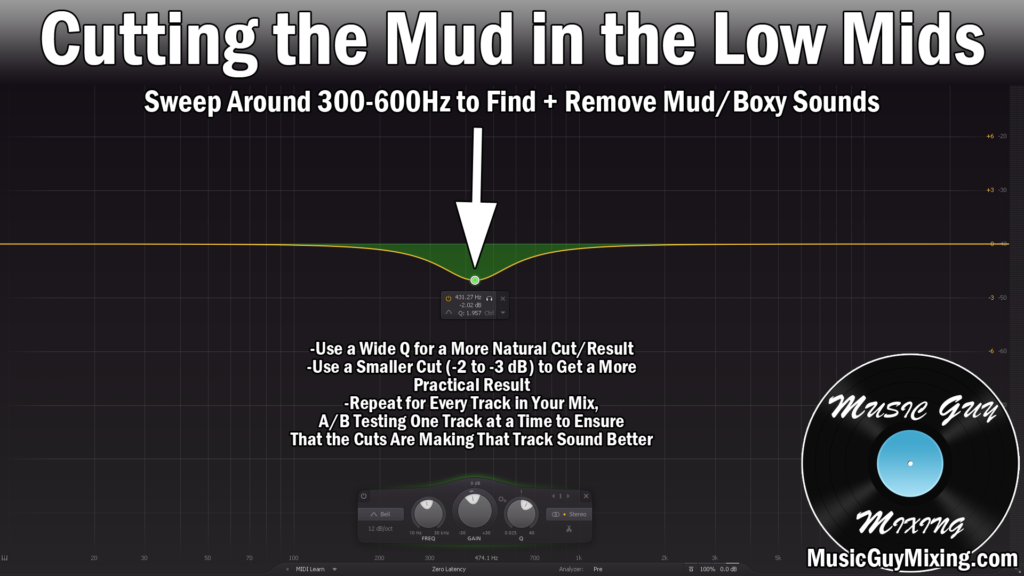
Not only does this remove a lot of those unattractive reflections buildups on many tracks, this adds clarity to the top end via subtractive EQ. This keeps you from having to boost the top end quite as much, too much of which can make your mix harsh and grating.
Another key to removing mud from your mix is to high and low pass your reverb.
Often colloquially referred to as the Abbey Road Reverb trick due to its origins in the legendary titular studio back in the 60’s, this involves high and low passing your reverb at 600Hz and 6000Hz, respectively:
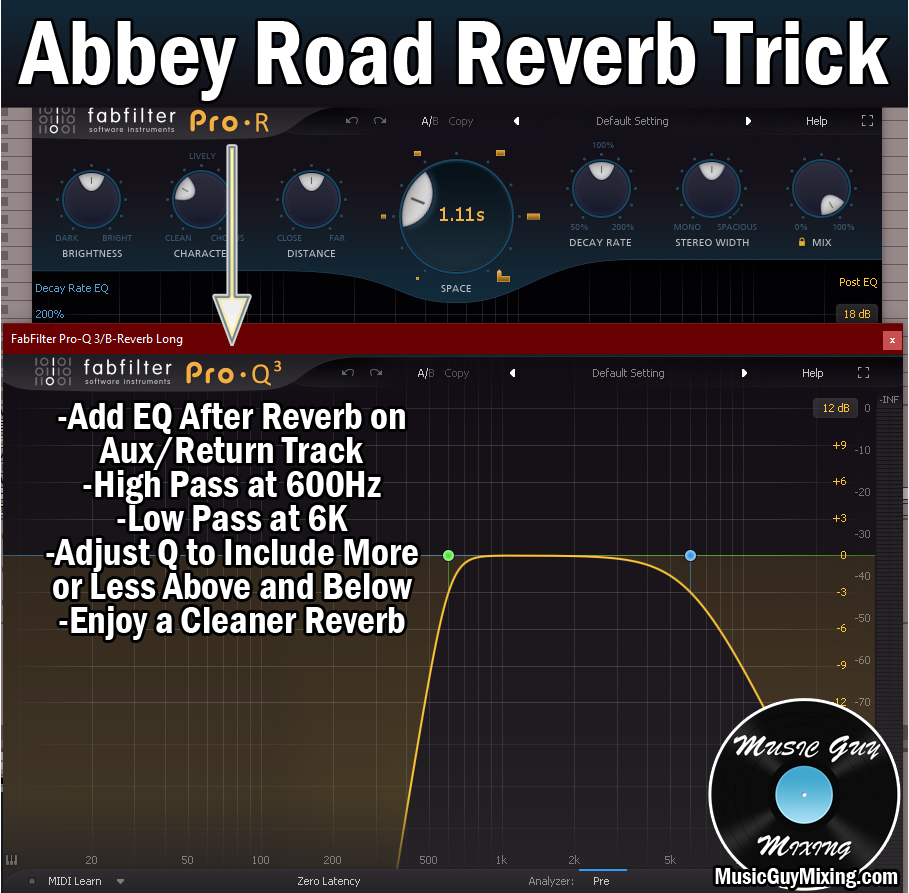
I recommend doing this on virtually every reverb in your mix. Some reverbs have onboard controls, but in the case of the Aux/Return track, mix-wide reverb I mentioned earlier, we can follow this up with an EQ with these two filters.
This instantly keeps that reverb in check and under control, cleaning up your entire mix as a result while allowing you to still enjoy the benefits of reverb.
Automate on a Track and Mix Level
Another one of the keys on how to make your music sound professional is to add some life into your mix by automating multiple aspects on both a track and mix level.
Automation means actively changing a parameter or aspect of a track (or the entire mix) as the song progresses.
The most common application of automation in mixing is to adjust the volume on a track or entire mix level to add energy to a specific part/section or keep that track visible and on top of the mix:

Volume automation can be done manually or automatically with a rider. Waves makes both a bass rider as well as a vocal rider, each designed to use a target level and aggression settings to adjust the volume based on the dynamics on the fly:

Speaking of vocal riding, you can also grab a free option like Vola:

There’s a bit more to this one and it’s not as intuitive or streamlined, but this can be used to automatically adjust the level of your vocal slightly to add a little life to it in real time (and for free!).
You can also automate other parameters, like the overall width of the entire mix. This can keep the verses buttoned up until you open it up for a chorus so it hits that much harder (just like automating the level of that mix up during the chorus by a 1dB or so will).
I cover the many applications of automation in my overview of mixing automation.
Preserve Dynamics in Master
A mistake a lot of amateurs in audio production make is limiting their masters or mixes to the point of removing the dynamics (and occasionally the transients) of their song entirely.
This is done for the sake of making a finished song as loud as possible. The result of this is it maintains virtually the same volume for the entirety and duration of the song.
This is a great way to lose the interest of the listener and dynamics keep the listener engaged.
I just talked about adding automation to your song; dynamics are a built in and natural form of automation, so you don’t want to remove them by flattening the peaks for the sake of more volume to the detriment of the song.
It’s important to remember that all music streaming services have normalization, often turned on by default. This means that it automatically adjusts the volume up or down of every song to hit the same target volume.
Incidentally this is something I covered in my overview on what LUFS to master to:

Knowing that these services will automatically adjust your levels via normalization regardless of what you master to and that it’s the norm is incentive to preserve your dynamics rather than crushing your master via a limiter.
The -14LUFS which most services go by is actually a good target as this is a target which is easily reachable without seeing much to any gain reduction via a limiter (especially if you’ve practiced gain staging through the recording/mixing process).
How to Make Your Music Sound Professional
There are 13+ tips on how to make your music sound professional for every step of audio production from recording to mixing to finally mastering.
This is precisely what I cover in virtually every tutorial I make here on Music Guy Mixing, so check out the hundreds of tutorials I’ve created on here over the years and the many more upcoming to ensure your music is sounding as good as it can!