
Starting around 1.5k and above, there are certain frequencies which can be perceived as being harsh in our mix to the human ear. Too much frequency information here and on certain instruments it can begin to overload our ears. This quickly leads to ear fatigue which will put off our listeners. For us as the mixing engineer, this translates to not being able to accurately hear the rest of the mix. Let’s cover how to fix a harsh mix.
Harsh Mix Fixes

Use Reference Tracks
I’ve talked about the importance of using reference tracks in your mix before.
Like I just mentioned, ear fatigue from high frequencies can cause us to not accurately hear our own mix. We have a tendency of tuning those frequencies out. By not hearing our mix accurately, this leads us to make poor decisions.
This is why it’s important to have reference tracks on hand so that you can split test back and forth to hear what your goal with that mix is. This helps with harshes mixes, a muddy mix, any problem you might have is magnified when played in context next to a good mix.
When you switch back to your mix, you should be able to hear the harsh mix problems with a fresh set of ears so that you can start to get to work in finding and treating them. Speaking of finding them…
Check Each Instrument Group
Generally the first thing you’ll need to do is identify where the harshness is coming from. Is it an across the board problem where the entire song was recorded or mixed too harsh, or can it be traced to a single instrument group or track even.

This is one of many reasons to use a mixing template every time you begin a new song. Whenever you notice something wrong, poking out in your mix, you can solo each instrument group to quickly identify where the problem is.
The same is true when you’re looking for what’s making your mix too harsh.
The typical culprits are guitars, synths, or cymbals.
Add Saturation
Saturation adds harmonics to the low mids of your track, supplementing the existing body.
You can try adding some saturation on the master bus if the problem stems from most of the buses being a little too bright, or you can apply it on the bus or track level.
As I mentioned a moment ago, guitars, synths, and cymbals are usually the worst offenders for harshness.
Decapitator, Saturn, and plugins of the like add frequency information in the low mids, creating a more balanced track.

Above are my typical taming setting for smoothing out harsh guitar, though these settings are a good starting place for a lot of instruments.
Simply dial the drive or mix percentage back to taste along with any tone adjustments and adjust the output accordingly.
These lower frequencies which are added fill out the sound, shifting the focus away from the harsh higher frequencies.
Multiband Compression
You can reach for an EQ or even better a dynamic EQ, but if it’s an instrument or group with a lot of high frequency information like cymbals, you’d probably be better served using multiband compression.
As I covered in my comparison of dynamic EQ vs multiband compression, dynamic EQ is great when you have a narrower problem frequency which only presents itself on occasion.
Multiband compression works better when it’s a broader frequency range you need to more regularly attenuate, making it extremely effective on taming harsh frequencies between 1.5k and 5k.
Cymbals as well as synths and guitars with too much treble can be treated with subtlety using a multiband compressor.
Here I have a band at 5k in FabFilter’s Pro-MB set at a 4:1 ratio and a relatively fast attack and release.

My threshold is set around the average level of the cymbals I’m using it on, and at most pulling about 4 dB out.
All around these settings are relatively subtle as I’m just trying to smooth the signal out a bit.
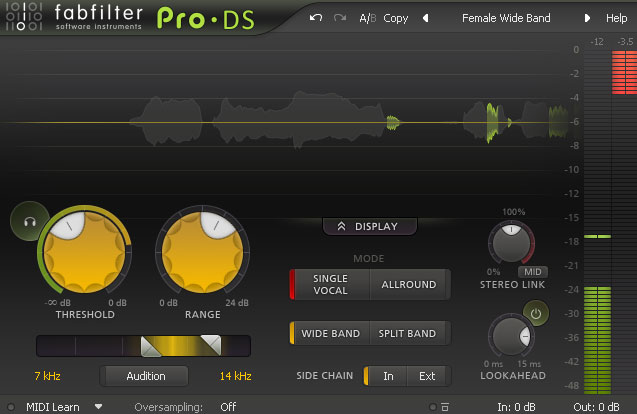
De-Esser
A de-esser like FabFilter’s DS is essentially a targeted multiband compressor which specializes in higher frequencies.
Most people think vocal sibilance when thinking about de-essers, as that’s what they’re primarily designed for. They target the especially sibilant consonants like “S” or “T” and attenuate the transients.
That said, they work well on higher harsh frequencies in general.
You can use a de-esser in place of a multiband compressor to smooth out hi-hats and cymbals on your overhead microphones.
In the case of Pro-DS, you simply set the frequency range you want to target (starting at 7k), then adjust your threshold and range until you get the attenuation you want on your source.
Soothe
The people at oeksound label their soothe2 as a dynamic resonance suppressor. Whatever they want to call it, it works extremely well on smoothing harsh frequencies, particularly on a track level.
It excels at identifying those harsh frequencies to pull them down while staying remarkably transparent, meaning you don’t notice any detrimental effect on the rest of the track (unless you really crank it).
I like soothe on vocals in particular. Between the voice itself or a less than ideal recording, vocals can be sneakily harsh given the right (or wrong) circumstances.

The “sharpness” and “selectivity” settings apply a narrower or broader stroke to the attenuation while the “depth” is the main controller.
Just be careful about not going overboard on the depth control. Pulling too much of this range out of the vocal will make it sound like the vocalist has a lisp.
You’ll get the same thing using a de-esser. This makes sense, as sibilant consonants will sound lispy without the hard transient in the front.
Just like de-essers aren’t exclusively for vocals or even just harsh frequencies, soothe works well on a number of instruments.
It has presets for every instrument in your mix, so try experimenting with it anytime you need a more balanced frequency spectrum for your instrument in question.
Harsh Mix Fixes
- A harsh mix can dull your focus on your own mix or make you go ear blind to those frequencies. This is why it’s important to have reference tracks to keep your ears focused on your ultimate goal.
- Use a mixing template so that your mix is organized by instrument type. Then you can go bus by bus in solo or adding them back in to identify where the harshness is coming from.
- Use saturation to add low and mid frequencies to thin or harsh tracks, rebalancing the frequency spectrum for those tracks.
- Try a multiband compressor over a dynamic EQ to pull down the harsh frequencies while keeping the rest of the track untouched.
- A de-esser is a type of multiband compressor which targets high frequencies exclusively, making it another good choice to attenuate harsh mix frequencies.
- Soothe2, the dynamic resonance suppressor, is a great tool for targeting and attenuating harsh frequencies transparently and with minimal collateral damage.
Pingback: Mix Bus Chain - How to Create the Perfect Mix Bus Chain - Music Guy Mixing
Pingback: The Best Plugins For Mixing - Evergreen Edition - Music Guy Mixing
Pingback: How to Treat Harsh Vocals - Music Guy Mixing
Pingback: My Mixes Sound Dull - 7 Causes and Fixes for a Dull Mix - Music Guy Mixing
Pingback: Guitar Frequency Range Chart - The Frequency Range of Guitar - Music Guy Mixing