
The vocals should always be the star of the show in your mix. To get them there, here is an overview of the best mixer settings for vocals, top to bottom.

Let’s go in approximate order of the signal chain which I recommend. Here is the entire chain at a snapshop before we break each one down, step by step, with an overview of what mixer settings for vocals to use on each:

Tuning
This is one of the few types of vocal processing which is innocuous to the rest of the processing and doesn’t rely on a particular level to get good results.
As such, autotune like the classic Auto-Tune Pro from Antares can go anywhere in the processing chain, but I generally put it first to get it out of the way.
The vocal might not always need much or any tuning up. This really depends on the genre, too. While we always want our vocals in tune, some very subtle flats or sharps in a vocal sounds natural as that’s how we sing, even the best singers out there.
Check out my tutorial on how to use autotune for tips on the best way to get your vocal in tune while maintaining transparency.
Gain and Automation
A lot of the best mixer settings for vocals are dependent upon feeding the right level into each step of the processing chain.
In other words, it’s time to think about gain staging with a gain plugin.
As I mentioned in my gain staging cheat sheet, many plugins are modeled after analog hardware and as such yield the best results when fed an average level of -18dB:
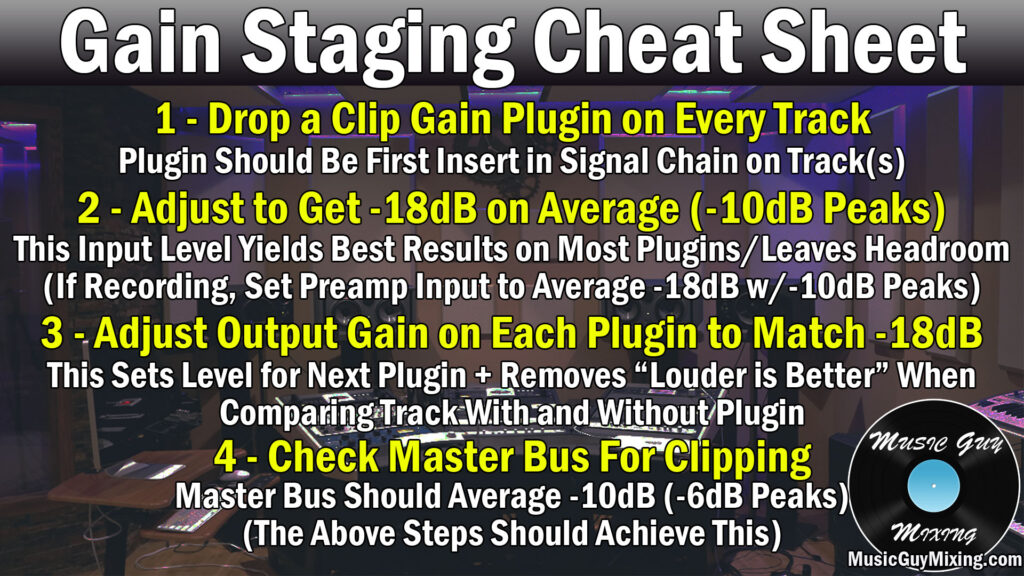
More than this, this keeps the busses including your master bus from clipping and maintains plenty of headroom for mixing.
My standard mixing template includes gain plugins on every single track in my mix set to -10dB.
I adjust these as necessary to keep my vocal tracks averaging around -18dB and peaking at -10dB at the most. We’ll bring down that dynamic range in just a minute with some compression, but if your track is seriously dynamic, you might think about doing some vocal automation manually or via a vocal rider before you even get to the next step.
With gain staging in mind, it’s difficult to achieve any kind of average or consistency when your track is seriously dynamic, meaning there’s a difference of more than 10dB or even 15dB from the quietest to loudest parts of a vocal track:

This can happen when you’ve got an especially challenging vocal part which requires a lot of belting.
I put together an entire tutorial on how to deal with a dynamic vocal, so refer to that for tips on getting that vocal in order before you move on.
De-Essing
Sibilance is a fact of life when it comes to vocals, though it can be a bigger issue with certain vocalists or recording conditions over others.
If you’re not familiar, sibilance is the harshness associated with “S” sounds in particular which manifests in the 7-10k region, give or take.
A de-esser is a particular type of multiband compression which targets this region and smooths out surges in vocals in this region which are a result of sibilance.
While you can use any multiband compressor (I even put together a tutorial on how to use a multiband compressor as a de-esser), you can use a plugin which is especially trained to detect and treat sibilance with transparency, leaving other frequencies untouched.
My go-to is the FabFilter Pro-DS for its ability to do just that, smoothing out sibilance with transparency.
Like I always mention when treating sibilance – don’t overcompress in the 7-10k region on a vocal as this will result in an awkward lisp on those sibilance consonant sounds from the vocalist.
Vocal EQ
Time to cut out what’s not working for or attributing to the good in the vocal (the premise of subtractive EQ).
And yes, in case you were wondering, I always preach EQ before compression as it’s more beneficial to cut out the bad and compress the sound we want rather than the other way around.
I put together an vocal EQ cheat sheet (just one piece of my entire free EQ cheat sheet for your entire mix!), so I’ll largely refer to that:

I also put together more specific guides on how to EQ female vocals and how to EQ male vocals, so refer to those for a more tailored guide for your specific vocals. Let’s take a quick overview of each move you generally want to make or at least each frequency area to pay attention to.
High Pass Around 100Hz
Essentially though you want to high pass filter around 100Hz to remove room noise and other rumblings that aren’t adding anything to your vocal.
This is a good lesson not just for your vocals but for 90% of your mix so that the low end is entirely devoted to the tracks which need it in your bass and kick (see my low end mixing tutorial for more information).
Boost/Cut at 150-300Hz for Body or Boominess
Most of these moves are dependent on what’s happening with your specific vocal and what your goals are. Still, as I mentioned, these are all good areas to pay attention to.
150-300Hz is where the body of the vocal exists. If you want more warmth and body, do a small boost of 1-2dB. Conversely, if your vocal is too boomy, a cut here can work well.
Even better is applying a dynamic EQ cut in the case of a boomy vocal so that it only pulls down or especially pulls down when there’s a surge in this area, yielding a more transparent result the rest of the time.
Speaking of which, if you have vocal pops/plosives in this area, dynamic EQ is the way to go as I explained in my tutorial on how to remove plosives from vocals.
Cut at 500Hz for Mud
There’s a lot of mud which builds up in the 500Hz region (see my muddy mix fixes).
A cut (or dynamic cut) will help clean up your vocal when these frequencies build up from certain words, phrases, notes, or room reflections.
Boost/Cut at 1-2k For Hollow or Nasal Vocals
1-2k can be a problem and solution area for two specific vocal issues.
If your vocal is feeling hollow, typically due to a less than ideal recording environment or setup, try a small boost here to fill out the sound. This can only go so far as unfortunately a hollow vocal is one of those vocal problems which is extremely difficult to impossible to correct. Oftentimes you’re better off just re-recording the vocal when possible.
Alternatively, a nasal vocal can be a product of recording conditions or the vocalist. A cut here can smooth out a nasally vocal (see my tutorial on how to mix a nasally voice).
Be careful about cutting or boosting too much in the 1-2k area as you can easily send the vocal into the opposite territory, or making a vocal sound nasally by boosting too much, or making it sound hollow by cutting too much here.
Boost/Cut at 3-5k to Add Life or Smooth Harshness
We can add life and brightness to a vocal with a boost in the 3-5k region. Conversely we can smooth out a harsh vocal with a cut in this area.
Like 1-2k, 3-5k is another area which should be treated carefully to avoid going too far one way or the other.
Cut too much at 3-5k and you remove the life from the vocal to make it sound stuffy and dull. Boost too much at 3-5k and you risk making your vocal sound grating, especially on certain words, phrases, or notes.
High Shelf at 10k for Crispness
We can bring out more of that inherent “air” and crispness in our vocal with a small high shelf at 10k. This is a relatively innocuous area which isn’t conflicting with many other instruments and it’s not grating to the ear.
Less is more; a small boost of 1-2dB is all you need to achieve the desired effect.
Low Pass at 20k
Lastly, apply a low pass filter around 20k to create some head room and remove inaudible, non-musical frequencies from the top of your vocals.
Vocal Compression
I recommend using more than one compressor on your vocals (see how many compressors on vocals).
This technique is known as serial compression, and it’s popular because it splits the compression workload between the two compressors, yielding more effective and transparent results.
Each one has a particular purpose, starting with an 1176 style compressor.
1176 FET Style Compressor (Compressor #1)
An 1176 style compressor is a FET style (see types of compressors), meaning it uses transistors to reduce gain and add some desirable color to the sound.
Some of the controls of an 1176 style compressor are counter-intuitive to how we normally think of compression. I put together an entire tutorial on how to use an 1176 compressor as this is one of the best compressors to use in mixing, particularly on vocals.
Here is an overview on the settings I recommend for your 1176 compressor, first in the serial compression chain:
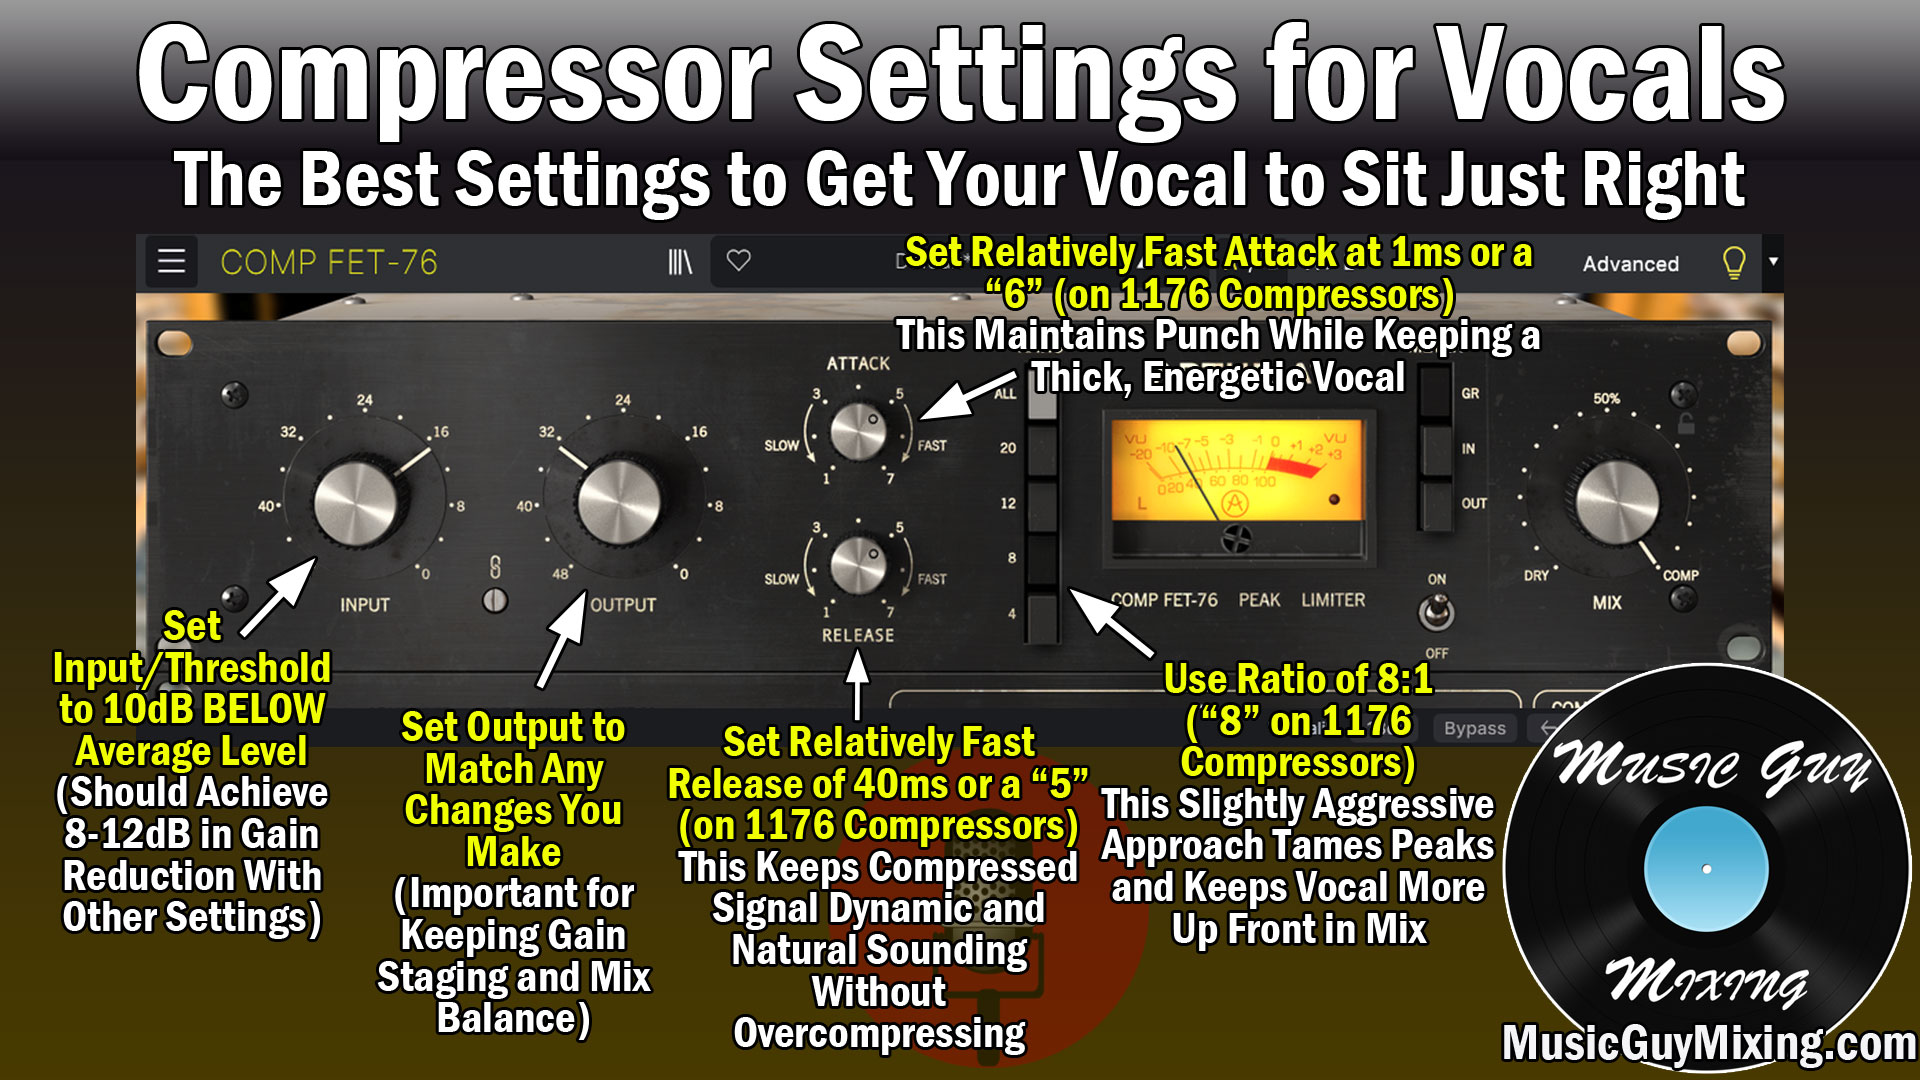
I’m using the Arturia Comp FET-76, but these same settings can apply to any 1176 style compressor.
Threshold
This first compressor is about catching and taming the peaks. As such, we’re going to set through threshold somewhere between the quietest and average level of our vocal. Alongside the rest of the settings, we should achieve 5-10dB of gain reduction on the loudest peaks.
Ratio
I like a relatively aggressive ratio of 8:1 on vocals, at least for this initial compressor. This is doing most of the heavy lifting in taming the peaks and reducing dynamic range, so 8:1 is ideal especially for a more dynamic vocal like I mentioned earlier.
Attack
The attack on a compressor determines how quickly the compression engages once the threshold is breached. Leaving a little attack on the compressor allows the peaks to still jump through for a split second, helping the vocal punch through in the mix (hence the mixing term punch) via the transients (see what are transients).
Remember that on an 1176 style compressor, a higher number on the attack and release denotes a faster/shorter time. I like setting my vocal compressor at “5” to allow for those peaks to still be punchy. If you’re not using an 1176, aim for around 5-10ms of attack.
Release
Similar to the attack, the compressor release of “5” works well on an 1176 to efficiently yet transparently ease off the compression when the input drops below the threshold.
Output Gain
Compression turns down the peaks of our vocal which in essence turns down the overall volume. We need to make up for the volume lost using makeup/output gain.
Turn this up to the point that when you turn the compressor on and off you don’t hear a difference in the level. This will help in gain staging; you should still be aiming for -18dB on average and incidentally the compression will help achieve a more average and less dynamic level.
CLA-2A (Compressor #2)
The second compressor immediately following the 1176 in the chain is an opto-style compressor.
I’m using the CLA-2A from Waves to smooth out our newly tamed vocal even more.

The controls on the 2A are dirt simple.
You simply set the peak reduction to achieve 1-3dB of gain reduction (roughly 3dB on the loudest remaining peaks) as shown on the display, then adjust the makeup gain accordingly as we did before to maintain gain staging.
I recommend leaving the analog set to off to avoid introducing any added noise into your vocal.
Between the two compressors, the vocal should be sitting nicely now in terms of level.
There should be plenty of energy and presence, and no dropped off words or syllables. We’ll revisit this in a moment if you do notice any dropoff, or you can drop the thresholds slightly on each or turn up the ratio further on the 1176, creating a bit more gain reduction.
If you want to completely flatline your vocal, keeping it more or less at the same level for the energy at the expense of natural dynamics, you can try introducing a limiter.
As I explained in my overview of what is a limiter, it’s not just a tool for mastering and can be very handy in keeping important tracks like vocals up front in your mix at all times.
Saturation/Exciter
Saturation and exciters (which is a form of saturation) introduce harmonic distortion into your audio. They add or boost frequency information where it wasn’t there before. Depending which form of saturation we use, we can give a bit more warmth or crispness to our vocal.
Check out my overview of what does saturation do as well as how does an exciter work for more information on how to apply this to your vocal to nudge it to whatever direction we want.
I find that if after the EQ moves I’ve made my vocal is a bit top heavy, I might introduce a bit of SoundToys’ Decapitator to bring out more of the body.
Alternatively, if I want a little more brightness out of my vocal, I’ll mix in some of Aphex’s Vintage Aural Exciter.

As you can see in the case of the latter, it’s incredibly easy to use; simply turn up the “Mix” knob to get some instant and natural harmonic boosts in the 2k+ range:

Other Processing
This is a good point to insert any other vocal processing you might want on your track. This is usually where I’ll add in a dynamic resonance suppressor like soothe2 to smooth out harsh vocals if I feel the vocal needs it.
Sometimes I’ll blend in a little chorus effect on my vocal if I feel it needs a little more size, though I find myself using this as a send more often than not.
Sometimes I’ll add in one last opto-style compressor for a little glue if I feel I need it, as well, right at the very end of the vocal chain. From here on out it’s aux/return tracks via sends in the form of delays and reverbs which I’ll get to in a moment.
Vocal Panning
9 times out of 10 we’re leaving our vocal panned right up the center so that it’s consistent and even in both the left and right speakers.
Backing vocals are another story, and I put together a complete guide on how to pan backing vocals:
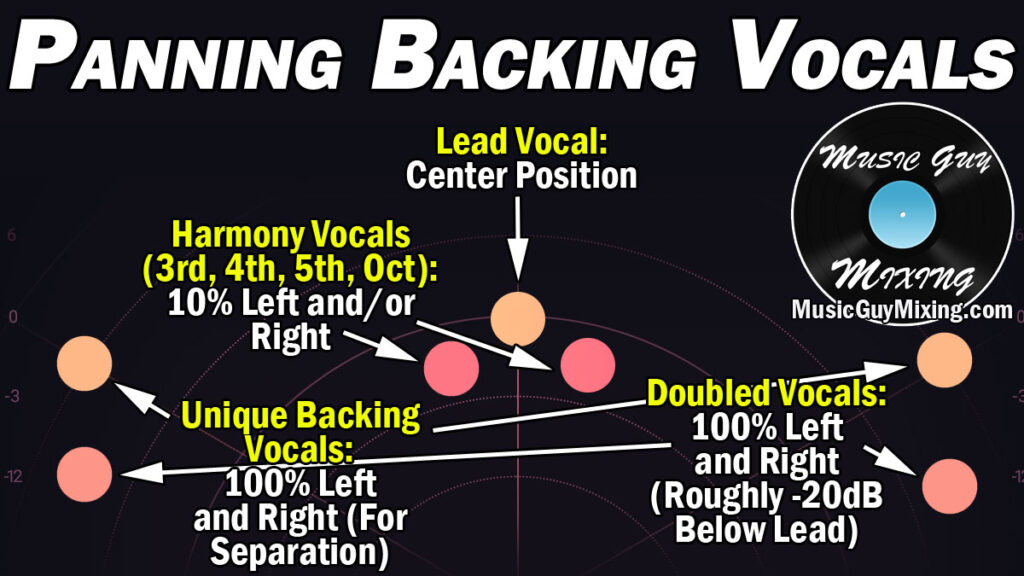
As you can see, it details where to pan harmonies, unique backing vocals, as well as doubled (tripled) vocals.
Delay
I recommend using spacial effects like delay and reverb on aux/return tracks and as sends (see inserts vs sends).
This allows us to save mixing CPU power by only having one instance of each effect, as well as applying the same effect to multiple tracks, creating a sense of cohesion and unity amongst all the tracks which use it (especially with room emulating reverbs).
With delay (and reverb – more on that in a second) I like to use two different delays on two separate aux/return tracks.
Here’s a brief overview on how to use vocal delay:
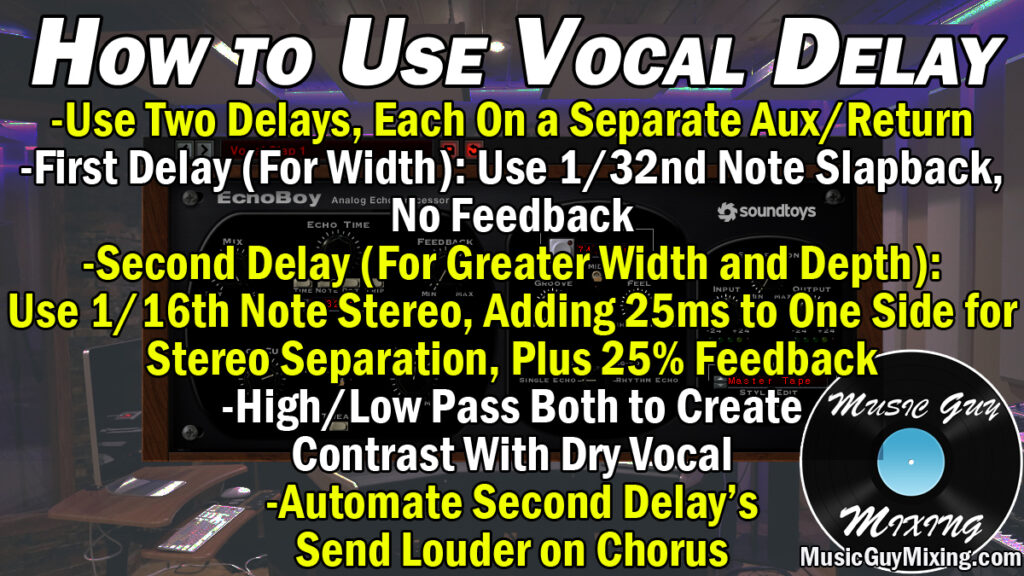
Essentially just use two instances of your favorite delay of choice (I’m partial to a number of plugins, though I find myself going to SoundToys’ Echoboy most often) one short and slapback in nature, the other with more width, feedback, and a longer (doubled) delay.
Use the first one throughout the mix but save the longer delay for moments you want to give that vocal more presence in the mix. I like to hold back my second delay for when the chorus hits to make it sound bigger and contrast from the verse.
Reverb
I use the same basic strategy on my vocal reverb as I do for the delay. I put together an entire vocal reverb cheat sheet to showcase how this works, but here’s the strategy at a snapshot:
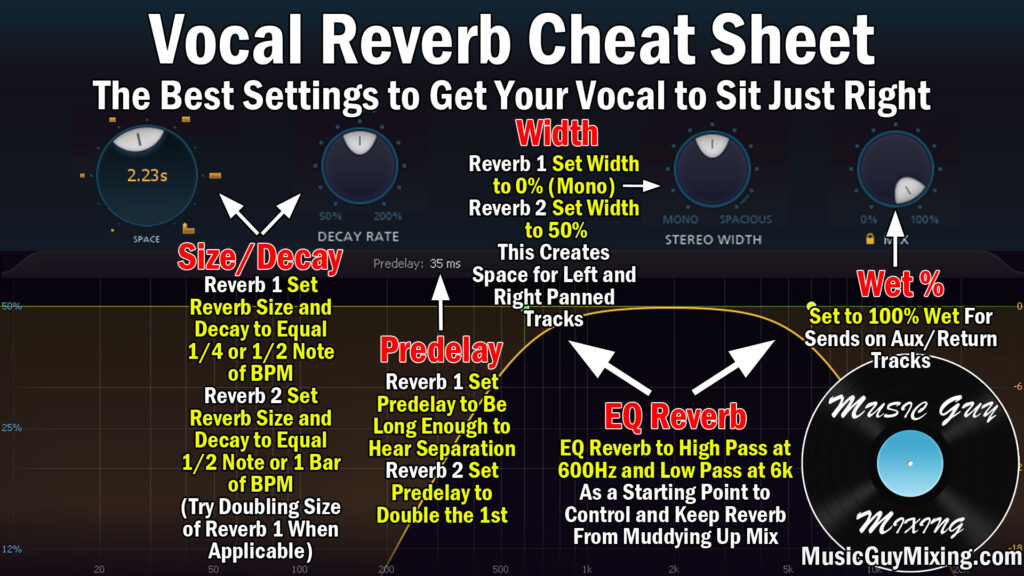
Once again we’re using two reverbs.
The first vocal reverb is shorter/faster, less predelay, and narrower.
The second reverb is roughly twice the length, predelay, and full width.
Once again I’m holding back that second, longer reverb when I want to add more presence and depth and size in general to my vocal, like in the case of the chorus.
Be sure to EQ your reverb to keep them from adding to the mix mud, high passing everything below 600Hz in particular to keep things clean.
Automation
I mentioned automating the level of your vocal on the input to feed a more reliable level at the start of your signal chain. We’ve greatly reduced the dynamic range of our vocal via our compression midway through these best mixer settings for vocals, but adding a little automation on the back end can help.
Whether it’s to ensure every single syllable is heard, or simply to emphasize the vocal in keeping up on top of a swelling instrumental, automating the level keeps the vocal lively and your listener engaged.
Once again, refer to my guide on vocal automation for tips on how to do this either manually or through the use of a vocal rider plugin.
There you have it, the best mixer settings for vocals from top to bottom, covering everything your vocal should need from gain staging, EQ, compression (compression again), saturation, delays, reverbs, and automation – everything to get your vocal sitting just right now matter what unique issues or treatment your vocal might need.
Check out the vocal category here on MusicGuyMixing for endless tips on getting your vocals perfect every time, and happy mixing!