
Last year I sent an anonymous questionnaire to my email list (which you can sign up for on the right to receive daily mix tips!) subscribers asking what their top goals were in mixing. One of the top responses was getting cleaner mixes. When we think professional mixes, maybe what we think of more than anything else is how open and clean everything sounds. With that in mind, let’s talk how to get a clean mix like the pros.
How to Get a Clean Mix
Let’s go through a checklist of things which you can do to get a clean mix.

High Pass Everything
If you’re an avid reader of this website then you’re probably sick of hearing me talk the wonders of high passing.
I recommend high pass filters on everything as often as I do because it’s one of the easiest ways of how to get a clean mix.
If you’re not familiar, a high pass filter is simply a type of EQ filter which removes everything below a certain frequency.

Not only does this remove background noise and unmusical sounds associated with the instruments themselves, but it creates room for the low end instruments which need to have everything below 100Hz to themselves.
100Hz is a good place to start with most instruments. Begin sweeping up with a 12 or 24dB/oct slope (see slope EQ) – the rule of thumb is when the sound starts to change, simply dial it back down by 10Hz or so.
We’re not trying to sculpt the sound here, we’re just getting rid of everything we can’t hear but which, when added up over dozens of tracks, contributes a lot of mix mud.
Pan With Frequencies in Mind
One of the most important rules in how to get a clean mix is to not simply make use of panning, but to pan with frequencies in mind.
When you have two tracks which share a similar fundamental frequency range, they should not be on top of one another in the stereo field.
For instance, two guitars which are playing a similar part generally should not be on the same side of the stereo field. My audio panning guide gives a snapshot on where you should be panning the various instruments in your mix.

The next time a track isn’t asserting itself enough or feels like it’s getting lost in the mix, pay attention to the tracks which are panned near or on top of it.
This is also a good time to check out my guide to panning backing vocals, as well, to get the best balance between backing vocals as well as your leads, harmonies, etc.
Check Your Transients
Speaking of tracks asserting themselves, clean mixes allow you to hear every track clearly. Part of that is making sure the transients of your tracks are clearly audible.
The transients of a track are the initial high frequencies which precede the rest of the sound (see what are transients for more information).
Setting the attack of a compressor too short/fast can cause the compression to engage instantly, dragging down and suffocating the transients. Typically an ideal attack time allows transients to pass through untouched for a split second before the compression engages.
If your track’s transients are still too weak regardless of compression (perhaps as a result of the recording itself), check out my tutorial for some techniques to actually add audio transients to a lacking track which needs to better cut through the mix.
Sidechain the Low End
I mentioned panning conflicts a moment ago.
One instance when we can’t pan to avoid frequency conflicts is the kick and bass. These two anchors of the mix represent the low end (see my low end mixing tutorial) and thus need to be right in the center of the stereo field so that they’re constant wherever the listener is standing in relation to the speakers.
The problem is their fundamental frequencies are each in that rich 50-80Hz region.
As such, the solution is to temporarily duck out the more constant element of the two, or in this case the bass using sidechain processing, when the kick triggers.
By turning the volume of the bass down whenever the kick triggers for a split second, this gives the kick sole access to the low end frequencies it needs.
This can be done with dynamic EQ or sidechain compression as I explain in my tutorial on how to sidechain bass to kick.
Cut at 400-600Hz
One of the reasons you get a dull sounding mix is a build up in the muddy mids in the 400-600Hz region.

This manifests as different sounds on different instruments, ranging from boxy to wonky.
Room reflections to simply inherent unflattering frequencies on a lot of instruments in this region add up over dozens of tracks, just like unmusical low end rumble below 100Hz.
A simple solution is to employ an EQ cut in the 400-600Hz range. Even better might be to use an EQ with the capability of making any EQ move dynamic like the FabFilter Pro-Q 3 (see my FabFilter Pro-Q 3 review) to make this cut dynamic so it only pulls as necessary when the dull frequencies surge for more transparent results.
The exact frequencies will vary from one instrument and recording to another, but my free EQ cheat sheet shows you the exact frequencies to cut to create natural clarity on every single track in your mix.
Shorten Your Reverb
Reverb creates depth on our tracks by giving the effect that they’re coming from deeper in the mix. This actually can help contribute to a cleaner mix by creating more space and separation.
The problem is reverb sounds cool, making it easy to go overboard when setting the length of the decay or size. This causes the tail of the reverb to overstay its welcome and smother the next hit, note, word, etc. which in turn kills transients and clutters up the mix.
An effective solution to keeping your reverb tight is to set the decay length to match your mix’s tempo via this calculator. Stick to 1/4 or 1/2 note timing to keep your reverbs sharp and responsive.
Check out my reverb tutorials for tips on the most effective ways to utilize it in your mix.
Filter Your Reverb
One last important word on reverb. Even with shorter decay times, its sound can still be suffocating on the low end.
A well documented trick pioneered by the engineers at Abbey Road Studios during The Beatles era was to place high and low pass filters at 600Hz and 6000Hz, respectively.
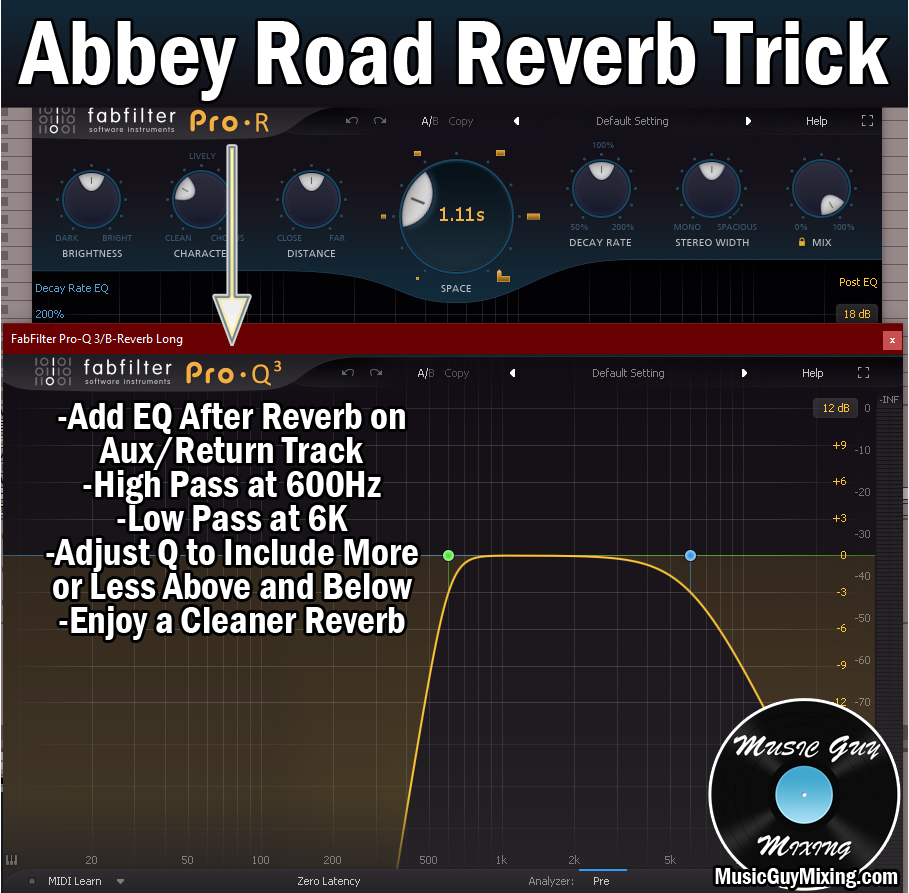
The Abbey Road Reverb trick, keeps your reverb sounding clean without clogging up the low, low-mids, or high frequencies of your mix.
Lower The Noise Floor
I recently talked about the noise floor – the combination of any and all unwanted or unintentionally captured sound either on a track or in our entire mix.
This can take the form of background or outside noise captured on microphone, electrical noise from analog equipment, etc.
The louder/higher the noise floor is, the more noticeable it will be in your mix, not to mention the less headroom you’ll have in mixing.
In that overview I covered a few ways to mitigate the effects of the noise floor. These include:
- Recording at 24 bit depth which gives you an extra 48dB of headroom to work with over 16 bit depth, putting more distance between the noise floor and the point of clipping. This is an easy way to lower the noise floor en route to getting a cleaner mix, and one you should already be doing.
- Most microphones you’d record with are cardioid pattern so be design they won’t pick up anything they’re not facing. With that in mind, aim your microphones away from any sources of noise you can’t turn off like your PC fan.
- Speaking of sources of noise you CAN control, turn off the air conditioner, humidifier, dehumidifier, and any other appliances you can or record in a quieter room if possible.
- Also sound proof your room as best you can from the outside, closing windows, doors, etc. or even recording when outside noise is minimal like at night.
- Keep cell phones away from anything involved in the recording process including amps or your recording hardware, use shorter quality cables, and plug everything directly into the wall rather than surge protectors to minimize electrical noise.
- Turn off all artificial analog noise from plugins whenever it’s an option (I’m looking at you CLA-2A from Waves).
Use Noise Gates
This is the same idea but I’ll give noise gates their own entry.
When you have noise from any of the above sources on your track in the mixing stage, drop a gate on the track and set the threshold so that the track is only heard when there’s practical/musical sound playing.
Gating requires the volume of tracks to reach a certain threshold before they’ll open and allow any sound to pass through.
Simply setting the threshold to just below the quietest instance of musical/wanted sound on a track will filter out everything unmusical, even before you send the audio to any processing.
Use Cleanup Plugins
Tools for the cleanup side of mixing when you need to correct issues with existing audio tracks have come a long way. Izotope’s RX suite offers a host of tools which are each designed to specialize in identifying and transparently cleaning up a specific issue with your audio.
These include one for pops, mouth noises (ugh), breaths, outside noise, etc.
When bad audio itself is the main thing holding back a clean mix, these tools can be exactly what you need.
As a mixing engineer, some of these have saved me hours of work and frustration while turning in better results than trying to correct these problems with surgical EQ, multiband compression, or cutting on the timeline itself.
Note that cleanup plugins and noise gates aren’t a substitute for manually trimming your tracks.
Trimming every clip to only the sections in which wanted audio is playing, making sure crossovers and transitions are clean, and even manually cleaning up breaths helps to ensure that you aren’t missing anything which could be dirtying up your mix without your realizing it (like during a busy section).
It takes more work, but as with anything in life, the more you put into mixing, the more you’ll get out.
Use Gain Staging
Gain staging is the process of recording and/or mixing tracks at responsible levels.
Okay, not the most exciting way to pitch it, but gain staging protects your tracks and entire mix from clipping related distortion.
My gain staging cheat sheet covers the basics of how to keep your tracks in a responsible range level-wise even if they were recorded too hot:
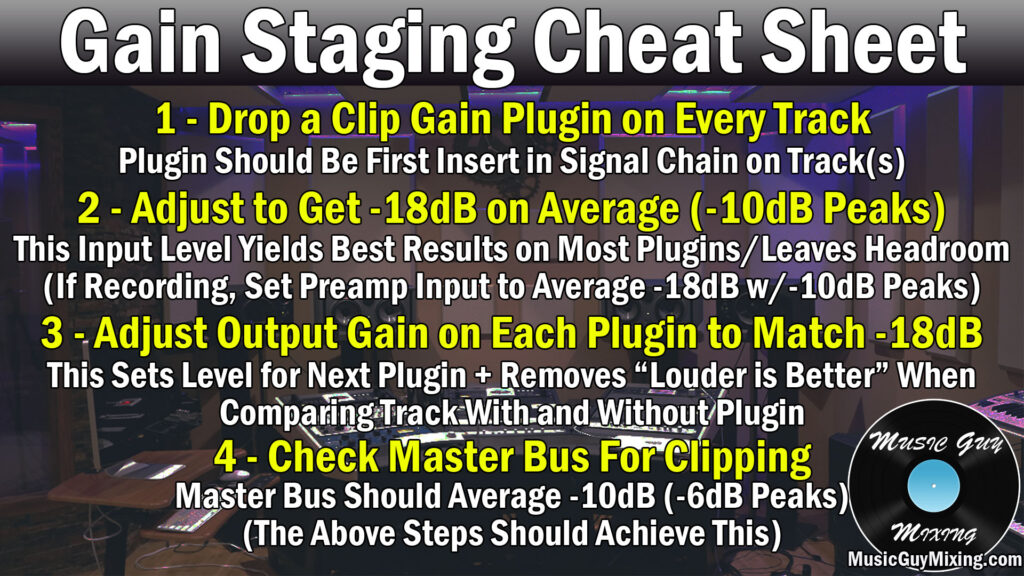
Gain staging also allows you to feed the optimal input level into each plugin for every track which actually makes the output sound better.
On top of all of that, gain staging allows creates more mixing headroom which contributes to a better sounding and cleaner master.
Remove Non-Essential Tracks
I end with arguably the most difficult of these tips on how to get a clean mix.
Sometimes we fall in love with our tracks so much so that we can’t see when there’s TOO MUCH going on at any point in the mix.
Sometimes the most effective method for how to get a clean mix is to make some difficult decisions and cut the fat. A track may sound good, but do you NEED it in a particular section which has too much going on?
An alternate solution to cutting a track altogether is to use mixing automation, varying up the presentation and placement of that track.
For instance, if you have two tracks playing during the duration of a chorus, try playing one only for the first half then transitioning to only playing one for the section half.
This allows you to keep both tracks and varies up the mix composition, keeping your listener more engaged as things are changing.
Sometimes you need to step away from your mix for a day to come back with a fresh perspective to better be objective in making these difficult decisions.
That’s actually a good bonus tip for getting a clean mix; the longer we mix, the less objective we become as we lose perspective.
Giving yourself a break helps to keep your ears refreshed so that you can come back and hear things you may have missed after being engrossed in the mix for an hour or more.
Speaking of which, use reference tracks as you mix to give your ears intermittent reminders of what a clean professional mix sounds like.
There you go, 12 (plus) ways to get a cleaner mix which span from specific track level fixes to macro level practical tips to make use of. Keep all of these tips in mind on your next mix and you’ll be amazed at how much cleaner, open, and BIGGER your entire mix feels.


Pingback: How to Use a Spectrum Analyzer for Mixing - Music Guy Mixing
Pingback: How to Mix Acoustic Guitars to Sound Their Best in the Mix - Music Guy Mixing
Pingback: How to Use Complementary EQ to Fix Your Mix - Music Guy Mixing
Pingback: How to Get Clear Vocals in Your Next Mix - Music Guy Mixing