
We’ve recently done a guide on vocal EQ and the best compressor settings for vocals to get the basic audio to sound as good as possible. The effective use of reverb on your vocals can bring a voice to life in your mix. It gives it depth and presence to help a vocal stand out, not to mention it can be used to provide a bit of ear candy, as well. If you’re unsure of how to best dial in your reverb, I’ve got your cheat sheet for the best reverb settings for vocals.
The Best Reverb Settings for Vocals
Note that for this example, I’m using FabFilter’s Pro-R. It’s my go-to reverb due to the fact that it sounds good and it’s easy to understand and dial in the sound you want. It’s even simpler than the stock reverb in my DAW of choice, Ableton Live.
While most reverbs have a certain array of features which are unique to them for coloring the sound in their own way, there are some settings all reverbs share. These are the settings we’re going to address for dialing in the best reverb settings for vocals.
These include predelay, room size, decay time, EQ, width, and dry/wet balance.
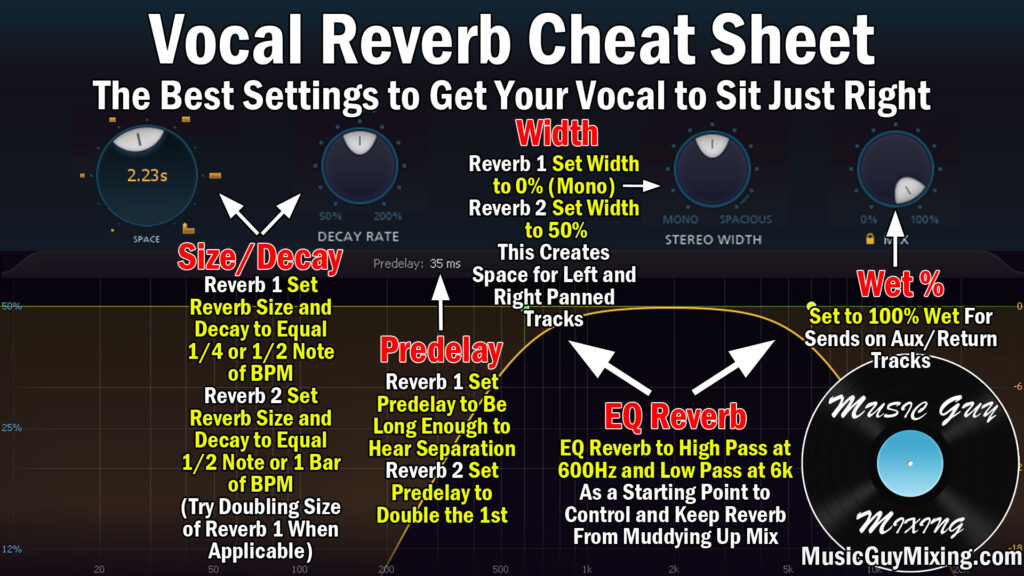
Here’s what the FabFilter R looks like with a breakdown of the best reverb settings for vocals on it. I’ll then address and explain each one individually.
Use Vocal Reverb as Send
Before we get into the best reverb settings for vocals, let me first establish that you should be creating an auxiliary/return track to put your reverb on and send your vocals to that track.
You can refer to my overview on the difference between inserts vs sends, but this saves you CPU by only having one instance of the reverb, and it ensures that all vocals (and any other tracks you send to that aux track) share the same reverb settings. This brings a sense of cohesion to all vocals in your set. If you want more or less reverb, you simply turn up the send dial higher on that particular track.
Now let’s talk specific reverb settings for vocals.
Vocal Reverb Cheat Sheet
As a starting point, I like to create two different reverbs as sends for my vocals. One is smaller, shorter, and narrower than the other, and I can automate more or less send signal to keep the vocal reverb and vocal dynamic.
As we go through the reverb settings for vocals, I’ll recommend a setting for each and explain what effect this will give.
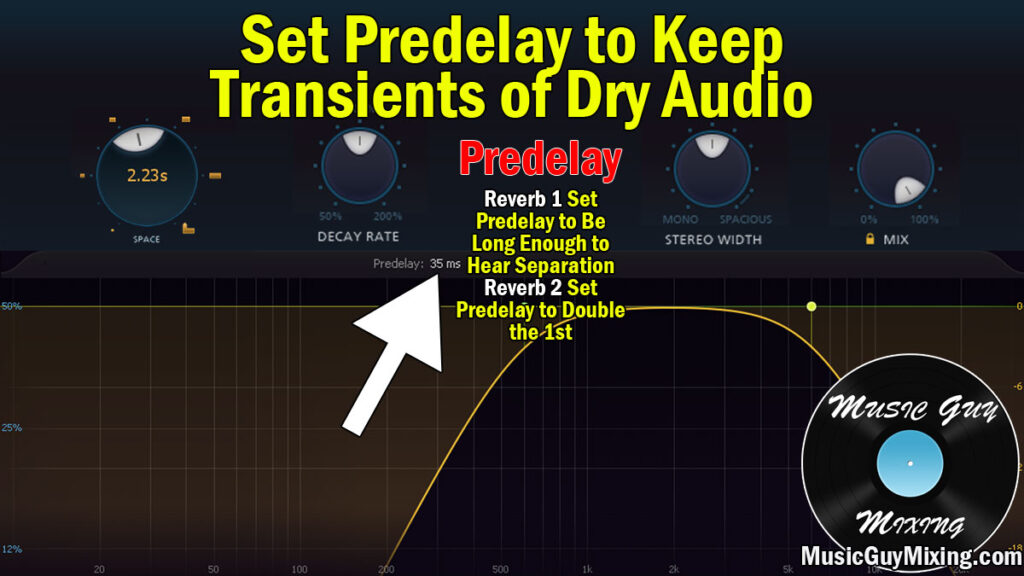
Predelay
We begin with an important and commonly confused reverb setting: predelay.
Predelay is the amount of time in milliseconds before that reverb is heard.
This is the first indication of how large of a room you’re trying to emulate or simulate via the reverb. You can think of it as the time before the audio reaches and reflects off of the walls in the room. A larger room will have a longer time or predelay before the reflections begin.
Setting this to 0 ms means that the reverb plays simultaneously on top of the dry audio. Setting this to 50 ms (for example) means that the reverb is heard 50 ms after the dry audio.
You’ll typically want some predelay (above 0 ms) so that you can hear the transients of the dry audio. Reverb soften the edges of the audio, so you lose that bite or punch when you play the reverb simultaneously.
The higher this setting, the more separation you’ll get between the transients of the dry and the sound of the reverb.
Note that as we covered on our overview of the Haas Effect in mixing, once you set your predelay to roughly 40 ms or higher, you’ll start to hear separation between the dry audio and the reverb.
This makes the reverb work more like a distant sounding delay which may or may not be what you want, but it’s worth mentioning.
Getting back to the best reverb settings for vocals, listening to the track and reverb in the context of the mix is the best way to approach predelay time.
You should match it to the size of the space you’re attempting to emulate for the best results.
Generally speaking:
0-10 ms emulates a tiny room, 10-20 ms a larger space, and 20 ms and above gets into cathedrals, concert halls, etc.
The predelay works closely with and should be set alongside your room size/decay time which we’ll cover now more specifically.
Room Size and Decay Time
Room size and decay time are closely related as the size of the room affects the length of the decay.
Essentially these are used to determine how long the reverb lasts as well as the depth of the sound of the reverb. Once again, this is a simulation of the size of the room.
A small room will have shorter reflections, meaning a shorter decay time and a brighter sound. A larger space like a cathedral or an arena will have a much longer decay time and a darker sound.
If you’re not sure where to start, a reliable way to set the decay time on your reverb is to set it in direct relation to the BPM of your song.
This keeps your reverb tight and controlled so that it doesn’t last too long and cover up subsequent “hits” on any instruments you apply it to.
Using this calculator, you can simply input your song’s BPM to get the best settings to set your reverb decay time (and predelay) to. Note you can adjust your predelay to experiment as listed above, just make sure you adjust your decay time to be more or less to keep it precise with the BPM if you want to get tight.

This allows you to set the total decay time (between the sum of the predelay and the decay itself) to equal the length of 1/4 note, 1/2 note, etc. in your song’s BPM.
The larger the fraction or number, the larger the space.
This is a reliable way to set your decay time because it keeps the decay perfectly square with the tempo of your song.
If you’re not sure what size space to use (1/4 note, 1/2 note, etc.), experiment with the set different note length times.
Generally I like to start with two different reverbs.
Ideally you want to set the timing of the reverb to decay fully before the next instance of it, otherwise the fading reverb of the previous “hit” will mask the clean/dry transients of the next hit.
This takes away the punch and immediacy of that instrument.
The 1/4 note length reverb decay generally works well for a room reverb as the decay only lasts a quarter of a beat, ensuring that the reverb never lasts longer than a second hit. This keeps the reverb tight and well controlled in your mix.
EQ
Many reverb plugins have a built in EQ so that you can adjust the frequencies of the reverb sound itself.
It’s important to EQ your reverb because by default, reflections are very low/low mids frequency heavy as they pick up a lot of the room.
As I recently covered on my post on the 5 causes of a muddy mix, reverb which isn’t EQ’d is one of the major causes of muddy buildup in a mix.
A lot of people who do their own mixing forget about this and wonder where all of the congestion in their mix is coming from.
This is yet another reason to use your reverb on an aux track as a send. When the reverb is on its own isolated track, you can add an EQ after the reverb plugin in the chain to sculpt the sound as you like via that EQ.
The built in EQ on the reverb will get you part the way there, but in my experience there’s no substitute for using a dedicated EQ to adjust the sound as you like.

Referring back to that aforementioned post, I like to use a high pass filter (see my overview of the 6 EQ filters) around 600 Hz to remove everything below that frequency. This will remove unwanted muddy, rumbly, and boxy sounds in that reverb which don’t add to the mix.
You can also add a low pass filter around 6k to filter everything out above that. Incidentally cutting below 600 Hz and above 6k is known as the Abbey Road trick as they EQ’d their reverbs the same way on hundreds of artists including The Beatles to keep the reverb from cluttering the mix.
Width
Width dictates how much of the stereo field the reverb occupies. This is typically listed as a percentage between 0 and 100, occasionally going above 100 in some instances.
Setting this at 0 will mean that the sound of the reverb is right down the middle, in mono. The higher you go with this, the farther left and right that reverb sound will spread.
In some reverbs, going to 100 or above removes the reverb from the middle entirely and just places it in the left and right channels.
This creates more space for your dry audio to exist independently, not to mention it makes that audio sound a lot larger as it extends to the sides of the mix.
That said, this can complicate a mix if you’ve already got a lot of tracks panned hard left and right.
For best results, you should adjust your vocal reverb’s width in accordance to how your mix is panned.
If you’ve got a busy mix with lots of instruments panned left and right, you might want to narrow the reverb width to have it fill in the space between the center and sides of your mix. It’s really about what feels right.
Also, don’t discount the value of a mono reverb.
You can create depth by keeping the reverb mono and blending it in with the dry signal with your send. This will give the effect of that track playing from deeper in the three dimensional space you are creating via the reverb.
Setting one reverb in or near mono in terms of width makes for a subtle reverb, ideal for verses.
Once that chorus hits, I bring in that second reverb which has more width to have that vocal suddenly occupy more space in the stereo field, bringing more attention to it to match the moment.
Dry/Wet
As I mentioned early on, you should be using your vocal reverb on an aux/return track you send your vocals to.
As such, the best reverb settings for vocals related to dry/wet ratio is 100% wet.

This means that any audio from this track will exclusively feature the sound of the reverb. This makes the send knob on any track you use it on act as a dry/wet knob as you blend in the sound to your mix.
Using More Than One Reverb
You can use a second reverb to give your vocal a different feel to it whether that’s through more or less depth or width than the first one. You can color it differently of course, as well.
Simply create another aux/return track and drop a different reverb with a longer decay time (still keeping it in time with your BPM).
You can reserve this for chorus vocals to give your vocal a bit more presence when the energy of the track is at its peak, keeping the vocals for your song more dynamic and changing as the song progresses.
Best Reverb Settings for Vocals Recap
- Auxiliary/Return Track and Send – Vocal reverb is best used as an auxiliary track which you send your dry vocals to and blend in. This creates a sense of cohesion that all of your vocals sound like they’re in the same space, not to mention that it saves on CPU.
- Predelay – Typically somewhere between 0-30 ms. The greater the predelay, the larger the room you’re modeling. You can set this to your song’s BPM.
- Decay Time/Room Size – Set to BPM of your song in fractions of a note increments (longer equals larger room). A shorter time keeps delay controlled and your mix clean and transients punchy.
- EQ – Recommended you high and low pass at 600 Hz and 6000 Hz, respectively, to keep reverb clean.
- Width – 0 makes reverb mono, 100(+) is typically completely left and right. Experiment with different widths depending on how busy your mix is.
- Dry/Wet – Set to 100% wet for an aux/return track then blend in to taste.
- Second Vocal Reverb – Don’t limit your mix to one vocal reverb. A second reverb with different settings allows you to draw extra attention to a vocal and give it more presence in space, both two and three dimensionally.
Pingback: Ableton Reverse Reverb - How to Do It to Make Tracks Pop - Music Guy Mixing