
Saturation is one of those nebulous audio effects that you’ll often hear referenced but doesn’t often get explained. Other effects are much easier to understand. Compression compresses the loudest parts of an audio clip to achieve a more consistent level. EQ cuts or boosts existing frequencies in an audio clip to sculpt the sound. But what about the NON-existing frequencies? Enter saturation. Let’s cover what does saturation do to your audio, and when and how to use it in your mix.
What Does Saturation Do
Let’s answer the million dollar question first: what does saturation do?

Saturation in audio refers to adding varying degrees of distortion to create harmonics, or essentially sound at frequencies which were not already present in our audio, in order to fill out the sound.
The technical side of this is that it does this by literally distorting the wave forms, hence the term distortion. Harmonics are created at multiples of the fundamental frequency. A very simple example of this is to apply saturation to a basic sine wave playing at and representing A1 which occurs at 110Hz:
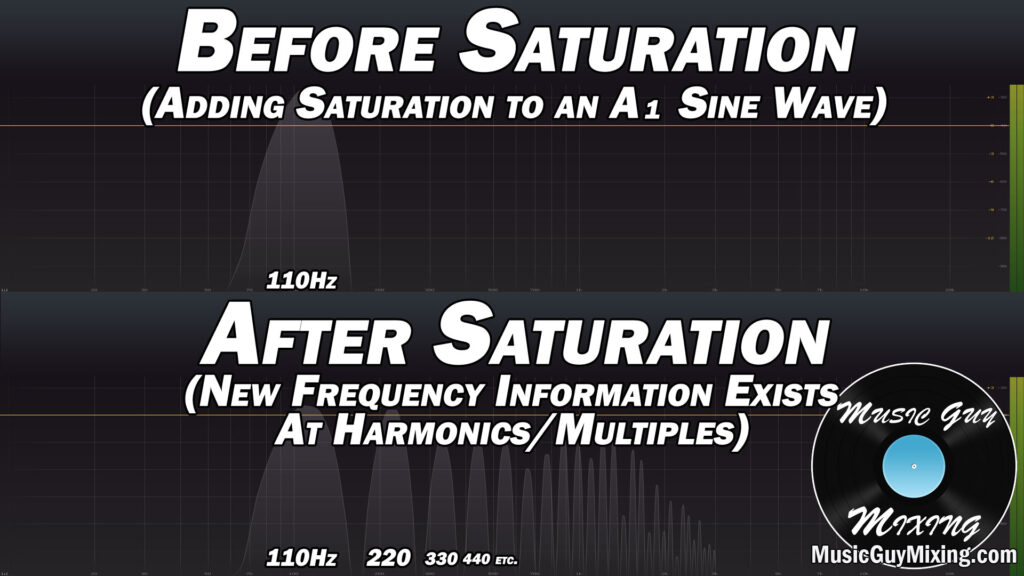
As you can see, frequency bands are created at each multiple of 110Hz post-saturation. This is the simplest and most clear cut example you can give to demonstrate the before and after effects of saturation.
In more practical terms and applications, we can use saturation to add fullness to thin or otherwise lacking audio or even smooth out a harsh or bright track in balancing the frequency profile by adding some mid warmth.
Saturation Vs Distortion
The term saturation itself comes from the idea that we’re saturating or coating our signal with generally a low level of distortion.
There are a lot of semantics involved with the terms saturation, distortion, overdrive, and even fuzz. Typically they’re used to describe the degree of distorting the wave forms of the audio, and you may even hear them used interchangeably in some way or another.
Generally when we’re talking about saturation, we’re referring to a gentler and more low and mid-centric adding of harmonics.
Most saturation plugins model tubes, tape, and guitar amplifiers and their influence on your signal.
You can ride them easier for some subtle mid frequency warmth, or conversely you can crank the settings to get crunchy or even fuzzy distortion on your audio.
Saturation Vs Exciters
We ALSO have exciters.
There’s still some semantics involved, but typically exciters perform exactly the same as saturation with the difference being they focus on adding high frequency harmonics.
So instead of warmth, you’re adding clarity and crispness through harmonics.
Exciters sound good on vocals, an overall mix when used in the mastering process, or really anything that’s feeling dull or too mid heavy.
How to Use Saturation
As I mentioned earlier, saturation in particular is fantastic for thickening up thin audio clips or those which are too bright. Anytime you want to add some warmth or even body to a track, rather than immediately reaching for an EQ boost in those low mids, try adding saturation first to balance out the tone.
There are a lot of saturation plugins available. While your DAW undoubtedly has a stock saturation plugin, I typically reach for either the massively popular Decapitator from Soundtoys or FabFilter’s multiband saturation plugin, Saturn.
The latter is great for more precise saturation considering you can only apply the effect to a particular frequency range of your choosing.
Decapitator is one of those plugins which you can put on just about anything and it sounds good, the plugin of a thousand uses.
Here are some presets I like to tame a harsh guitar tone:

The style buttons at the bottom emulate different systems to give different results so you can experiment with those. The “tone” knobs in the middle work well for high or low passing as well as placing more of an emphasis on the darker or brighter frequencies.
This setup works really well for imparting body and warmth to most anything, though you can adjust the drive to taste.
I like pushing the drive and backing off of the output when using it on guitar.
Here is what the frequency spectrum for a harsh guitar looks like before and after being smoothed out by saturation:

It looks like a subtle change, but it saved the guitar in this instance which was already recorded with too much distortion and treble. Adding EQ just made the tone muddy or brought out tones I didn’t want, trying to bring out something which wasn’t there.
This is the beauty of saturation, compensating for something you need which isn’t already present in the audio.
So the next time something is feeling weak, thin, or even too top (high) heavy in frequency, try imparting some warmth by way of some light saturation to keep your audio clean.
Pingback: Mix Bus Chain - How to Create the Perfect Mix Bus Chain - Music Guy Mixing
Pingback: How to Mix Snare Tutorial - Getting it Just Right - Music Guy Mixing
Pingback: How to Make Synths Sound Full - Music Guy Mixing
Pingback: Master Bus - How to Process Your Master Bus - Music Guy Mixing