
The vocal chain refers to the processing or effects which you insert on your vocal track(s). I’m going to cover my own personal vocal chain and at the end I’ll share my recommended vocal chain order which I use on my vocals every time.
Vocal Chain

Auto-Tune
Auto-tune is typically one of those set and forget it things, so I like to put it early on in the vocal chain away from the plugins I may need to go back and tweak later. I use the Antares Auto-Tune Pro – just set the major or minor key and adjust the sensitivity to find that sweet spot between natural nudges and artificial robotic tuning.
Admittedly sometimes an auto-tune plugin can’t thread that needle finely enough. Sometimes you may either need to manually adjust the note yourself or automate the plugin’s parameters to keep things sounding natural.
In some genres you may want to tighten the vocal up more than others. You can get away with more of a noticeable and aggressive tuning in Top 40 pop and EDM than you can in say folk or singer songwriter.
Gain
The first plugin to insert on your vocal chain should be something to adjust the gain.
A gain plugin allows you to adjust the input volume of your vocal for the rest of the chain with gain staging in mind.
You generally want to aim to average around -18dB to get the best results from your plugins as an input volume.
If your track is quieter or louder than this, you can use a gain plugin to add or remove as much gain as you need to get it right in that pocket.
You can also automate the gain plugin to get a more consistent level feeding into our plugins. You can argue that’s what a compressor is for, but you’ll get a more natural sound from your vocal if you don’t have to ride your compressor too hard. Feeding it a more consistent level via a gain plugin does that, but we’ll get to compression in a bit.
Volume Rider (Optional)
This goes with the last point. We typically think of vocal automation or using a vocal rider to automatically do it for us as being the last step. We can automate the vocal to emphasize certain lines or rise above certain points in the instrumental as the final step, but doing that on the in gives us a more consistent level like I just mentioned.
We don’t want to completely remove dynamics from our vocal, but a rider early on in the signal chain can help give us a bit more control in the signal chain.
EQ
Vocal EQ is essential to sculpting your vocal to better lift the good parts and remove the bad parts.
You can use an SSL based EQ like Waves SSL EQ, or my favorite EQ in FabFilter’s Pro-Q 3 (check out my FabFilter Pro-Q 3 review if you haven’t already to see why it’s arguably my favorite plugin in general).

This typically means high passing around 100Hz to remove room/ambient/non-musical noise, boosting around 200-300Hz to bring out the fundamental body of the vocal, making a cut around 400-600Hz to remove boxiness, adjusting 1-2k as well as 3-5k accordingly (as shown above), and maybe adding a small high shelf to boost around 10k for some air.
Every vocal will be different, though the good news is the more you work with a particular vocal (maybe even your own), you get a better idea of the problem frequencies and how to treat it so you can EQ it more efficiently for next time.
De-Esser
A de-esser is a type of multiband compressor which targets high frequency syllables associated with sibilance.
Sometimes, depending on a number of factors, vocalist’s “S” and “T” sounds come out with a pronounced hissing sounding. Whether it was from the recording or something which gets exacerbated through compression or both, these sounds are distracting for the listener.
When it’s bad enough, sibilant sounds are all you can focus on, so a de-esser smooths out these sounds to be more subtle.

These sounds typically occur in the 6-10k region. A de-essing plugin like FabFilter’s DS is designed to identify and specifically target sibilant sounds, attenuating them when they peak while leaving the rest of the vocal intact for transparency.
Remember that a little sibilance in a vocal is natural as we don’t want to attenuate those “S” sounds to a fault. Get too aggressive with a de-esser and the sibilant sounds will get transformed into lisps. Like with most processing, less is more with a de-esser.
CLA-76 (Compressor #1)
Now it’s time for our first compressor. As I explained in my answer to the question how many compressors on vocals to use, more than one works better for achieving a more transparent compression.
Using two or more compressors on your vocals allows you to split the duties between them, not to mention add compression for glue later in the chain after any additional processing you’ve added.
An FET style 1176 style compressor like the Comp FET-76 from Arturia or the CLA-76 from Waves is a good way to open up the compression for your vocal.

I like an 1176 early in the chain to get a handle on the biggest peaks, achieving 5-10dB in gain reduction on the loudest peaks. It’s also a bit easier to dial in the sound you want as there’s less settings to fiddle with.
Remember that the input, attack, and release on an 1176 compressor all work a bit counterintuitively, so be sure to check out my tutorial on how to use an 1176 compressor.
CLA-2A Compressor (Compressor #2)
After I’ve gotten control of the most dynamic parts of the vocal, I like to quickly follow it up with another compressor to smooth things out.
Most types of audio compressors will work for this just fine, but I prefer a relatively transparent optical compressor like the Waves CLA-2A.

This one is dummy proof; simply set your “Peak Reduction” knob in the case of the CLA-2A until you average 1-3dB in gain reduction (3dB on the remaining loudest peaks). After that, add back in the makeup gain you need with the “Gain” knob to get your output level sorted.
CLA Vocals (Optional)
CLA Vocals from Waves is an efficient little vocal suite which boasts some very simplified EQ, compression, reverb, delay, and width controls.
Many mixing engineers exclusively use this on their vocals because of the simplicity and ability to dial in a great sounding vocal in seconds.

I like to use it to supplement the rest of the processing I’ve got on my vocal so that I can use it conservatively to add in a little extra flavor.
It’s similar to how I use match EQ in that way like I mentioned in my recent mix bus chain tutorial.
Rather than getting bogged down with a plugin with 1000 settings, just give me a slider I can nudge up or down and say “that sounds better”.
R-Vox (Optional Compressor #3)
At this point, if I’ve added CLA Vocals or anything else I’m not mentioning here which is more of a rarity, I’ll add one final compressor. At this stage, simplicity and transparency are key to me, so I like R-Vox from Waves.

Once again, the controls are streamlined. Just lower the main slider until you get the amount of gain reduction you want (displayed at the bottom) and adjust the output slider accordingly.
It’s just transparent compression to give our vocal that last little touch at the end of the chain (almost).
soothe2
soothe2 is a dynamic resonance suppressor. Its aim is to attenuate (or boost) a frequency range of your choosing as transparently as possible, leaving the rest of the audio untouched.

Practically speaking, this plugin is ideally suited for treating and taming harsh vocals. If your vocal is a bit too bright or brassy to the point of being grating in that 4-8k area (it varies from vocal to vocal), sooth is a great way to treat it without blunting the vocal or changing the timbre.
Less is more once again with soothe2, so adjust that “depth” knob accordingly to keep your vocal assertive without being harsh or painful to the ears.
Vocal Rider (Optional)
I mentioned using a vocal rider before compression at the start of the vocal chain to feed it a more consistent signal.
Vocal riding is more commonly done at the end of your vocal chain to keep your vocal under control as well as giving it some life. You can do this with a vocal rider, or conversely you can manually ride your vocal level with one more gain plugin (or both).
Gain (Optional)
As I just mentioned, a gain plugin at the end of the vocal chain allows you to add some vocal automation to give your vocal a little extra life in keeping it reacting to the music.
If the instrumental builds at a certain moment, it can swallow up the vocal. In this case, you should automate a boost in the vocal gain to match that swell of the instrumental.
Note that at the end of the vocal chain, riding the track fader itself would yield the same result. I prefer a gain plugin for the reasons I explain in the pre fader post fader tutorial, plus it keeps the fader clean.
This allows me to universally pull the level of the vocal up or down with the fader regardless of automation if I need to adjust the overall level in the context with the rest of the mix.
That’s essentially the end of the vocal chain there. You can add more EQ in at different stages to adjust for any changes along the chain, and I’d particularly recommend this if you end up adding additional processing not covered here.
At this point, the vocal should feed into its parent bus, and on and on down the signal chain eventually to the master bus. That’s not the end of my vocal processing, though, as I like to use a number of additional types of processing as sends.
Vocal Chain (As Sends)
The last section was all about the inserts on the vocal chain. Let me also acknowledge that part of the vocal sauce comes from aux/return tracks via the send knobs (see inserts vs sends).
These include (in no particular order):
Reverbs (1 and 2)
I’ve talked at length about the best reverb settings for vocals, so I’ll defer to that for the full overview.
I use FabFilter Pro-R chiefly, but any reverb plugin will do.
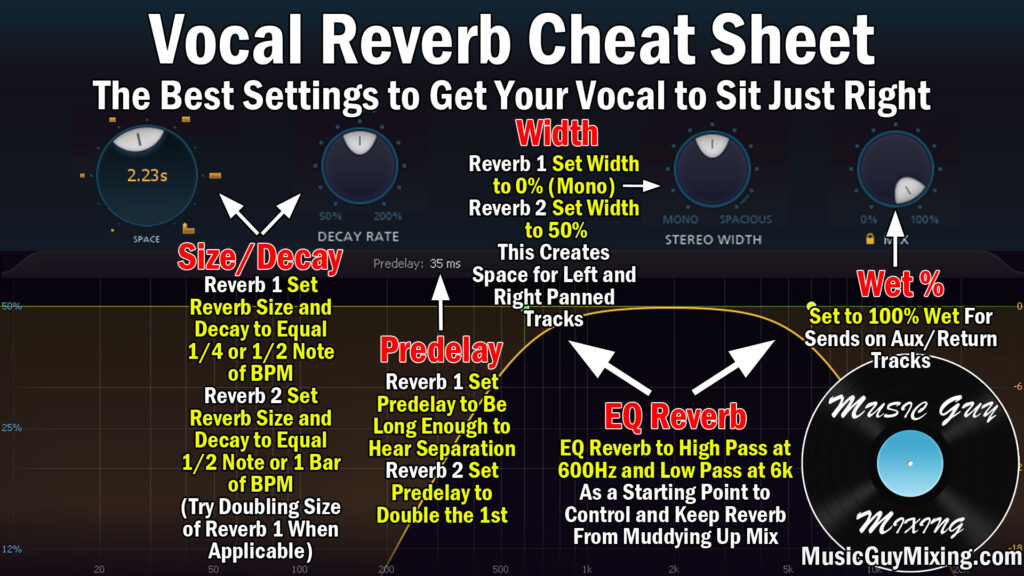
Suffice to say that I like creating two aux/return tracks for reverb; one for a short and narrow reverb for a bit of depth, another for a longer wider reverb for more width and depth.
Note that these reverbs are used across the entire mix as sends to different degrees.
In addition to giving my tracks in addition to the vocal depth, using your reverbs (or any effect) as a send utilizes the same effect for anything you feed into it.
This helps to give your mix cohesion, particularly with a reverb which makes anything you send to it sound like it’s coming from the same room.
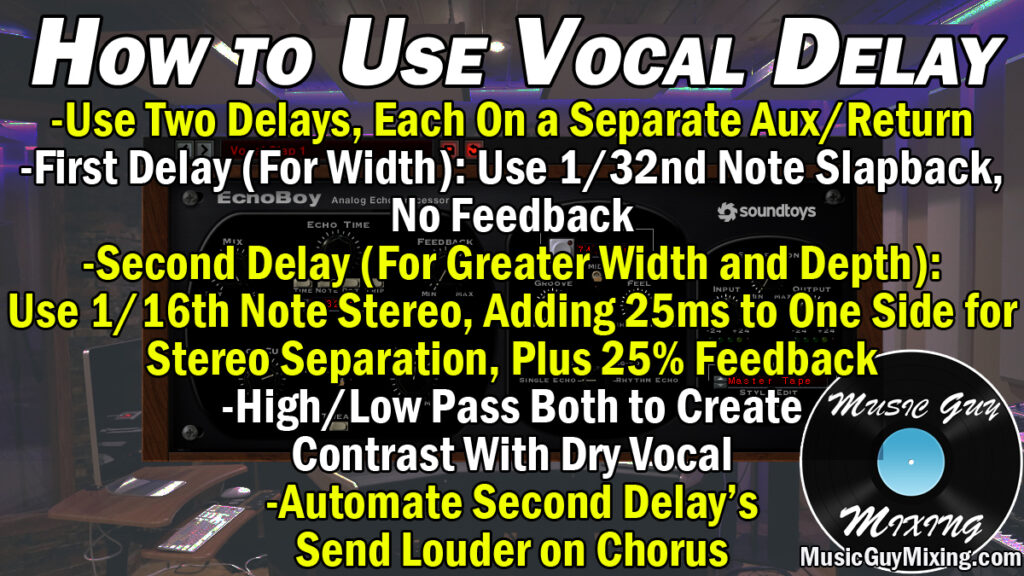
Delays (1 and 2)
I approach vocals delay the same way as the reverb whereas each delay has a purpose.
Parallel Compression
I don’t use this too often with vocals, but sometimes when you want to add a little subtle energy to a vocal you can blend in an absolutely crushed parallel compressed vocal via a send.
No secrets here, just follow my guide for parallel compression and blend to taste.
Saturation
I like to add an instance of Decapitator from soundtoys with extreme (i.e. crushed) settings and blend this in when I want to here some of that distorted sizzle via the send.

Little Microshift (For Width)
Little Microshift also from soundtoys is a bit like a chorus plugin in that it creates the illusion of width in your track.
Whenever a track feels like it’s not quite big enough after everything else, I’ll blend in a little (little) Microshift.

I use the little variety that I got free years ago, but it gets the job done just fine.
Sometimes I even use this plugin in place of delay when I want an even drier width and save the delay for a bigger moment for the vocal like the chorus.
Vocal Chain Order
The vocal chain order I just delivered in covering the effects to use in your chain works well. As you probably guessed or already knew, the vocal chain order absolutely matters because each time you process the vocal with one effect, the output is going to be completely different than if you put a different effect first.
Part of the ideal vocal chain order is ending the EQ or compression first debate.
As I explained in the linked to article, you should put your EQ before your compression in the chain.
You may have multiple compressors like I have in my vocal chain, but make sure you’re cutting out the frequencies you don’t want on your track/affecting the compressor via EQ before compression.
The best vocal chain order is the order I just listed the components in.
In other words, the best vocal chain order is:

Once you’ve finished your vocal chain and blended in your sends, your vocal should be in good shape before it is sent to its parent bus and eventually the master bus.
Speaking of which, check out my tutorial on how to process your mix bus chain for the best plugins to put the finishing touches on your entire mix.

Pingback: How to Treat Harsh Vocals - Music Guy Mixing
Pingback: How to EQ Reverb to Achieve a Cleaner Depth - Music Guy Mixing
Pingback: What is a Noise Gate and How to Use One - Music Guy Mixing
Pingback: What is Multiband Compression - How to Use It in Your Mix - Music Guy Mixing
Thanks for sharing I’m looking forward to using myself. I usually struggle with mixing MY own vocals but anyone else I have no issues
It’s frustrating . Email me if you can possibly help with this.
Pingback: Best EQ Plugin for Vocals - Music Guy Mixing
Pingback: Chorus Effect on Vocals - The Best Settings for Lead or Backing Vocals - Music Guy Mixing
Pingback: How to Process Your Vocal Bus Chain - Music Guy Mixing
Pingback: Vocal Saturation - The Best Settings For Warmth and Thickness - Music Guy Mixing
Pingback: The Best Free Vocal VST Plugins - Music Guy Mixing
Pingback: How to Make Vocals Sound Professional - 11 Tips - Music Guy Mixing
Pingback: What Does a Compressor Do For Vocals (And How to Use It) - Music Guy Mixing
Pingback: Autotune and Reverb - How to Use Both on Your Vocals - Music Guy Mixing
Pingback: How to Make Vocals Sound Warmer - Warm Vocals Settings - Music Guy Mixing