
An 1176 compressor is modeled after the Universal Audio 1176 analog hardware compressor which was first released in 1967. It is a dynamic FET (Field Effect Transistor) style compressor (see types of audio compressors) which works well on vocals, all types of instruments, buses, you name it. In this guide I’ll cover exactly how to use an 1176 compressor in your mix.
How to Use 1176 Compressor
An 1176 compressor has a lot of the features you’d find on a typical compressor, minus a few additional features like “knee”, “range”, and “hold”.
As such, an 1176 style compressor like the Waves CLA-76 or Arturia Comp FET-76 is easier to dial in the settings to get the result you want.
Let’s go through each component in how to use an 1176 compressor and cover the curveballs associated with it.
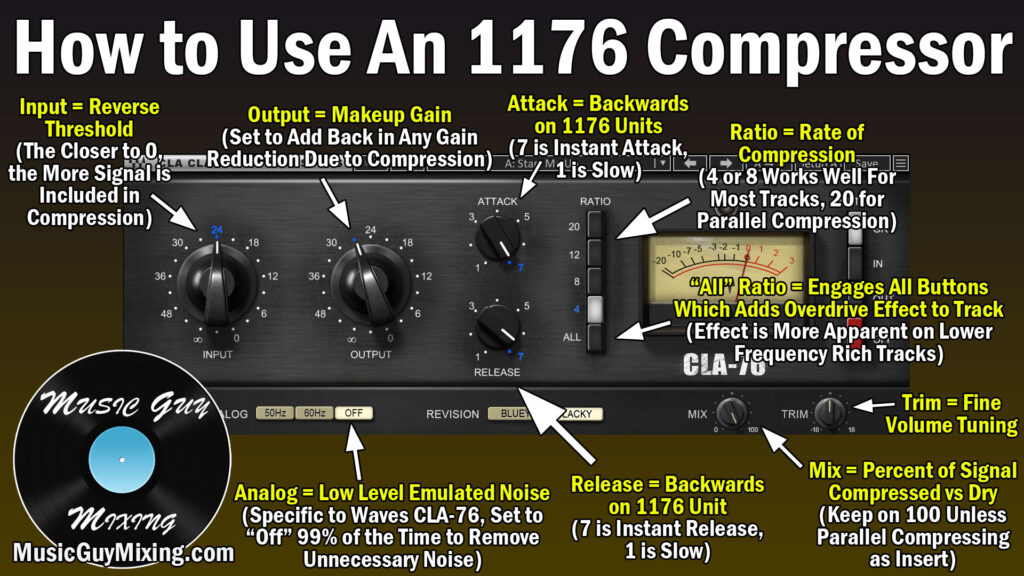
Input
The input on an 1176 style compressor is the first of many curveballs associated with this style of compressor. Acting as the compressor’s threshold with a twist, on virtually every other compressor we’ve ever used, the lower we set the threshold, the more level gets compressed.
So on an average compressor if you set the input threshold as low as it would go, it would compress everything regardless of volume.
On an 1176, the input is backwards so that the closer we turn the knob to the left, the less signal gets compressed. Turning it all the way to 0 is the equivalent of turning the knob to negative infinity on an average compressor, compressing the entire signal.
Keep an eye on your gain reduction, represented in the window to the right, to see how much the loudest peaks of your track are being compressed to set this (keeping the rest of the settings in mind).
Output
The output is the makeup gain. As I covered in my gain staging cheat sheet, we generally want to average -18dB on every track. This yields the best results for most plugins, not to mention it keeps the headroom intact in your entire mix.
Adjust the output gain knob accordingly to output roughly -18dB on average, post compression.
Speaking of which, make sure your signal feeding into your 1176 compressor averages that (by turning up or down the output gain on the plugin immediately preceding it), as well.
Ratio
The ratio on an 1176 style compressor is simplified to where you just have 4 radio buttons for ratios (4:1, 8:1, 12:1, 20:1).
I generally recommend sticking with either a 4:1 or 8:1 on most tracks, with the latter setting being for more dynamic tracks you want a little extra hold on.
The 20:1 ratio works well for limiting or if you want to use the 1176 compressor for parallel compression. Set the input on the higher end (meaning you’re compressing most of the signal) for this combined with a 20:1 ratio to squash your track and blend it in. You can do this on a separate track, as an aux/return track, or even on the track itself as an insert (see sends vs inserts).
In the latter case, make sure you turn the “Mix” knob down which I’ll mention in a moment.
All Ratio
There is a fifth radio button, the infamous “All” ratio. This engages all of the radio buttons at once which creates harsh slopes for the attack and release.
The main thing to know is that engaging the “All” ratio button adds overdrive to your track, and this effect is more pronounced the more low frequency heavy your track is.
The “All” ratio button is often used on drum overheads to create a kind of explosive sound via that distortion, so feel free to experiment with this for a noticeable amount of color on your tracks here or there.
Attack
Another instance of the 1176 working again conventional wisdom, the higher numbers denote a faster attack time. Turning the knob all the way to the right (7) immediately compresses your signal whereas all the way to the left (1) engages the compressor as slowly as possible.
Note that on an 1176 compressor, the attack is much faster than average, even on the “slow” end at 1. Typically on an 1176, the slowest setting of 1 equates to .8 milliseconds, or .0008 seconds. At the fastest speed, you’re getting down to 20 microseconds, or 0.00002 seconds. Yes, there is an audible difference between the two, and at this speed it’s lightening quick, and transients are basically an afterthought.
I recommend keeping your 1176 attack time around “5” as a starting point to preserve your transients while still enjoying the benefits of the compression.
Release
Similar to the attack, turning this all the way to the left (1) is a slow release, keeping your signal compressed for longer after the signal drops below the input.
Conversely, turning this to the right (7) results in an immediate release. Similar to setting an instant release on a more typical compressor, this can result in a pumping sound, particularly depending on the aggressiveness of the rest of your settings.
Once again, a “5” or “6” is a nice compromise for keeping your signal responsive without immediately letting go to the point that you hear artifacts, but experiment with this to dial in the perfect sound for your particular track.
Mix
The mix knob dictates how much of your output is the “wet” compressed signal and how much is the “dry” uncompressed signal. You back this off a bit if you want a little of the uncompressed signal coming through to keep a little added punch.
Furthermore, you can turn this relatively low if you’re doing some of the aforementioned parallel compression as an insert on the track itself, but typically I just like to use parallel compression as an aux/return track and blend it via the send knob.
99% of the time, you’ll want to keep the mix at 100 so your entire signal is being compressed to the specifications you have set.
Trim
This is mostly just for some very fine tuning on the output level. If you want just a HAIR more or less of your track, you can adjust this dial.
Analog
This is specific to the Waves CLA-76 and is used to impart a little low level noise which is associated with the actual hardware these plugins are based on.
I generally always keep this turned off to keep things clean, otherwise you’ll have a very low amount of static noise on your track. On one track it’s not much, but if you copy and paste one instance of this plugin to multiple tracks, that noise adds up.
Note that many of the included presets have this setting engaged, so be aware of that.
How to Use 1176 Compressor Tips
- An 1176 style compressor emulates the 1967 UA 1176 hardware which uses transistors to process and compress audio, keeping things relatively clean while imparting a little color.
- Several features are absent from an 1176 that you might associate with other compressors, but it makes it easier to dial in a good compression quickly.
- Note that the input (threshold), attack, and release all work inverse to most compressors in that pushing them to the right/higher numbers results in more aggressive settings.
- Roughly a “5” or “6” on the attack and release works well as a starting spot for more tracks.
- A ratio of 4:1 or 8:1 works well on most tracks with 20:1 working well for limiting or parallel compression.
- The “All” ratio engages all buttons and results in some noticeable overdrive, particularly on lower frequency heavy tracks.


Pingback: 1176 All Buttons in Explained - What Does it Do? - Music Guy Mixing
Pingback: My Vocal Chain - The Perfect Vocal Chain Order - Music Guy Mixing