
The kick drum is the anchor of your mix. It keeps time, keeps the listener in touch with what’s going on in the song, and drives everything forward. It needs to be felt and heard. Just as importantly it needs to be cleaned up. This guide on how to EQ kick drum will explain the exact frequencies you should boost or cut to get your kick sounding perfect.
How to EQ Kick Drum
Whether you’re using recordings (good or bad) or samples, this guide is guaranteed to get your kick sounding markedly better in minutes.
Bear in mind that you also need to be aware of these frequencies when mixing other instruments in your mix, as well.
For instance, high passing virtually every other track in your mix will carve out space for the essential low end of your kick. This will also clean up your mix in general (see my 5 causes of a muddy mix).
Kick Drum EQ Cheat Sheet
I put together this kick drum EQ cheat sheet to show you the exact frequencies which are especially relevant with a kick. I’ll explain each point in detail below, but this is meant to be a guide to help you get started. Note that, depending on the audio you’re working with, these frequencies may vary slightly.
As always, trust your ears!
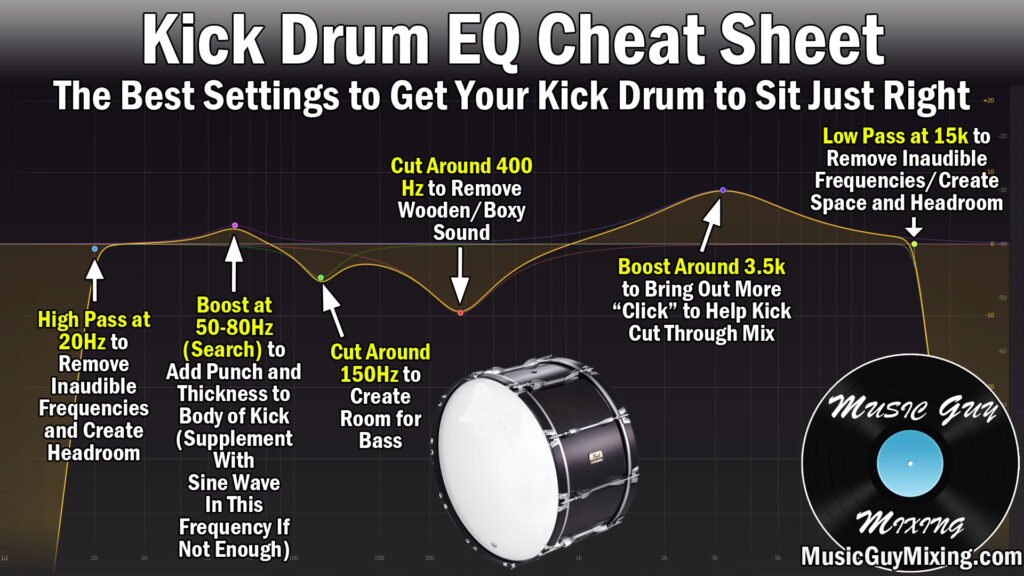
High Pass at 20Hz to Remove Inaudible Frequencies
Yes, you can (and should) even high pass your kick drum!
The lowest frequency the human ear can perceive is 20Hz. There’s still audio information there, we just can’t hear it.
With that in mind, there’s no reason to keep anything below this in your kick.
Create a high pass filter to cut everything below it as this will still create headroom, allowing you to get a naturally louder mix (and master).
You can even sweep higher, but bear in mind that if your speakers, monitors, or headphones can’t pick up these sub frequencies well, then you shouldn’t filter much higher anyway.
Boost at 50-80Hz for Presence
The thickness of the kick, that “boom” sound which resonates from it lives somewhere between 50-80Hz.
Solo this frequency range and sweep around until you find the loudest point, and try giving it a small boost. This is especially helpful if your kick is weak or top heavy.
Note that if your kick is TOO boomy, then you might need to take a bit away from this spot with a cut.
If you try boosting here and your kick still feels weak, try supplementing it with the sine wave kick drum trick. It works surprisingly well, particularly on poorly recorded or made kicks.
Also remember that the kick and bass share a lot of space in that low end (see my bass guitar EQ guide). Doing a complimentary EQ cut on your bass at this section can help the kick cut through and clean up the low end.
Cut Around 100-150Hz to Make Room for Bass
Just like we made room on the bass FOR the kick, we need to make room for the bass ON the kick. This means doing a cut somewhere in the 100-150Hz section on our kick for the fundamental of the bass to breath.
I always liken mixing to putting together a puzzle. Every instrument has its fundamental frequencies. Creating space for those instruments on other tracks where those frequencies aren’t as important is the secret to creating a pro mix.
Cut Around 400Hz to Remove Boxiness
If you solo your kick drum at approximately 400Hz, it will sound like someone is knocking on a piece of wood.
More to the point, it sounds bad and stifles the sounds of the important frequencies. Cut and forget, that frequency is dead to us.
Boost Around 3.5k to Bring Out Click
We perceive higher frequencies as being closer and hear them first. This is well exemplified on the kick drum. The click of the beater on the skin helps the listener locate the anchor that is the kick in the mix. Without this, the kick is quickly lost.
The click is more prominent around 3.5k. I like to do a generous boost here as necessary to make that kick can be heard through the busiest moments in the song.
Low Pass at 15k to Remove Inaudible Frequencies
We started by high passing, let’s finish by low passing. 15k is a conservative point to start, though you can easily go lower without sacrificing anything.
We want to keep the highest of high frequencies for the air of our vocals, synths, and cymbals. This creates headroom, as well, to get the aforementioned naturally louder mixes and masters.
EQ Kick Drum Tips
- Knowing how to EQ kick drum brings out the fundamental frequencies and helps it cut through a busy mix.
- High pass at 20Hz to remove inaudible frequencies and create headroom.
- The thickness of the thud of the kick is somewhere between 50-80Hz.
- Cut or boost here to create more thickness.
- If your kick’s “thud” is still lacking thickness, supplement it with a triggered sine wave (linked to above).
- Cut from 100Hz to 150Hz to make room for the bass.
- Boost around 3500k to bring out more click of beater on skin to help kick cut through.
- Low pass at 15k to remove inaudible frequencies and create space/headroom.
Pingback: Vocal EQ Guide - The Complete Guide to EQing Vocals - Music Guy Mixing
Pingback: Ableton Sidechain Compression - Music Guy Mixing
Pingback: How to EQ Drums - EQing Every Piece in Your Kit - Music Guy Mixing
Pingback: Mixing a Kick Drum - The Complete Guide - Music Guy Mixing
Pingback: Synth EQ Cheat Sheet - How to EQ Your Synth - Music Guy Mixing
Pingback: Drum Bus EQ Cheat Sheet - How to EQ Your Drum Bus - Music Guy Mixing
Pingback: Live Kick Drum EQ - The Best Settings to Use - Music Guy Mixing
Pingback: Drum EQ Chart - The Complete EQ Chart for Every Drum - Music Guy Mixing