
EQ filters are used to add/boost, attenuate, or completely remove certain frequencies from your audio. You can achieve a lot of different desired results just by using EQ which is arguably the most useful “effect” in audio production.
Depending on what you want to do to the audio, there are different EQ filters for different purposes. Let’s talk about the 6 different EQ filters and when to use each one.
EQ Filters
Here’s an overview on the different EQ filter types and a brief explanation on what each one is for before we dive into each individually:

Each one of these EQ filters has its purpose to achieve different results with the audio.
Let’s talk about each type individually and give some common examples of how to use them.
Low Pass Filter

A low pass EQ filter removes higher frequencies while leaving everything beneath the filter untouched to pass through (hence the name).
I like to use low pass filters where the fundamental/important frequencies of a track are on the low end. In other words, your bassier tracks.
This clears up space for a cleaner high end, as well, so your vocals and synths will be nice and crisp with all of that space to themselves.
As a general rule, I also like to add a low pass filter above 20k on virtually every track in my mix.
Your only audience that high up is dogs and, with no disrespect to the music listening dog community, there’s nothing important that high up.
Cutting it out creates more headroom, meaning your mix can be louder and therefore more competitive with other mixes.
High Pass Filter

On the other end of the spectrum (literally), a high pass filter removes lower frequencies, leaving everything above the filter to pass through untouched.
The best use of a low pass filter is to remove low end rumble from tracks that don’t have any fundamental/important frequencies on that end.
Every track in my mix has a low pass filter around 100 Hz give or take to free up all of that space for the tracks which have their identities in the low end.
Not only does this create space for your low end, you’ll find that this cleans up your mix in general, removing mud and even creating more headroom for a louder mix at the end.
Note that 100 Hz is an estimate and each track should be adjusted slightly alongside the rest of your EQ settings for it to ensure you’re not removing anything important.
Bell Filter

The bell filter is the most used and dynamic of the EQ filters because you can use it to boost or attenuate any frequency range in your mix, large or small.
You can even use it in place of a high or low pass when you don’t want to completely remove an entire end of the frequency spectrum.
By setting the Q, you can control the slope of the filter to be steep or gradual. Gradual/smoother bell shapes produce more natural results as it’s a more gradual administration of the change in frequencies.
This is also the filter you want to use for sweeping up and down the frequency range of a track to find sections you might want to add to or attenuate to benefit the overall sound.
Many EQs like my favorite, FabFilter’s Pro-Q 3, allow you to solo particular frequencies, letting you know what the exact part you’re adjusting sounds like.
Note that when sweeping in solo like this, make sure the Q or range/size of the bell you’re focusing on isn’t too narrow. I say this because you’ll quickly discover every band sounds bad when it’s too narrow.
Notch Filter

The notch is a very steep cut in the frequency range of your choice. You can use the Q to set a notch with surgical precision, only removing a handful of Hz without affecting nearby frequencies.
This is useful when you want to remove very specific frequencies and preserve the core of the sound.
This might be room noise, sibilance on vocals, or any unwanted noise on a track.
Shelf Filter
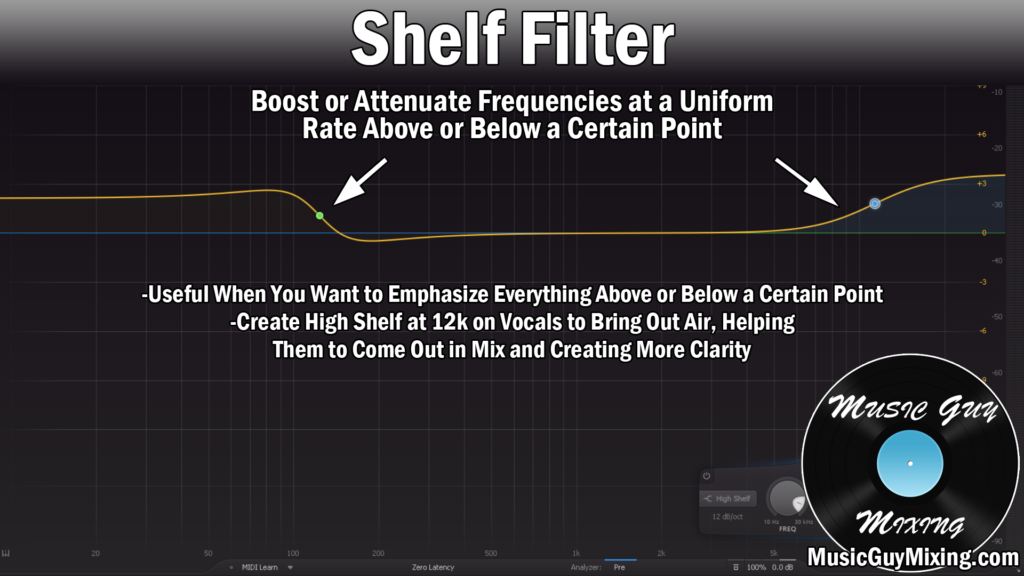
A shelf creates a small slope up or down which then levels out to prop up a certain frequency section.
There are high shelf EQ filters and low shelf EQ filters which allow you to boost or cut frequencies on the higher or lower ends, respectively.
The Q can be used to not only prop up everything higher or lower than the frequency you’re creating the shelf at, but it can attenuate the frequencies on the other side.
It’s common to use a subtle high shelf on vocals at 5k or higher to bring out a bit more crispness and air from the vocal.
This also helps to bring the vocal closer to the front of the mix which emphasizing the high end does.
Other EQ Filters
Note that there are additional types of EQ filters, but they’re just variations on the types we’ve already covered.
For example, a “Band Pass” filter is a combination of a high and low pass filter, cutting everything on BOTH sides of the filter to focus on a specific range.
You can use a band pass around 1750Hz to extend from 600 to 3500Hz to get that classic nasally telephonic sound, for example. This type and other lesser used EQ filters are more appropriate when you want to create a specific aesthetic like that.
Recapping EQ Filters
Whether you want to make a big or small change to bring out or attenuate frequencies in a track or on your overall mix bus, there are EQ filters for every purpose.
They can:
- Cut out unwanted frequencies to make the individual track sound better.
- Boost the best fundamental frequencies in audio to place a greater emphasis on what sounds good but needs more presence.
- Create cleaner mixes and create more headroom for louder mixes.
Also don’t forget you can use EQ filters on your main master bus. Just note that any changes you make on the master bus will have greater effects than on an individual track, so EQ conservatively on this level.
Whether you’re working with your own recording audio, samples, or midi instruments, use your EQ to bring out the best in the audio you have!

Pingback: The 5 Causes of a Muddy Mix (And How to Fix) - Music Guy Mixing
Pingback: How to EQ Harsh Vocals to Smooth Them Out - Music Guy Mixing
Pingback: How to EQ Acoustic Guitar for a Perfect Sound Every Time - Music Guy Mixing
Pingback: Electric Guitar EQ Guide - How to EQ Every Frequency - Music Guy Mixing
Pingback: FabFilter Pro-Q 3 Review - Music Guy Mixing
Pingback: How to Beef Up Thin Guitar - Music Guy Mixing
Pingback: EQ or Compression First - The Best Way to Do It - Music Guy Mixing
Pingback: Types of EQ in Mixing - Parametric, Graphic, and More - Music Guy Mixing
Pingback: Vocal EQ Guide - The Complete Guide to EQing Vocals - Music Guy Mixing
Pingback: High Shelf EQ - How to Use It - Music Guy Mixing
Pingback: Low Shelf EQ - What it is and How to Use It - Music Guy Mixing
Pingback: What is a High Pass Filter and What Does a High Pass Filter Do - Music Guy Mixing
Pingback: The Q Setting in EQ - What Does it Do? - Music Guy Mixing
Pingback: How to EQ Sub Bass - Music Guy Mixing
Pingback: Sidechain Compression Vs Sidechain EQ - Which is Better - Music Guy Mixing
Pingback: Free EQ Cheat Sheet from Music Guy Mixing Now Available - Music Guy Mixing
Pingback: Complete EQ Settings Guide - Every Equalizer Setting Explained - Music Guy Mixing
Great Tutorials. I learned a lot from you to start Audio mixing at my Church.
Excellent to hear, and thank you!
Pingback: Complete Snare EQ Guide - The Perfect Sound Every Time - Music Guy Mixing
Pingback: Low Shelving Filter - When and Why to Use It in Your Mix - Music Guy Mixing
Pingback: How to Use Parametric EQ to Improve Your Mix - Music Guy Mixing