
EQ is far and away the most powerful tool at your disposal for achieving the perfect acoustic guitar sound. This is especially true if the recording you start with isn’t the best. This guide will cover how to EQ acoustic guitar with every boost or cut you should make on YOUR acoustic guitar track.
EQ Acoustic Guitar Guide
First, make sure you know how to record acoustic guitar because the better it sounds going in, the easier this process will be.
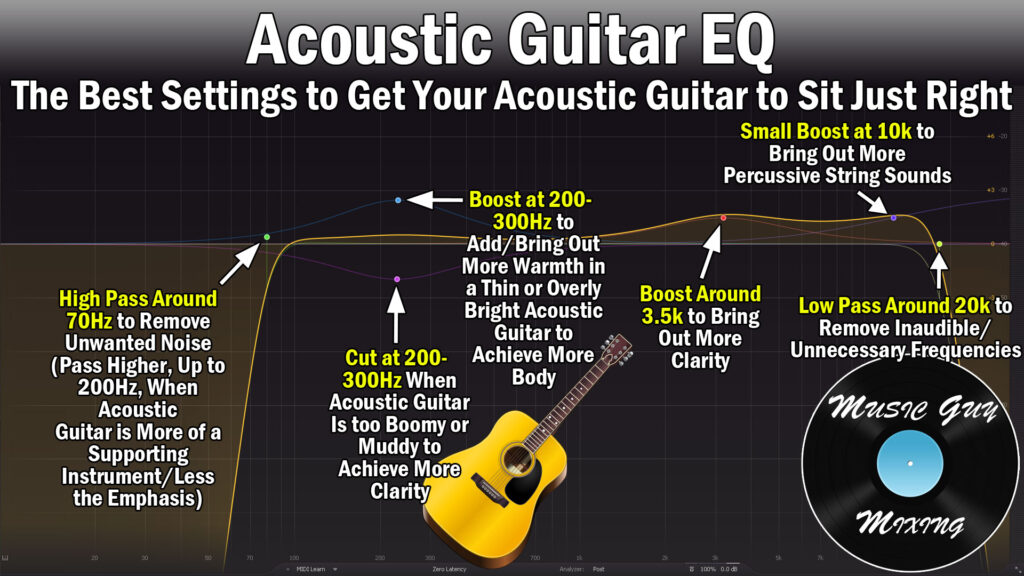
I’ll discuss each recommended move step by step, but here is an overview graphic to demonstrate my EQ acoustic guitar guide in a nutshell. This highlights the most important frequencies associated with acoustic guitar:
Acoustic guitar is one of those instruments which typically runs one of two extremes: it’s too boomy and muddy, or it’s too bright and lacks body.
Regardless of equipment or performance, you often get these results especially due to poor recording techniques.
For instance, if someone doesn’t know any better, their first instinct when recording acoustic guitar is to place a microphone primarily in front of the sound hole. This results in a booming, bass heavy sound lacking in clarity.
If this describes the tone you’re getting from your acoustic guitar, some EQ sculpting on the low end can go a long way.
As a quick aside, you can’t go wrong with placing the microphone a few inches in front of the 12th fret. This yields a nice blend of body and clarity.
Anyway, on to how to EQ acoustic guitar to get that perfect sound EVERY TIME.
Let’s drop an EQ on our acoustic guitar track. I like the Pro-Q from FabFilter because it has a simple, easy to read and work with user interface. It also allows me to make changes quickly to dial in any sound I want.
High Pass at 70Hz
For our first step, create a high pass filter at 70Hz. If you’re not familiar with the different types of filters, check out my complete overview on the 6 EQ filters as this knowledge is helpful when working with an EQ.
The lowest E string in standard tuning resonates at 82Hz when played open, meaning E2. If you’re tuned a half step down, this turns into roughly 78Hz for the open D#2.
Below that you’re getting into room noise and other unwanted noise from the instrument itself. Setting a filter with a relatively sharp Q to cut out everything below 70Hz will clean up the track and carve out that frequency for your kick drum (if applicable).

Just use 70Hz as a starting point, then sweep higher with that high pass until you start to lose the fundamental low end of the track.
For mixes where the acoustic guitar plays a greater role, we want to keep more of that low end intact as this might represent the bass for the song.
A lot of singer songwriter and folk music is stripped down to primarily a vocal and the guitar. In this case I wouldn’t filter out much higher than 70Hz as that’s essentially our low end for that song.
Alternatively, if the acoustic guitar is more of garnish for the mix, one of many tracks, you might want to move that filter higher to remove even more low end.
When I’ve got a busy mix where the acoustic plays more of a supporting role, I mostly want the sound of the strings which are much higher in the 2k and up range.
You can remove more of those low frequencies of the guitar when you’ve got something representing the bass in the mix, whether it be a bass guitar or synth.
Try moving the filter up to 200Hz and see how it sounds playing alongside the bass if this is more similar to your mix. Like with the kick, this provides a dedicated space for the bass and removes a lot of mud (see my 5 causes of a muddy mix) or simply competing frequencies from the mix.
A general rule I follow is the more prominent the acoustic plays in the mix, the less of those lows and low mid frequencies I filter out with the high pass filter.
One last thing to mention when high pass filtering is to reference the section with the lowest played notes so you know the most relevant part which will be affected.
Sculpt at 200-300Hz to Affect Body/Warmth or Clean Mud
This area will sound wildly different depending on the acoustic guitar, how you recorded it, etc.
This is why rather than giving a definitive cut or boost recommendation here, I say try both in this important frequency range for an acoustic.
This is where the body of the acoustic guitar comes out, so if you find that your track is lacking in warmth, a little boost here can do wonders.

Alternatively, a small cut in this section can go a long way in cleaning up the sound of an acoustic lacking in clarity.
If the body is overwhelming the overall tone, try a cut here.

Try both and trust your ears to determine where the improvement lies.
Boost at 3.5k for Clarity
The clarity in the acoustic guitar can be brought out around 3.5k. I almost always do a small boost here to bring out more clarity from the tone and give it a bit more shine.

Remember as always that wider EQ bell curves sound more natural than sharper, surgical boosts or cuts.
As such, I’m including at least 1k on either side of that 3.5k.
This brings out more of the clarity of the strings and top end in general. Unless your acoustic guitar is too bright or harsh, bringing out more of the strings here usually sounds good with this boost.
Boost at 10k for String Percussiveness
The strumming or picking percussive sounds of the strings themselves can be brought out with a small boost at 10k.

This is especially helpful if your acoustic guitar isn’t cutting through the mix quite enough.
Another instance where this can help is if the acoustic guitar is just more of a featured player in a busy mix.
In a lot of rock and pop, the acoustic guitar is often buried in the mix and is almost utilized more as a percussive instrument with the crispness of the strumming. Here it’s not about the notes or chords being played but the sound of the steel.
If you took the earlier tip to heart about high passing out more of the low end and you want the acoustic guitar to be more felt than heard, definitely experiment with a little boost here to bring out those strings a bit more.
Low Pass Around 20k
This is just a little housekeeping. I recommend high passing around 20k on most tracks in order to create more headroom for the mastering engineer.
If you solo out everything above the low pass, meaning you’re playing everything above 20k then you’ll be hard pressed to hear anything without really cranking it up. Yes there are still (impractical) sounds there, but just like with high passing the lowest inaudible frequencies on most tracks, you’re clearing up space in the mix.
Add this up over dozens and dozens of tracks and you might hear a tiny difference. More importantly, this creates more headroom, which means your final master can be (competitively) louder without having to squash the mix with more compression to achieve it.
After you’ve EQ’d your acoustic guitar, you’re ready to use compression on acoustic guitar knowing that you’re just compressing the good stuff!
EQ Acoustic Guitar Tips
- EQ is the most powerful tool in shaping the sound of the acoustic guitar for the better.
- Follow guide on how to EQ acoustic guitar to tailor the best results for your unique recording.
- Wider EQ filter bands sound more natural.
- High pass starting at 70Hz to roll off room noise and unwanted noise.
- Experiment passing higher to give the bass more room, particularly if the acoustic guitar isn’t the focus of the mix.
- Boost around 250Hz if your acoustic guitar lacks body and warmth.
- Cut around 250Hz if your acoustic guitar is too boomy or muddy.
- Boost around 3.5k to bring out the natural clarity in the strings.
- Boost around 10k to bring out more of the percussive sound from the strings (especially when you’ve got a lot of tracks in the mix).
- Low pass at 20k to remove inaudible high frequencies.
Now that you’ve cut or boosted all the right frequencies, it’s time to even out the level itself with compression.
Check out my tutorial on how to use compression on acoustic guitar to get more cohesion, energy, and sustain out of your tone.


Pingback: Electric Guitar EQ Guide - How to EQ Every Frequency - Music Guy Mixing
Pingback: How to Use Compression on Acoustic Guitar - The Perfect Settings - Music Guy Mixing