I’ve been mixing music professional for over 15 years now. I’ve used hundreds of plugins in that time, and over that time I find myself reaching for a select few time and time again. I thought I’d put together a list of the best plugins for mixing based on the ones I feature in literally every mix I put together, so let’s get into it. Forget “the best for X year”, these are the plugins which never go out of style.
Best Plugins for Mixing
Note that I’ll be updating this list over time if and when a new plugin becomes a constant in my workflow, but these plugins are just that. These are the best plugins for mixing, the ones I can’t work without.

Pro-Q 3
We’ll start with the FabFilter Pro-Q 3 because I have an instance of this plugin on virtually every single track in my mix. An EQ is arguably the most ubiquitous plugin you’ll find in a typical mix because virtually every track can benefit from a cut or boost here or there, or a high or low pass filter at the very least to clean things up, and the Pro-Q 3 is the most dynamic and versatile EQ plugin available.
As I covered in my FabFilter Pro-Q 3 review, this is the swiss army knife of EQ plugins.

You can use it as a typical parametric EQ, a dynamic EQ, a spectrum analyzer, you can even use it to match EQ like I mentioned in my mix bus chain tutorial.
Multiple instances of it in your mix even communicate with one another so that you can more easily identify frequency conflicts to keep your mix uncluttered and spacious.
If you can only have one EQ, I recommend FabFilter’s Pro-Q 3 as the only EQ you’ll ever need.
Decapitator
If I can only have one saturator (see what does saturation do), I’ll go with the tried and true Decapitator from Soundtoys.
It’s not just the best saturator, it’s one of the best plugins for mixing in general.
There’s something to be said for the fact that this plugin came out in 2010 and it’s still arguably the best saturator on the market.

Despite only having a “Drive” knob and 5 style buttons to shape the saturation color with no option for multiband saturation like FabFilter’s Saturn, Decapitator is impressively versatile.
I especially love this plugin as a quick fix anytime I have a track which is too bright or weak in the low-mids.
It warms up thin guitar or a top heavy snare by adding some mid frequency harmonics in a second.
It’s not just about saturation; Decapitator is great as an extremely simplified tonal rebalancer.
Simply turn the tone knob in the “Dark” or “Bright” direction to favor the lower or higher frequencies, respectively. Sometimes that’s all you need to get the result you want without even having to touch the “Drive” knob.
CLA Vocals
After mixing for so many years, at a certain point you begin to realize the value of shortcuts.
Mixing, at least GOOD mixing, takes a lot of time, so anything we can use to cut a corner or two is seriously appreciated and alone will make it one of the best plugins for mixing.
CLA Vocals from Waves is an all-in-one vocal suite designed with guidance from Grammy award winning producer Chris Lorde-Alge, all contained in a single plugin.

Its processing chain spans EQ (in the form of a bass and treble slider), compression, reverb, delay, and pitch (chorus-like width).
Each effect also has three settings which act as the type (and sometimes depth) of that effect which work alongside the slider itself.
For instance, the compression has “push”, “spank”, and “wall”, with each equaling a more extreme degree of compression. You can use push and have the slider all the way up top to create some glue on your track. Conversely you can drive the slider all the way up on “wall” to squash the entire track and the dynamics with it like settings you’d use for parallel compression.
The spacial effects are more straightforward. For instance, the delay goes from “slap” (slapback) to “eight” (eighth notes) to “quarter” (quarter note) delay.
The presets are especially useful in this plugin. Even the “Start Me Up” makes for a great starting (and sometimes finishing) point for a lot of vocals.
Let me acknowledge that there’s a stigma associated with using plugins like this. As mixers, we feel like it’s cheating to hit a button, use a preset, etc. and get a great result.
I feel it and fight against it too, even as I’m writing this! I’ve EVEN gone to the trouble of trying to reverse engineer what my favorite CLA Vocals setup is doing using 5-6 individual plugins. Talk about a waste of time and processing power.
My advice is don’t overthink it, and give this vocal suite a try in place of your normal vocal chain to get professional sounding vocals with a fraction of the effort.
Pro-C 2
Like their EQ equivalent, FabFilter’s Pro-C 2 is the compressor to have if you can only have one.
Like the Pro-Q 3, the Pro-C 2 is a workhorse and boasting the features of several different compressors it’s one of the best plugins for mixing.
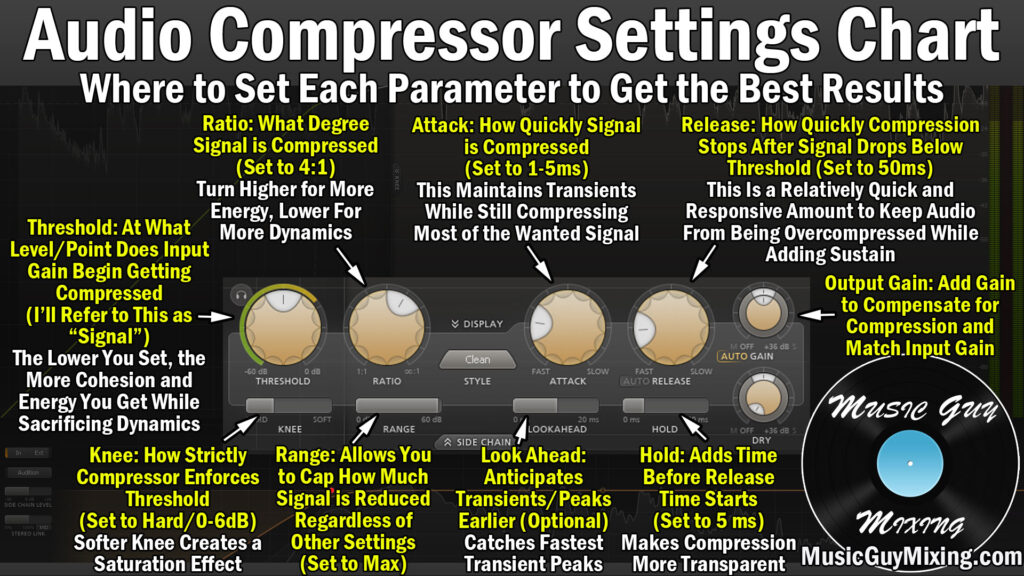
You can use it as a typical compressor with all of the standard settings you’d find on an audio compressor settings chart:
In addition, it has a specific “Style” setting which emulates different types of audio compressors.
For instance, you can turn on the “Vocal” style setting which turns it into an optical style compressor where you just need to set your threshold. This yields a very transparent compression making it great for vocals.
There’s a built in EQ which can be used to filter out frequencies which trigger the compression on the track itself, or it can be used as sidechain compression to compress based on the behavior of a different track altogether.
With a dry knob, you can even use it as a parallel compressor without even needing a second track or an aux/return track. You simply set the dry where you want it, then blend in the parallel compressed instance via the gain.
I love the Waves CLA-76 compressor for that classic FET style modeling compression on a lot of tracks, but the Pro-C 2 is so much more versatile that if I could only have one compressor, this would be it.
soothe2
soothe2 from oeksound is a dynamic resonance suppressor. It’s kind of a dynamic EQ, kind of a multiband compressor, kind of its own thing.
What this means is that it removes problem frequencies and creates a more balanced tone with transparent results and minimal artifacts.
As the name suggests, I primarily use it on and feel it works best on harsh instrument tracks or buses.
I use it on vocals, and tracks which more commonly run harsh like cymbals, synths, and sometimes distorted guitars.
While it’s great for soothing elements of a harsh mix, you can use it to clean up muddy mixes, boxy frequencies, etc.
You simply set the frequency band you want to attenuate like an EQ, then adjust some multiband compression-like settings in attack and release, and finally set your soothe2 specific settings in sharpness and selectivity (which work like a Q within the Q you have set to give you more or less selectivity):

The “Depth” is the main controller for how much you want to attenuate (or boost) the affected frequency range.
Normally when you target a frequency range to pull something unwanted out of the audio with an EQ, you’re taking some good stuff out with it.
The magic of soothe2 is its ability to attenuate without working to the detriment to the tone.
Pro-R
Another instance where there are plenty of great reverb plugins out there and some which I use and can recommend like Valhalla’s Plate Reverb or Room Reverb.
But if I only have one and need versatility, I like FabFilter’s Pro-R.

It’s the reverb I use in all of my reverb tutorials, and I like it for its simplicity and versatility.
You simply dial in the predelay and “space” which is the size of the room/decay, set the width of the reverb to where you want it, and you’re good to go.
It can model virtually any kind of space, big and small, dark and bright. The tone knobs on the left let you adjust the color of the reverb, and the distance is surprisingly effective for bringing an instrument closer or sending it to the back of the mix along with the size.
A very cool feature I love is the built in EQ to filter out and change the sound of the reverb itself. You can use this to easily dial in the Abbey Road Reverb trick or just generally keep your reverb (and your mix with it, to an extent) clean.
I drop an instance of Pro-R on two different aux/return tracks, one for a shorter reverb, one for a longer reverb, to blend in more or less size on my tracks as I need for points of emphasis and contrast in my mix via the send knobs.
EchoBoy
I can’t mention reverb without giving a nod to my favorite delay plugin: Echoboy from Soundtoys.
This is another one which has been around for over a decade, but it’s still everything you need for delay in a single plugin.

Like the FabFilter Pro-R, I typically have two instances of this plugin, one each on a different aux/return track.
You can get a lot of unique delays to achieve virtually any effect you’re after.
Aside from time, note, dotted, or triplet based delays, you have single echo, dual echo, ping pong, and rhythm echo (which makes for a number of interesting aesthetic effects).
You can high and low pass these and add more or less feedback to adjust any repetitions.
The real secret sauce is in the ability to adjust the groove and feel dials to make the delay tighter or looser as necessary, and of course the “Style” option which colors the character of the delay itself.
With so many options, the roughly 100 presets help to quickly get a sense of the possibilities you can achieve with this outstanding delay plugin.
G-Master Buss Compressor
I’ll end this list of the best plugins for mixing with the G-Master Buss Compressor from Waves.
Based on the built in console compressor from the SSL 4000 G-Series Console which was discovered to work well at “gluing” multiple tracks together, the G-Master Buss Compressor does the same thing but without the expensive desk.
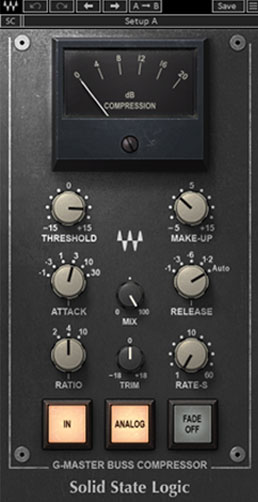
While this can be used to compress any track in your mix, it best shines as a glue compressor on a bus or on your entire mix bus.
I always use an instance of this both on my drum bus as well as my main mix bus to add a little energy and cohesion across the board.
The settings are very simplified by most compressor standards, the only variations being the “Analog” button for a little simulated analog distortion and the “Fade” button which fades out a mix better than I’ve ever heard (not kidding).
This is the cherry on top to put last in your mix bus chain after everything else to give your mix that extra “oomph” and bring it all together.
There you have it, the best plugins for mixing, determined by the fact that I use them in every single mix. Other plugins may be good for a one off effect here or there, but these are the workhorses (there’s that word again) which I call on time and time again and as such heartily recommend myself.
Happy mixing!