
In most genres, vocals are one of if not THE most important element in the entire mix. Let’s talk how to mix vocals start to finish, covering my entire processing chain to get your vocals sounding their absolute best and at professional level quality.
How to Mix Vocals

Aside from setting some rough levels during the rest of the mixing process, I typically like to save my vocals for last, opting to get the instrumental version of my mix sounding its best.
The instrumental is essentially the bedrock of the mix with relation to the vocals; if the instrumental is muddy, feeling cluttered, narrow, if any elements are getting lost, etc. this is typically something I like to address first.
You’ll find tutorials on mixing everything else here on this site, but now moving to focus on how to mix vocals, here’s a snapshot of my vocal chain order:

This specific order as well as all of the individual components are by no means mandatory and it’s not what I use every SINGLE time I mix vocals, but it’s an excellent template to follow in how to mix vocals and will yield excellent results.
Let’s roll up our sleeves and take a closer look at each element in this overview on how to mix vocals, starting with some optional autotune.
Autotune
Autotune is an effect which automatically pulls slightly sharp and flat notes of a vocal (or instrument) to the nearest in tune note.
Antares’ Tune-Tune Pro is considered to be the gold standard for autotune plugins, but you can grab yourself a fully serviceable free option like Graillon, as well.
Here is a snapshot of the best autotune settings to dial in to get your vocal in tune without tipping your hand that you’re using an autotune:

Note that I like to open with an autotune in the processing chain on the vocal because that ensures it tunes up the vocal at its rawest or purest form before we add any subsequent processing which can affect how effective the autotune can be.
Also note that autotune is no necessary on all vocals; if you’ve got maybe just one or two visibly sharp or flat notes then I recommend isolating those sections as clips and manually bringing their tuning up or down as necessary to be in tune (you can drop a tuner at the start of the vocal chain to show how sharp or flat a note or notes are to help with this).
Input Gain (and Optional Vocal Rider)
If you recorded the vocal with gain staging in mind, you can ignore this step and move on to the meat of this how to mix vocals guide.
The point I’m trying to make is that any processing you throw at virtually any track in your mix will respond and sound better if you feed an average level of -18dB as the input level into the processing chain:
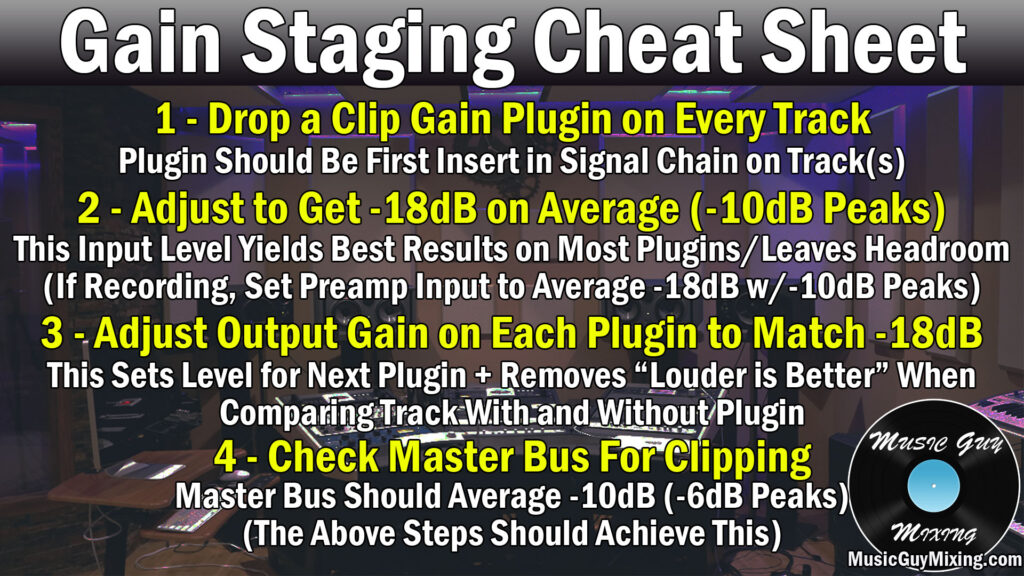
If the vocal was recorded too “hot”, drop a gain plugin at this point at the start of your vocal chain here (the autotune isn’t affected/doesn’t affect this) and adjust this to average -18dB with -12dB or so peaks.
This gets that vocal to a responsible level for your next plugin; make sure you adjust the output on all subsequent plugins to maintain these levels to ensure you’re always feeding the ideal levels, not to mention keeping your entire mix at a more responsible level with no clipping between individual tracks, busses, or your master bus.
EQ
In the eternal question of EQ or compression first, I recommend EQ first to cut out all of the stuff we don’t want in the vocal so it’s not being included in the compression.
Here is a snapshot of my vocal EQ cheat sheet which is taken from my greater and complete EQ cheat sheet:

… And a quick overview of what we’re doing at each point:
High Pass at 100-130Hz
Generally speaking, there’s nothing constructive happening on the vocal below 100Hz, so a high pass filter is removing a lot of unwanted outside noise and character on the vocal which is detracting from the overall sound.
We can go a bit higher on certain male vocalists (see my male vocal EQ cheat sheet specifically) and female vocalists (see my female vocal EQ cheat sheet specifically) on average; I like to create a 12-24dB/oct slope and sweep up around 90Hz until I hear the vocal thinning out (headphones work best), then dial it back 5-10Hz.
Boost at 200-300Hz
The body of the vocal is in that 150-300Hz pocket, so a little 1dB boost can add some power to the vocal. If the vocal was recorded poorly like specifically the vocalist was directly up on the microphone, you might need a small and possibly reactive by which I mean dynamic EQ cut around 225Hz to control these surges.
Also note that plosives or those “pops” or surges in air which can occur without a pop screen or certain vocalists exist around 150Hz, so a dynamic EQ cut can control those at 150Hz (see what are plosive sounds).
Dynamic Cut at 500Hz
I like a small dynamic cut in the 400-600Hz range to control the flat and boxy room reflections (which can be worse in certain rooms, vocalists, or microphones). This is the second time I’ve mentioned dynamic EQ, meaning or an EQ band which reacts to the level at that frequency to dictate how much it cuts or boosts.
Dynamic EQ works well to ensure we’re not cutting more than we need to in the event that this range isn’t uniformly always a problem and gives us more latitude to deal with the problem as necessary (see my guide on how to use dynamic EQ).
Boost/Cut at 1-2k
1-2k on a vocal can be used to address a couple of issues, neither of which may be an issue on your specific vocal.
Still, we can boost around 1k or so to patch up a hollow sounding vocal. Alternatively, we can cut around 1k or so to manage and correct a nasal vocal.
I mentioned this in each of those respective, linked to guides, but cutting too much here can MAKE a vocal hollow and likewise boosting too much can MAKE a vocal nasally.
Boost/Cut Around 3-5k
If you want a bit more bite and presence in the vocal, a small boost around 5k or so will place that vocal more up front.
You can also cut here to tame a harsh vocal, but I have an answer for that later on in this how to mix vocals guide for what it’s worth.
Note that the 500Hz dynamic cut should’ve added some vocal clarity by way of subtractive EQ, so you shouldn’t need to boost too much here if that’s your goal.
High Shelf at 10k
A high shelf around 10k of 2-3dB can bring out some more clarity, presence, sizzle, and air from that breath to make that vocal cut through the mix a bit better.
Low Pass at 20k
I typically add a low pass filter in the 15-20k region to bring down that shelf to finish off the vocal EQ portion of this guide on how to mix vocals.
De-Esser
The next part of our vocal mixing involves slotting a de-esser in.
A de-esser employs frequency specific compression or attenuation, specifically on the high frequencies associated with vocal sibilance – those exaggerated and distracting sounds associated with certain consonants, particularly the “S” sound.
Like other vocal issues, sibilance can be worse with certain rooms, microphones/placements, and certainly vocalists.
While I put together a guide on how to make a multiband compressor a de-esser, I prefer a dedicated de-esser like the FabFilter Pro-DS when I’m mixing vocals as it is trained to detect and target sibilant consonant sounds specifically.
This yields a more transparent and targeted sibilance smoothing which leaves more of your vocal untouched, saving it from unnecessary compression which can take away its clarity or sound strange.
1176 Compressor
On the heels of our de-essing and vocal EQing, it’s time for our first compressor.
An 1176 style compressor like the Waves CLA-76 or the free UA 1176 Classic FET Compressor are great options to act as the first compressor on your vocal as these FET compressors are ideal for taming the peaks of as uncompressed dynamic signal like a vocal.
My guide on the best compressor settings for vocals shows the ideal 1176 settings to dial in:

Here’s a quick rundown of the parameters you’ll find on an 1176 and where to set them on your vocal as the first compressor:
Threshold
As with any compressor, the threshold dictates what the input level needs to be before any compression is applied. Considering this is the first compressor we’re using in our chain in this guide on how to mix vocals, we want to be aggressive to smooth out the considerable dynamic range we’re likely dealing with.
As such, I like to set the threshold to 10dB BELOW than the average level of the vocal. If the average level is -18dB, set this to roughly -26dB. This will compress the entire vocal, and particularly the loudest peaks, to give us a much smoother and more consistent level, especially when combined with the subsequent settings.
Ratio
The ratio of the compressor determines to what degree the vocal will be compressed. The higher we set this, the more those peaks and the average level on the in will be compressed and brought down, meaning less wiggle room/a more consistent level on the out.
Considering again that this is the first compressor, I want a more aggressive setup here and this extends to the ratio, as well. As such, we want to set this to 8:1, meaning every 8dB which exceeds our threshold will be output as 1dB (reduced by 7dB).
I just say that to help articulate how much compression is actually occurring, but you don’t need to worry about the math; just know that 8:1 is a relatively aggressive setting on the ratio but one which works well for taming peaks of an (to this point) uncompressed vocal.
Attack
The attack on a compressor determines how soon the compression engages after the threshold is exceeded.
Note that on an 1176 style compressor like we’re using here, the attack (and release for that matter) work opposite to how most compressors work.
The main takeaway is that a higher attack on an 1176 results in a faster attack, so turning this up to “7” means instant attack.
Setting the attack TOO fast will swallow up the vocal’s transients so that it won’t feel as immediate or visible in the mix, so I like to set this between “5” and “6” on vocal compression on an 1176.
Release
As I just alluded to, a compressor release of “7” means instant, or in other words once the threshold is no longer met, the compression instantly lets up and returns the signal to its normal uncompressed sound.
Setting this TOO fast can sound a bit choppy and odd, so I like to again set the release on an 1176 on vocals at “5”.
Output
As mentioned earlier when talking gain staging and just as a reminder, make sure you adjust the output gain which dictates the level of the vocal POST compression so that it maintains that -18dB.
For what it’s worth, it will be much easier to hit that consistent -18dB average after the 1176 compressor has done its job.
Optical Compressor
I typically like to follow up my 1176 compressor with a second compressor (see how many compressors on vocals).
While we’re not aiming to achieve the likely +10dB in gain reduction that we got from the 1176, this subsequent compressor helps us smooth out any remaining peaks by 1-3dB to help get that vocal a little more controlled and ultimately up front in the mix where it belongs.
An optical compressor like the Waves CLA-2A works well in this role as it’s very subtle as well as transparent, not to mention extremely simple to set up, especially relative to other compressors:

It’s so simple that all you need to worry about is the “Peak Reduction” dial, turning it down/lower until you see 1-2dB on average, 3dB or so at most at the loudest peaks in gain reduction on the meter.
Beyond that you just need to adjust the “Gain” dial to maintain gain staging and keep that -18dB average level.
Note the “Hi Freq” dial on the 2A for prioritizing compression on the higher frequencies, making this good for smoothing out an overly bright or harsh vocal (though I have a solution for this in a moment), otherwise leave it to the right to compress uniformly.
Additional Processing (Optional)
Quite genuinely at this point, our vocal should be sounding good and pretty much where we want it outside of adjusting its level relative to other tracks in the mix.
We’ve addressed any tuning issues on the vocal, managed the level, cleaned up the frequency profile by removing the frequencies which aren’t working, then fed the best of that vocal into one compressor to tame the peaks then another to smooth out the new level to achieve a smoother and more reliable level which will sit much better (and up front) in the mix.
If you want to add any subsequent processing, this is typically a good point in the chain to do it.
R-Vox Compressor (Optional)
On the heels of any subsequent processing, I like to add another light compressor/compression to tame any wrinkles said processing has added into the vocal.
Regardless of if you added anything after the optical compressor, a third overall compressor can help to keep that vocal EVEN MORE up front. If you’re working in a genre like pop which revolves around the vocal, this isn’t a bad idea.
I like Waves’ R-Vox in this spot, adjusting the “Comp” slider in the middle for more or less compression as necessary, still just aiming for about 1-3dB in gain reduction:

You can use any compressor here, but again this is entirely optional.
soothe2 (Optional)
Also optional is using a plugin like soothe2, a dynamic resonance suppressor, to smooth out any harshness you have lingering in the vocal either as a byproduct of our other processing or harshness which was inherent in the vocal on the in we haven’t fully addressed yet:

I put together an entire overview on dealing with harsh vocals, so refer to that for additional treatment options for conservatively smoothing out a vocal which is a bit too harsh.
Output Gain (and Optional Vocal Rider)
I like to drop a gain plugin at the end of my vocal chain, as well, to either adjust a vocal’s overall level as necessary (in the case of the last plugin in the chain not having an output control) or to control any automation.
Vocal automation refers to changing the volume of a vocal in real-time as the mix plays, typically to keep that vocal on top of the mix.
While you can add automation to the vocal’s fader, I prefer to do this via a gain plugin so that the fader is kept clean to adjust the level of that vocal track as necessary as a whole relative to other tracks.
You can also insert a vocal rider like the Waves Vocal Rider to automatically adjust the volume for you.

You set the “Target” level you want to average and adjust the “Range” sliders to dictate how many decibels plus or minus that target the vocal can move and the plugin automatically adjusts the level based on the ongoing, changing level of the vocal itself.
This not only can be useful for keeping the vocal on top of the instrumental where it should be but it adds a little extra life to the vocal, keeping the mix as a whole feeling a bit more lively (see my guide to mixing automation for more tips in this vein).
Sends via Aux/Return Tracks
That’s it for the vocal chain, but one of the most important aspects in how to mix vocals relates to using effects as sends, meaning they’re not on the vocal itself, but blended in alongside an independent version of that vocal via the sends dial for that track (see sends vs inserts).
A quick reminder – anytime you’re using an effect as a send via an aux/return track, set its “Mix” percentage to 100% wet as the send dial is effectively acting as the blend amount we want.
Regarding using effects as sends on vocals, a few examples include:
Parallel Compression
Parallel compression refers to taking an extremely aggressively compressed version of a track and blending it in alongside the “dry” version of the audio.
This is yet another way to keep a vocal up front, not to mention thicken it out, so refer to my guide on how to parallel compress vocals.
Delay
Delay takes a copy of the audio it’s applied to, either dry or colored, and plays it back after the initial audio plays at an interval of your choosing. This can be used to add sustain, width, and even depth to a vocal by utilizing the stereo field.
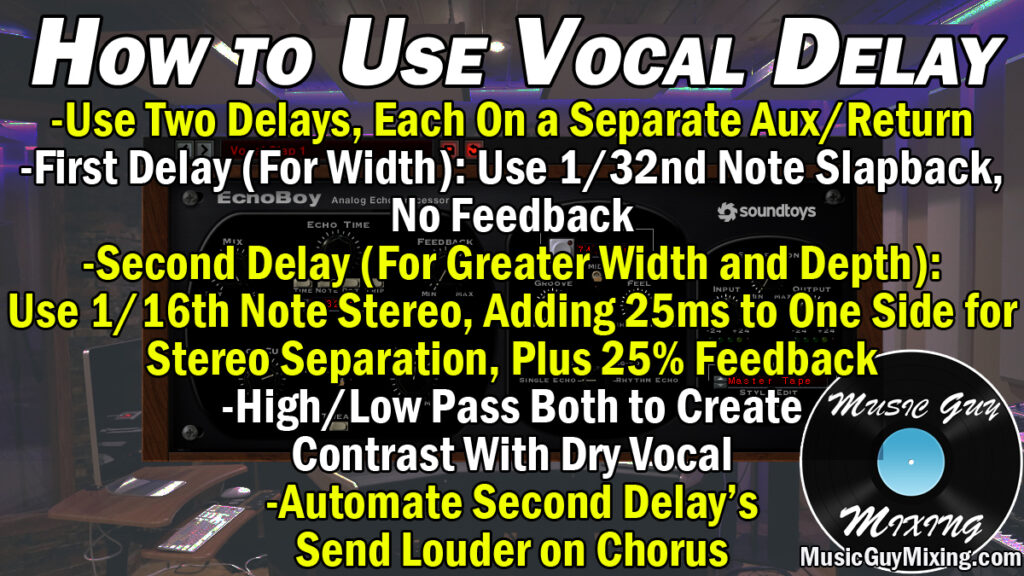
Check out my complete guide on vocal delay for more specifics on using it in your mix.
Reverb
Reverb adds convincing simulated depth to anything we apply it to, taking advantage of the third dimension of our mix.
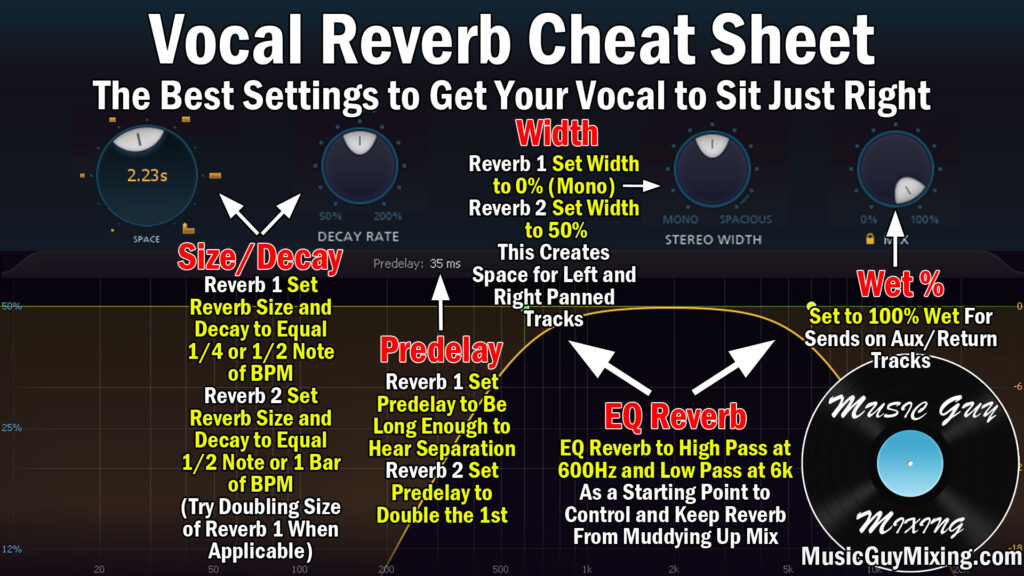
Check out my vocal reverb cheat sheet for a more in depth guide on how to best use reverb on your vocal.
Width
While both delay and reverb can be used to add width to a vocal, I love a plugin like Microshift or Little Microshift:

It’s dirt simple to use; drop it on an aux/return track, set the Mix to 100% wet as usual and set it to your mode of choice (I like Mode II on Little Microshift), and adjust the send dial for that aux/return track on that vocal to get the desired amount of width to help it sit better in the mix.
Like any of these effects, you can automate the send amount for more or less of that effect blended in to taste as the mix progresses.
Check out my complete guide on getting wider vocals for more options.
Saturation
Adding any kind of saturation or distortion can help thicken out a vocal in the mids or add some excitement sizzle on the higher frequencies.
See how to use saturation on vocals for specifics on using it in your next mix.
Your vocals should be sounding professional quality at this point from their raw and unprocessed beginnings.
For more tips on how to mix vocals, check out my many, MANY vocal tutorials here on Music Guy Mixing!
