
You know the sound. The harsh high frequency sibilant sounds associated with the delivery of “S”, “T”, and more consonants. It comes out in singing more than speech because of the power, emotion, and oftentimes drawn out syllables associated with vocals. In a mix, vocal sibilance can not only be annoying and grating on the ears, it can be a distraction to the point where that’s all the listener can hear.
Fortunately we have a number of weapons at our disposal to treat vocal sibilance, so let’s talk about how to fix it now.
Vocal Sibilance Fixes
There are a few different tools which all target the culprit of sibilance which is typically located in the 5-8k range (though it can go a few 1000Hz on either side in some cases).
You’ll have some of these tools built into your DAW, so let’s go one by one.
De-Esser
Let’s start with the obvious. A de-esser is an audio compressor which specifically targets the aforementioned sibilant frequencies. It’s basically a multiband compressor, but it only targets this one range.
On most de-essers, you can adjust the range. You can even typically sweep up and down with this band solo’d so you can hear the fundamental range of the sibilance in your vocals.
A proper de-esser is typically configured and trained to specifically identify, isolate, and mitigate sibilance.
FabFilter’s Pro-DS is my go-to de-esser. It’s designed to locate and exclusively attenuate the sibilance in a vocal and compress them, leaving the rest untouched. This yields a transparent result where the sibilant bits on the vocals are smoothed out without changing the sound of the vocal.
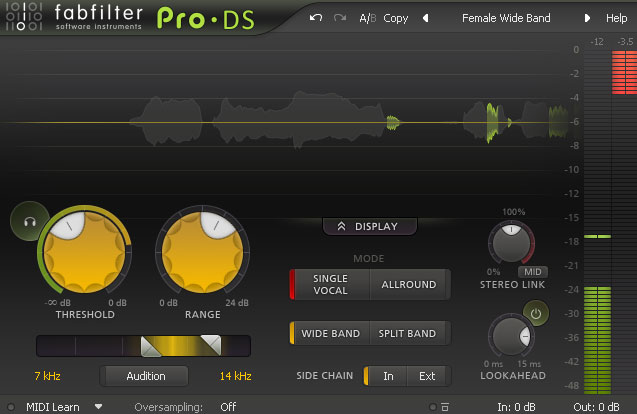
Clicking “Audition” allows you to isolate that frequency range to hear what’s going on. You might be surprised at how sibilant your vocal is when that’s all you’re hearing.
The highlighted sections from the image are the instances of sibilance in the vocal.
You’ll note that some of the controls will look familiar, similar to a compressor. The threshold allows you to take less or more of the audio in the selected frequency range in, and the range control determines the maximum those notes will be turned down.
Getting these two controls right is important, because if you take in too much signal hear and the range is set too high, you’ll get over-compression.
Over-compressing sibilance on your vocal will make your vocalist sound like they have a lisp, and this will make consonants which sounded natural before sound strange.
Remember that some sibilance is natural; the aim is simply to smooth them out a little.
Multiband Compression
Of course you don’t NEED dedicated de-esser; we can recreate the basic mechanics behind it with another tool.
Let’s do the same thing with a dedicated multiband compressor which will turn down those frequencies based on the behavior of the sibilance.
I’m going to be using FabFilter’s Pro-MB, but any stock multiband compressor your DAW has will do just fine. Just replicate these settings:
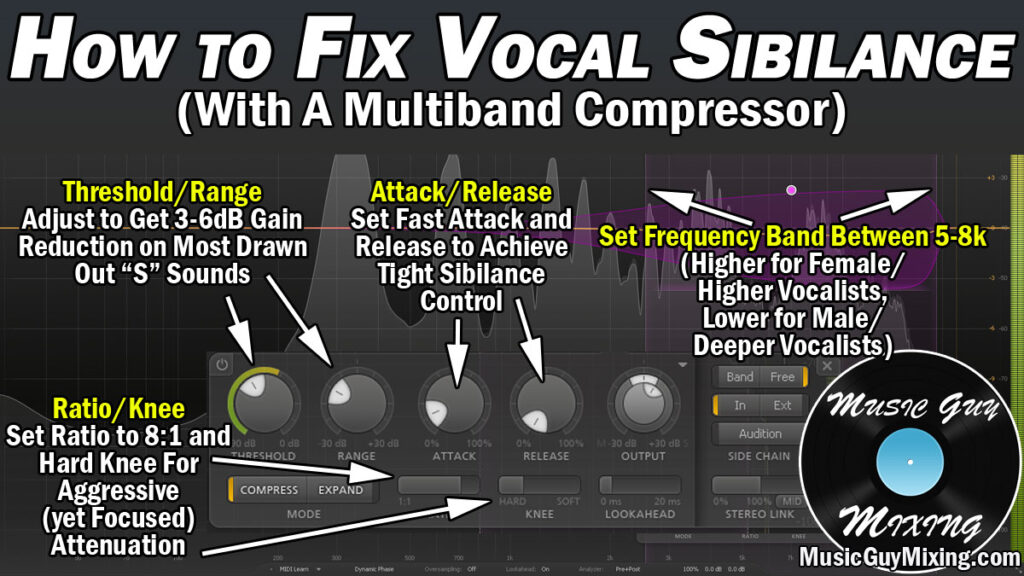
Frequency Range
Set the main frequency core of a band to around 6.5k. You can solo and sweep to hear where the most offensive frequencies are to find the heart of the sibilance. As a general rule, for male or lower singers, it’s going to be a bit lower than 6.5k. For female or higher singers, it’ll be on the higher side.
Adjust until you find the fundamental area of the sibilance.
Threshold/Range
Similar to the de-esser, we want to get this right because if you over-compress, you’ll get that unnatural lisp sound.
After we find the core frequency range, achieving 3-6 dB of gain reduction on the most sibilant sounds is a good target to aim for. This yields a nice transparent attenuation of sibilance without negatively changing the characteristics of the audio.
Just adjust that threshold to catch the spikes above the average which will trigger with those sibilant sounds.
If you want to smooth out those sounds further, adjust these slightly in tandem until you get the result you want.
Ratio/Knee
I like a relatively aggressive ratio on a de-esser (see compressor ratio explained). 8:1 works well considering we’re only targeting the peaks of the sibilant sounds.
Go for a harder setting on your compressor knee, as well. This ensures that the threshold is strictly enforced so you’re only compressing those spikes associated with the sibilance.
Attack/Release
A also like a relatively quick attack and release to keep the compression tight on our multiband compression de-esser. This activates it quickly to immediately smooth out those sibilant spikes. And because we’re only targeting the higher frequencies, we’re not cutting into the majority of the frequencies associated with the vocal, so we can get away with a faster attack (not to mention we’re only targeting the sibilant instances anyway via the rest of the settings).
Note you can apply similar processing using a dynamic EQ (see dynamic EQ vs multiband compression), but I typically reach for a multiband compressor as sibilance takes place over a slightly wider frequency range than dynamic EQ is meant for.
Also note that de-essers aren’t just for vocal sibilance! You can apply their same multiband compression to attenuate any instruments with harsh higher frequencies.
While vocals are typically the thing I’ll reach for a de-esser on, occasionally I’ll drop one on overly splashy cymbals (see my cymbal EQ guide) or distorted guitar which was recorded with too much distortion, treble, or presence (see my distorted guitar EQ guide for more help in getting your distorted guitar in shape).
Hopefully these techniques helped you get your vocal sibilance under control just using the effects you have stock in your DAW!

Pingback: Master EQ Settings - The Best Settings for the Master Bus - Music Guy Mixing
Pingback: Three of the Best Free De-Esser Plugins - Music Guy Mixing
Pingback: How to Use Dynamic EQ for Situational Adjustments - Music Guy Mixing
Pingback: How to Use Dynamic EQ on Vocals - 5 Useful Tips - Music Guy Mixing
Pingback: How to Mix Vocals - A Complete Guide - Music Guy Mixing
Pingback: How to Fix a Vocal Lisp in the Mix - Music Guy Mixing