Parallel compression refers to compressing a second instance of a track with extreme settings. When blended in alongside the original “dry” version of the track, the combination has more energy and sounds thicker in the context of the mix. Parallel compression on vocals in particular works well for giving a vocal a bit more presence in the mix, so let’s talk parallel compression vocals settings to help your vocal stand out.
Parallel Compression Vocals
When it comes to using parallel compression in general, you have a few options as to how you want to implement it in your mix.
Oftentimes if I have one instrument type which I’m going to apply it to, like in this case vocals, I’ll create an Aux/Return track in my DAW and drop a compressor on it. Dialing in the parallel compression settings, I can then blend in as much of the parallel compressed vocal as I’d like via the send knob (see sends vs inserts).
This allows me to use the same compressor on multiple vocals anytime I want parallel compression on them, saving CPU (see my guide to saving CPU in mixing). This tends to work better when you have similar types of tracks (like in the case of vocals) with similar threshold requirements rather than just using one parallel compressor for the entire mix, but
Getting back to the topic at hand, here are the parallel compression vocal settings which I use when I want to thicken out and add some energy to my vocal(s):

Ratio
I don’t normally start with ratio when talking compression, but for the purposes of parallel compression this is a huge part of it.
An ideal ratio for parallel compression is 20:1 at minimum.
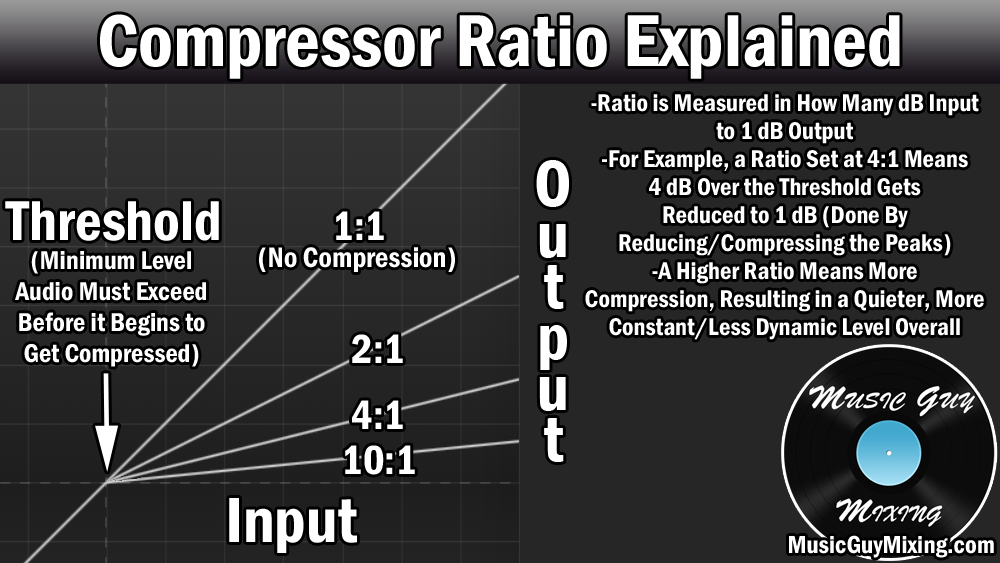
The compression ratio refers to the degree to which the signal is compressed.

As you can see from the graphic above, the higher the ratio, the more everything which exceeds the threshold essentially gets turned down by the same amount.
A 20:1 ratio is almost a flat line which acts as a ceiling which the peaks cannot exceed. Combined with the threshold, we can completely remove the dynamics from our audio which is the point of parallel compression.
This is how we get that fat, sausage-like audio clip which is completely in our face with every phrase, word, and syllable of the vocal being the same volume by virtue of that ratio.
Remember that this is not the original track; we still have that “dry” instance with all of its dynamics intact (after its typical compression – see my guide to normal compression on vocals).
But a lot of this depends on the threshold, so let’s cover that next.
Threshold
Generally with parallel compression you want the entire vocal to be compressed at that 20:1 ratio.
When setting the compressor threshold for parallel compression, set it to just below the volume at the quietest instance of that vocal.
This means that whatever volume we set this to, anytime the volume of the vocal exceeds that threshold volume, that 20:1 ratio will kick in.
And again with such an extreme ratio, whether the vocal exceeds the threshold by 5dB or 20dB, it’s essentially getting output to the same volume. This keeps the vocal in our face throughout the entire performance (on the parallel compressed instance of the vocal).
Just a reminder that different vocal tracks will likely respond to your threshold differently when using a single parallel compressor.
A chorus vocal will likely have a louder “quietest” practical instance than a verse. In that case, you may want to use the verse’s quietest vocal point to set an Aux/Return parallel compressor so that you’re assured it will squash every practical vocal part of every track you send to it.
Knee
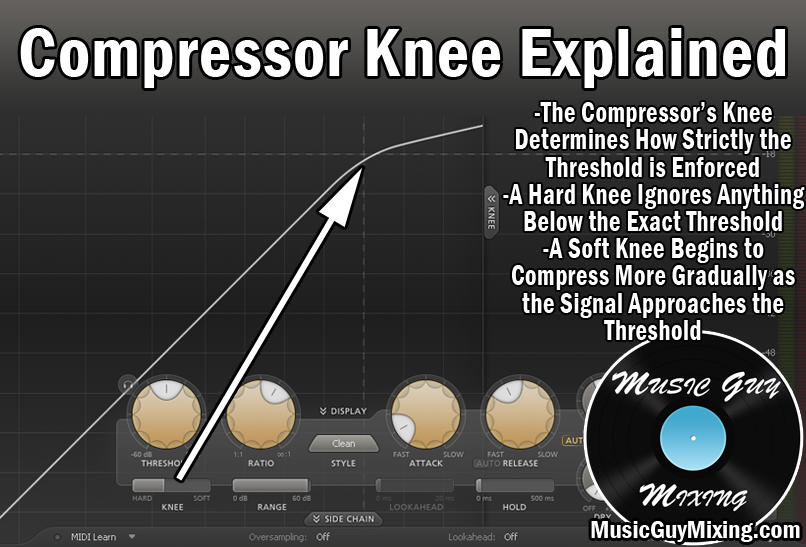
The compressor knee essentially enforces how strictly the threshold is enforced:

A softer knee is more transparent because it opens the compression “gate” more gradually as it relates to the threshold.
As a general rule, I prefer to set a higher/softer knee with vocals or anything with a lot of varied dynamics to it.
A hard knee is better suited for tracks with clear, all or nothing dynamics like a kick or snare.
With parallel compression, I like a soft knee of 48dB or higher to generously and transparently apply that ratio at an increasing rate the more signal I feed to the compressor.
Attack
The attack setting on a compressor determines how quickly the compression begins once that threshold is exceeded.
If that sounds familiar considering what we just talked about, the attack and knee settings actually work together to determine when compression begins.
Normally we like to slow down the attack to allow for those initial transients or that first “bite” of whatever we’re compressing to still come through before the compressor clamps down. This helps that track assert itself and cut through the mix.
In the case of parallel compression on vocals or otherwise, we still have that dry track for the transients. As such, a fast attack of 1ms to just flatten everything works well on the parallel compressed vocals.
The dry track still has the bite whereas this flattened version thickens out the rest.
Release
The release setting determines how long it takes the compressor to ease up on the compression after the signal dips below the threshold again.
A release setting of 100ms works well on parallel compressed vocals to both keep the (parallel) compression engaged longer and create a transparent off ramp for that compression, as well.
Dry/Wet
Remember that when we’re using ANY effect, parallel compression or otherwise, as a send to an Aux/Return track, we want to set the dry/wet ratio to 100% wet.
In the case of my favorite compressor, FabFilter’s Pro-C 2, you have two dials – one which controls the wet/effect of the compression, the other lets you blend in the dry uncompressed instance of that track.
Not all compressors have this functionality, but it’s important to mention in the context of parallel compression that you can actually use the two dials together to create parallel compression right on a single vocal track as an insert. Simply dial in the parallel compression settings as I show above, keep the dry dial right in the middle, then turn the gain up for the parallel compression/wet instance of that vocal to taste.
Again, this is specific to this plugin and for our purposes of using this effect as a send, we want the dry dial all the way the left/quiet and the wet dial right in the middle as we’re using the send knobs for our various vocal tracks to act as the blend amount.
That’s basically it. At this point we just turn up the send dial for that particular Aux/Return track to blend in as much of that parallel compression of each individual vocal to taste.
A good rule of thumb when finding the perfect amount of parallel compressed vocal to blend in alongside your “dry” vocal is turn the send knob up until you can hear it in the mix, then dial it back a couple dB.
Parallel compression is generally one of those effects you want to feel rather than hear, or in this case feeling the added energy and thickness you’re getting from that in your face vocal blended in with subtlety alongside your dry vocal.
