Recording acoustic guitar with two mics gives you a lot more options when it comes to the mix, regardless of how the guitar is being used in the song. You can pan both guitars against one another fully wide, partially wide, or even layer them on top of one another for some added thickness and fullness. Let’s talk HOW to go about recording acoustic guitar with two mics now with every one of the best options and talk about how their results vary from one another.
Recording Acoustic Guitar With Two Mics
There are a few orientations which work well for recording acoustic guitar with two mics, so let’s go through them one by one.
While condenser mics tend to work best (see my guide to the best mic for recording acoustic guitar), you can apply these techniques with any types of microphones (with an asterisk on the final method).
Neck and Bridge Technique
The neck and bridge recording technique is as simple as it gets when it comes to recording acoustic guitar with two mics.
As the name suggests, one microphone favors the neck which is the brighter end of the acoustic guitar while the other favors the bridge which is more of the warmer end:

Essentially you take two microphones each roughly 6-12 inches from the guitar.
One is pointed at the 12th fret (representing the neck) and yields a brighter tone with more presence and character of the strings and acoustic guitar itself. I prefer using whichever microphone of mine has a flatter frequency response to get a nice rounded profile of the guitar.
The other is pointed at the literal bridge of the guitar, below the sound hole. Note that you never want to point a microphone AT or angled toward the sound hole as this will make the tone boomy and muddy. I like whichever microphone of mine has a weaker low end as its frequency response at the bridge.
The microphone choices are essentially to compensate for the lackings of the cheaper microphone of the two, but as a general rule I like to match the brighter part of the guitar (neck) with my warmer microphone and vice versa on the bridge with my brighter microphone.
One last thing to mention with the neck and bridge recording technique, a 1:3 ratio works best regarding the distance to the guitar and distance between the mics.
While this can vary slightly from guitar to guitar, I find that somewhere in the 6-8 inch pocket works well so the mics are 18-24 inches apart.
The neck and bridge recording technique gives you two decidedly different sounding recordings which you can layer on top of one another or you can split and pan wide in the mix with one representing the warmth, body, and low end of the acoustic, and the other representing the character, presence, and brightness of the acoustic.
While this technique arguably yields the least similarly sounding tracks (which is why I like to blend them as much as possible with the mic choices), this can make the entire stereo field feel like it’s serving the full range of the acoustic itself, making it sound huge.
Plus, sometimes it sounds nice having dissimilar representations of the same instrument/recording in the field for a little more of a dynamic feel.
XY Technique
The XY recording technique involves keeping the two microphones much closer to one another and creates the most similar sounding recordings between the two:

Here, both mics are pointing at that sweet spot on the acoustic of that 12th fret, albeit with one microphone closer to the bridge favoring the neck in its angling and the other closer to the neck favoring the bridge/sound hole end in its angling.
I recommend setting up the two microphones so that they’re basically an inch or less from touching one another and 3-6 inches from that 12th fret for a dry sound which minimizes the room.
Similar to the neck and bridge technique, I like to point the brighter leaning microphone favoring the sound hole/bridge angling (meaning the one closer to the neck) and vice versa for the warmer leaning microphone favoring the neck (meaning the one closer to the sound hole/bridge).
While you’ll get one microphone slightly favoring brightness and presence and the other slightly favoring warmth and body, the microphone choices should correct some of this so you get two unique recordings with slight variations in their tone.
This allows you to mix them however you want, but I generally just like to pan them opposite one another, however much that works out to be. Sometimes I’ll automate that width (see my overview on mixing automation) so I get a bit more during the chorus or bigger moments in the mix.
XY is a favorite for a lot of producers because of the similar blended tone it creates between the two recordings with have a subtle but just enough difference in their tone which works very well together in the mix.
I recommend the XY recording technique in particular if you’re new to recording acoustic guitar with two microphones or otherwise and just want something which is difficult to mess up and always sounds good.
Mid Side Mic Technique
Lastly, we have what is arguably my favorite method for recording acoustic guitar with two mics in the mid side mic technique, but it requires a particular type of microphone for one of the two.
Specifically, it requires a microphone which has the capacity for a bidirectional/figure-8 style polar pattern:
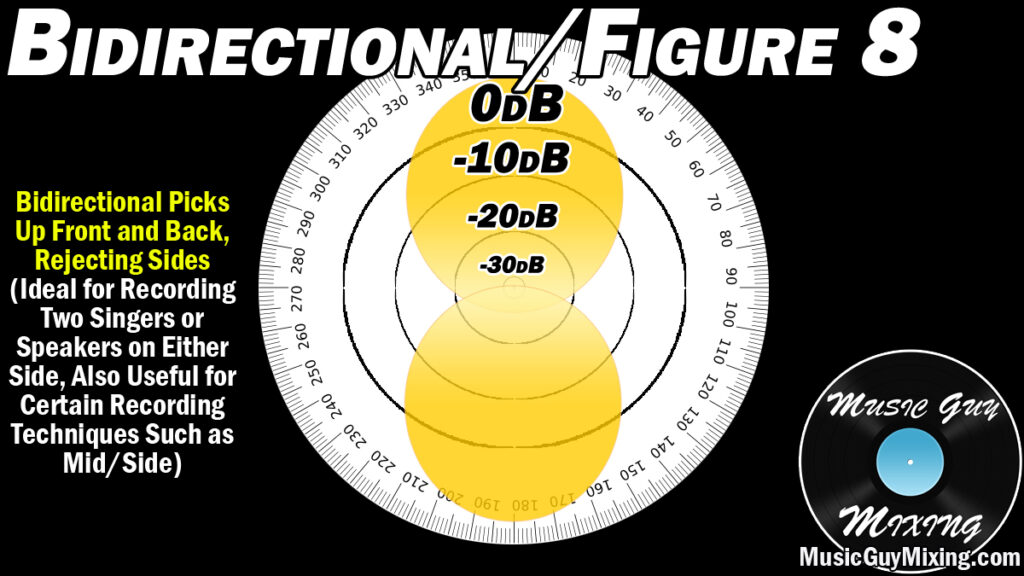
In other words, this microphone can record what’s directly in front of and behind it.
The orientation of the two microphones in the mid side mic technique is a little tricky, as well:

Essentially, you place both microphones the same distance from the guitar, ideally 3-6 inches from the 12th fret, with the normal cardioid microphone facing straight at the 12th fret and the bidirectional microphone turned 90 degrees and sitting directly above or below the other mic.
That bidirectional microphone is now recording BOTH the neck side AND the bridge side of the guitar by way of the front and back (remembering that it’s turned 90 degrees to essentially face both ends of the guitar with its “live” ends.
After you’ve recorded both tracks, you duplicate the bidirectional track in the mix, pan one hard left and one hard right, and invert the phase on one or the other. The effect is that you’ll the full stereo sound of that acoustic guitar between those two tracks on the ends with the other microphone acting as the centered track.
The cool thing about the mid side mic technique is that the faders/volume level of those wide tracks (the bidirectional recording we duplicated and inverted one for) now act as the controllers for the desired amount of stereo width we want for that guitar.
Turn these up, and you’ll hear more of a natural stereo spread for the acoustic guitar. Turn them down and you just get the narrow cardioid miked track in the center.
I like to automate this up and down as necessary as the mix calls for it, dialing them up during key moments like choruses or any moments where the mix needs to be bigger.
The mid side mic technique is the best for creating naturally sounding wider acoustic guitar, but again it requires more work to set up, not to mention a special microphone with the capacity for bidirectional recording.
As with any of these techniques for recording acoustic guitar with two mics, experiment with different places in your room, sit down while playing to minimize movement, and be aware of phase issues in the mix after the fact.
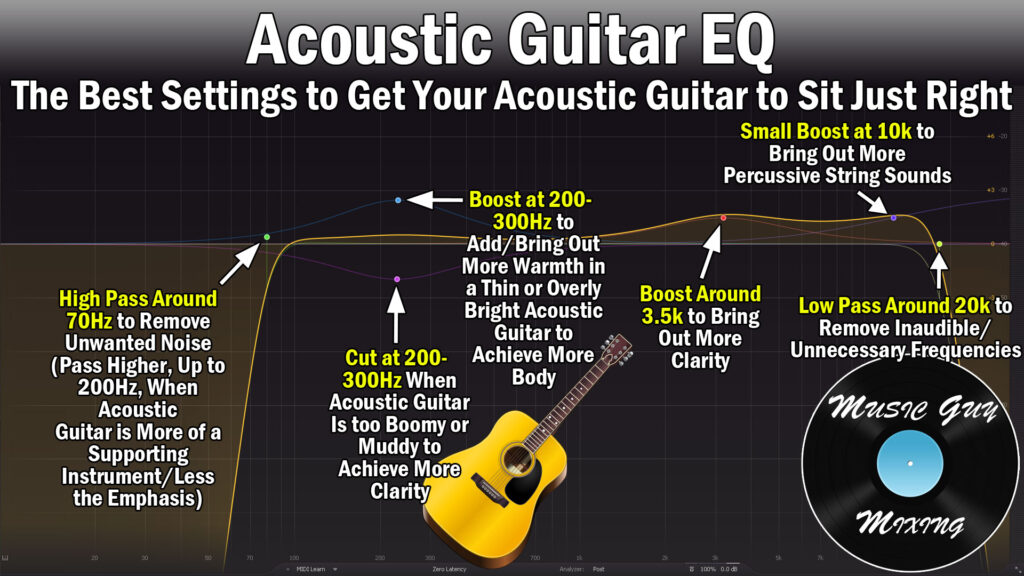
Once you’ve got your acoustic guitar on tape, refer to my complete guide to mixing acoustic guitars to ensure your acoustic(s) is sounding as good as it can in the mix.