
Given that the human voice is one of the most dynamic instruments, compression on vocals is a necessity. Without the right compressor settings for vocals dialed in, you’ll hear the compression working or you’ll be losing critical words or syllables here or there.
A compressor is a tool like any other. When you know how to use it properly, you’ll get the best results. With that in mind, let’s talk about the perfect compressor settings for vocals to dial in to get that perfect sound every time.
Make sure you check out my vocal EQ guide (which includes a cheat sheet) to cut out all the stuff you don’t want before you hit the compressor. That way we’re only compressing the good stuff. Now, back to the vocal compression!
The Best Compressor for Vocals
Before we get into compressor settings for vocals, make sure you’re using the right type of compressor on them. I recently did an overview on the best compressor for vocals and explained why a FET compressor like the 1176 or an optical compressor work so well on vocals.
And in case you were wondering how many compressors to use on vocals, you can’t use too many. You should certainly be using more than one.
I specifically like to use one after another in my chain which is referred to as serial compression.
This distributes the compression load between multiple compressors, yielding a more transparent compression. I typically use Arturia’s 1176 modeled compressor as the first in my signal chain on vocals. This does most of the heavy lifting for me, and it features the normal settings featured on most compressors. With that in mind, let’s talk about the best compressor settings for vocals.
Best Compressor Settings for Vocals
Here is my vocal compression cheat sheet that I always use when I compress a new vocal:

Let’s cover each of these compressor settings for vocals in depth.
Threshold/Input
Some compressors label this as threshold, others as input. Whatever name it goes by, this is the level which the audio must reach before the compressor begins reducing the signal.
On this first compressor, I like to set the threshold to around 10dB BELOW the average level.

This should achieve a gain reduction of 8-12dB on the peaks. Note that gain reduction is achieved through a combination of the threshold/input AND ratio, so let’s get into that.
Ratio
One of the most important settings for vocal compression is setting a ratio at the right spot. The ratio is essentially to what degree the compressor is going to pull down those peaks of your vocals. Check out my quick guide on compressor ratio explained for more information, but essentially a higher number will reduce the signal more.
A high ratio affecting a lot of input will significantly reduce the dynamics in your vocal. This is the difference between the quietest and loudest parts.
With vocals, particularly on this first compressor in the chain I typically use a vocal compression ratio of 8:1.

Because I typically like to use more than one compressor on vocals (see how many compressors to use on vocals), I like to go more aggressive with the ratio with the first compressor. I’ll often open with that ratio of 8:1 to tame those peaks and help keep the vocal under control and, as such, up front in the mix.
This means that for every 8dB which exceed the input/threshold we set, it will be compressed to 1dB.

Again, the real takeaway is that a higher number means any signal which is compressed gets compressed harder. This takes the dynamics out of your vocal and gives you a more constant level.
As the human voice is naturally a dynamic instrument, more compression sounds less natural, but it keeps that vocal in the front of the mix. No words or syllables are lost when a signal is heavily compressed.
Typically on FET compressors you have the 1176 style ratio presets.
So rather than having a ratio dial like on most stock compressors which come with DAWs, you have locked in 4, 8, 12, and 20 ratio options.
While I typically go with 8:1, if I’m compressing a gentler signal or a vocal in a sparser mix and I really want transparent (undetectable) compression, I might go with 4:1.
Attack
The attack setting on a compressor dictates how long after it crosses the threshold that it begins to be compressed.
This is measured in milliseconds, even as quickly as a fraction of a millisecond which realistically means instant compression.
The whole point of using a compressor is because we want the audio compressed, so why not set the attack to instant?
Setting the attack to be too fast means that all we hear is the compressed audio. In other words, the compressor will clamp down before the initial “punch” of the audio is felt. Those transients help create a punchier individual audio track and a mix overall.
This is why I like to set the attack so that we get to hear the initial punch right before that compressor clamps down on the signal. It’s more of a feel than a hear sensation, and it’s an important aspect of creating a lively engaging mix.
So, to answer the question what’s the best attack on vocal compression, the answer is typically relatively fast.
If you have the option to set a specific time, try starting with 10ms (or a 5 on the 1176) and move it left and right to hear the difference.
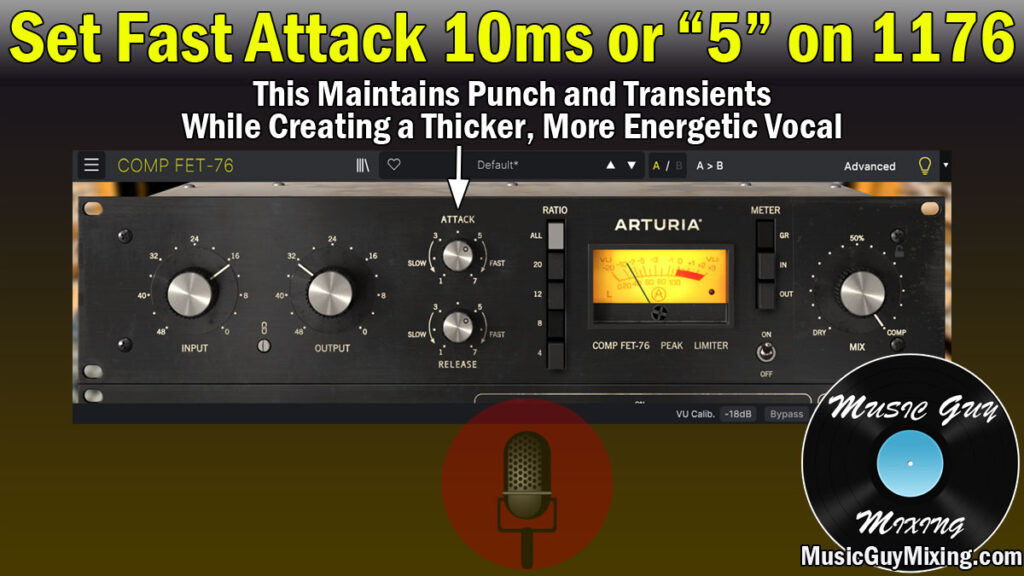
The signal will sound flat when you set that attack as fast as it will go. Slow it down a bit and you hear a more of the dynamic jumping bite of the vocals coming through.
Let’s get back to the compressor I’m using in this entire example.
Note that the attack is another area where 1176 compressors (which again to remind you are great on vocals) throw you a curveball.
In going against the norm of every other compressor, a higher number on an 1176 means a faster compressor. The attack speed is represented with numbers between 1 and 7 with 7 being the fastest. So if you’re compressing a vocal and you want it right up in your face, set it at or near 7. Generally though start with 5 and adjust as you monitor it accordingly.
The Arturia gratifyingly even makes it clear right on its interface that higher numbers denote faster attacks.
Release
If attack determines how quickly the compressor starts working, the compressor’s release dictates how quickly the signal is released from compression after dropping below the threshold.
The ideal release on vocal compression is more clear cut: you’ll typically want a fast release. Try 50ms on a stock DAW compressor. Once again on an 1176, higher numbers means faster release times. Try beginning with 5 and adjust as necessary.

This creates a natural and smooth off-ramp for the compressor to let up and “release” the signal from its compression when it dips below the threshold.
Output Gain
The output gain is simply the level of audio after the compressor has done its thing. You’ll typically want to have the same perceived volume coming out of the compressor as you had going in without the compression. As such, you’ll need to turn up the output dial to put some volume back into the track.
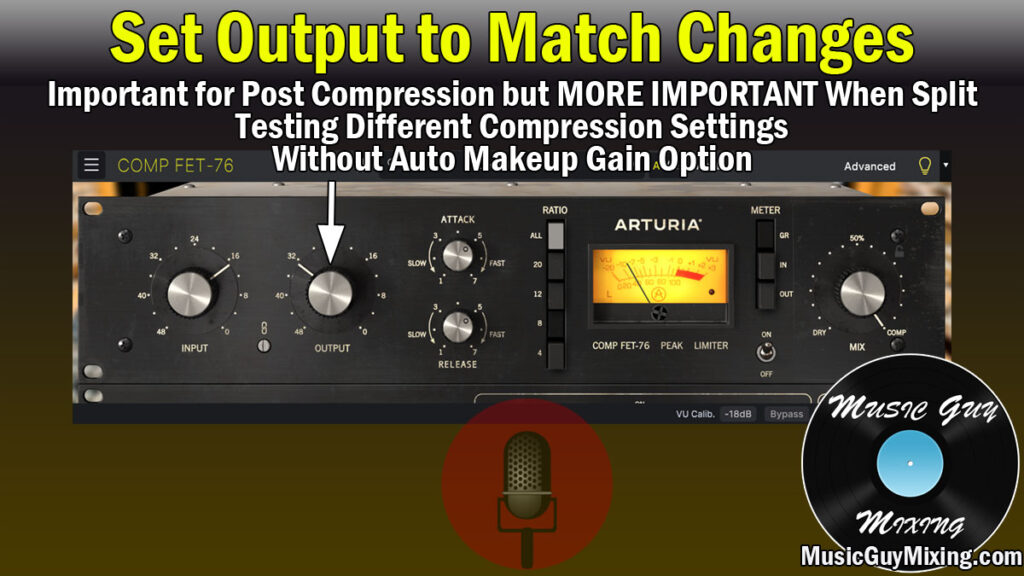
One thing to mention is to make sure that whenever you’re experimenting with a setting like the attack or ratio that you are aware of the volume.
For instance, slowing the attack means more of the uncompressed signal comes through, resulting in a louder volume. This can trick your ears into thinking that a slower attack is better, because louder is always perceived as better.
If you’re comparing settings like that and the compressor doesn’t have an automatic makeup gain, create a second instance of the compressor with the different setting and adjust the output gain manually to match the first instance.
Then you can split test between the two settings by way of the two different compressors and have a realistic idea of which actually sounds better without the louder of the two winning.
After your initial compressor, I recommend following it up with a second compressor to smooth out the remaining signal.
Once again, this is known as serial compression, or using two compressors in a row. Each one has a different role; the first compressor which we just covered works to be more aggressive in taming the peaks.
As any awkward jutting out peaks will likely have been addressed with the first compressor, this second compressor is just for a bit of glue.
Optical compressors like the Waves CLA-2A are perfect for this role.

You don’t even need to worry about settings outside of the threshold – attack, release, and ratio are all automatic.
Set the peak reduction to achieve 1-2dB of gain reduction on average and at most 3dB of gain reduction on any remaining areas which poke out.
After all of these compressor settings for vocals are set, your vocal should be sitting in a good spot. Follow it up with a bit of automation in case any words aren’t poking through enough in the context of the rest of the mix and you should be good to go.
If you want to add another compressor for a touch more glue, drop it at the end of the chain after any additional processing.
Vocal Compressor Settings Tips
- The best vocal compressor settings yield a controlled, thicker, and more energetic, yet natural sounding vocal.
- Set your compressor threshold or input when dealing with vocals to achieve 5-10dB of gain reduction at loudest peaks.
- Remember to set your output gain manually to match any changes particularly when split testing settings if compressor doesn’t feature auto makeup gain.
- Set a ratio of 8:1 on most compressors. On an 1176 the preset “4:1” or “8:1” settings each work well on vocals. Aim for the “8” for a more dynamic vocal which needs more control or simply to help keep your vocal more up front in the mix.
- Setting a relatively fast attack of 10ms (or around “5” on 1176) is a sweet spot for maintaining punch while keeping a thick, energized vocal.
- Setting a relatively fast release of 50ms (or around “5” on 1176) avoids overcompression and keeps a natural signal post compression.
- Remember to use more than one compressor on vocals. An 1176 is a great compressor first in the chain, followed up by an optical compressor.

Pingback: Serial Compression - The Ultimate Guide - Music Guy Mixing
Pingback: How to Mix Double Tracked Vocals - Music Guy Mixing
Pingback: Electric Guitar Compression Guide - How to Compress Electric Guitar - Music Guy Mixing
Pingback: Audio Effects Explained - The Complete Guide - Music Guy Mixing
Pingback: How to Mix Extremely Dynamic Vocals - Music Guy Mixing
Pingback: Vocal EQ Guide - The Complete Guide to EQing Vocals - Music Guy Mixing
Pingback: How to Use Parallel Compression - The Best Settings - Music Guy Mixing
Pingback: The Best Vocal Compression Settings Live - Music Guy Mixing
you are my hero in this feild / i am learning from your posts . my first day start today vocal mixing and mastering /
today topic was EQUALLISER.