
Whether they’re serving as a little filler or they’re an essential component to the mix like in the case of a singer-songwriter or folk song, let’s talk how to mix acoustic guitars to get them sounding their best, no matter the situation.
How to Mix Acoustic Guitars

Let’s move left to right in the signal chain, start to end, starting with a little gain correction (when necessary).
Gain
Depending on how the acoustic guitars were recorded, they might need some gain adjustment before we feed the signal into an EQ or any other form of processing.
Speaking of which, check out my complete overview on how to record acoustic guitar for 14 tips on getting the best sound coming into the mix.
You’ve likely heard this before, but it’s true; the better the recordings you’ve got to work with, the less work you’ll have to do on the back end and ultimately the better it will always sound in the end.
Getting back to how to mix acoustic guitars, I like to begin with a simple gain adjustment plug.
In my DAW of choice, Ableton Live, we have the Utility plugin which has a gain knob so you can adjust the gain of that track wherever it is in the signal chain:

Placing this first in the signal chain ensures that we’re feeding an optimal level into all subsequent plugins, many of which thrive on and produce the best results when they receive a level of roughly -18dB on average (especially those emulating and modeling analog gear).
This is the basic principle of gain staging and you should aim for this same level as the output after every plugin in the chain (especially those which have a more impactful effect on the level).
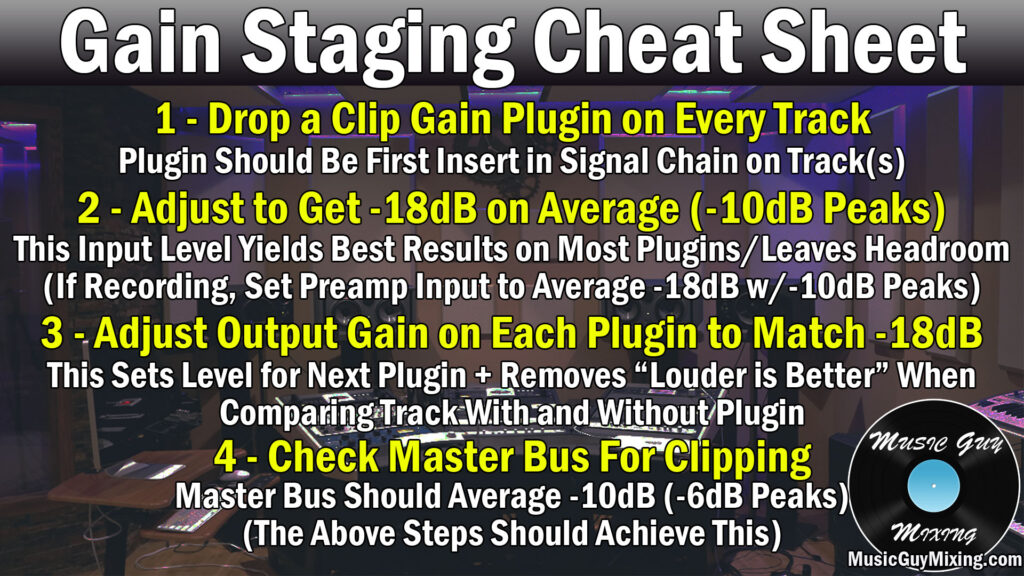
Not only does this yield better sounding results with each step of the processing chain, it also keeps every track in your mix at more responsible levels, giving you more mixing headroom, allowing you or the mastering engineer to produce better sounding, naturally louder masters of your track.
If your acoustic guitar was recorded too hot, you should utilize a gain plugin early on to set its output to average roughly -18dB before we send it into the EQ (the next step in how to mix acoustic guitars).
EQ
An EQ allows us to cut or boost certain frequencies on our acoustic guitars.
While there’s no hard and fast rules, it’s generally better to cut than boost as by cutting to remove the frequencies which are detracting from the sound you want, you’re cleaning up the tone while placing a greater emphasis on the remaining frequencies via subtractive EQ.
Before we cut or boost anything with our favorite EQ, it’s important you understand what the frequency spectrum of the acoustic guitar looks like:

Taken from my acoustic guitar frequency range overview, this chart demonstrates the characters of the sound at each frequency range of the acoustic guitar.
With that in mind, here is a great place to start in terms of how to EQ acoustic guitar:
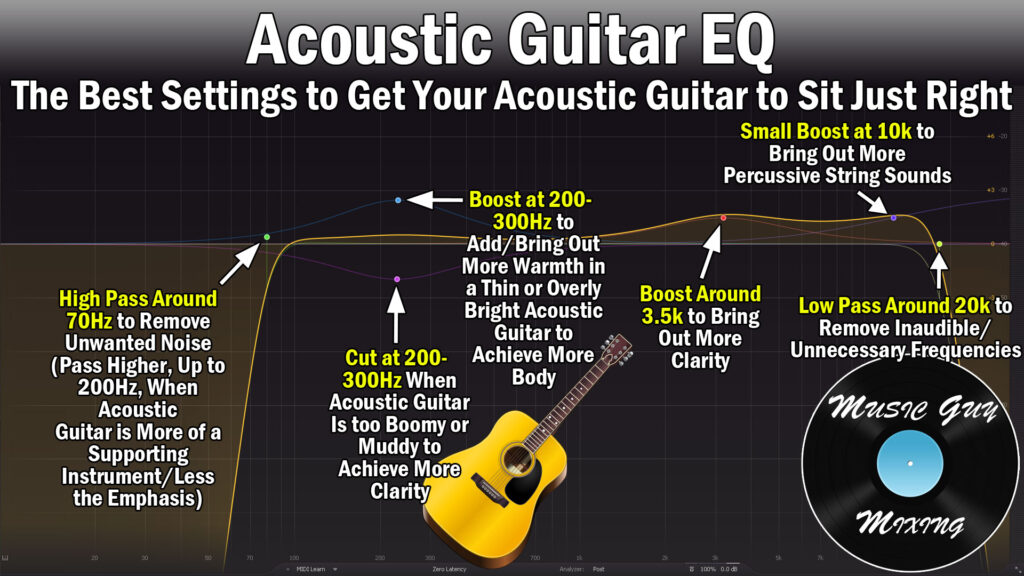
To give a brief overview on each step:
High Pass Around 70Hz (Inaudible)
A high pass filter removes everything below a certain point, allowing the higher frequencies above that point to “pass through” untouched.
High pass filters are important for removing inaudible low end frequencies, audible but unwanted low end frequencies, or both. By removing this noise and clearing up and prioritizing these frequencies for the instruments which actually need them in your bass and kick, you’re creating a cleaner mix.
How high you high pass on acoustic guitars is dependent upon how you’re using the acoustic guitar in your mix.
As I mentioned in opening, acoustic guitar will generally either be a large focus in your mix (in some genres more than others), or more of an accent piece.
If it’s the former and the acoustic guitar is a large element in carrying the instrumental side of the mix like in folk, singer-songwriter, etc. then you want to keep more of that fundamental body of the guitar intact. In that case you want to high pass around 70Hz to ensure that you’re keeping the full tone of that open played low E string unaffected.
Conversely, if I’m using an acoustic guitar more of an accent and more for the percussiveness of the strings, I’ll high pass as high as 200Hz.
Cut or Boost at 100-300 (Body)
As the chart above demonstrates, the fundamental frequencies of the acoustic guitars, meaning the prominent frequencies the strings resonate at, exist between 200 if not 100 and 300Hz.
If you want more thickness and body on the guitar, try a small boost here. If the guitar was recorded too far or off position of the microphone (see how to mic an acoustic guitar), then you may need a bit more body here.
If the guitar tone is too boomy which is the result of miking the sound hole (which you should avoid in favor of aiming for the 12th fret moving forward), you may need a cut here.
Try a dynamic EQ cut instead if it’s a case where the acoustic guitar is only occasionally boomy which is typically a product of the performer moving during the recording, in which case the sound hole was pointed toward the microphone on and off during the performance.
Cut at 400-600Hz (Clean Up Tone)
A lot of unflattering reflections build up around the first overtones on the acoustic guitar.
Adding in a small dynamic cut here can mitigate their effects on the tone, not to mention clean up a lot of the mix mud.
Boost at 3.5k (Clarity)
The presence of the acoustic guitar exists in that 2-5k range.
As such, a small boost at 3.5k will add some brightness and clarity to your tone.
In going back to the concept of subtractive EQ, remember that attenuating the impact of the body and muddy reflections with cuts like we covered in the last two steps will place a greater emphasis on the clarity of the acoustic guitar, resulting in less of a need for any boosts, or at least as sizeable a boost.
Boost at 10k (Transient String Percussive Transients)
An instrument’s transients are its high frequency, percussive sounds which precede the rest of the tone.
In the case of acoustic guitar, its transients are the percussive, non-musical sounds of the strings which draw the listener’s ear to them.
As such, a small boost at 10k where those transients reside can help the acoustic guitar(s) cut through the mix. This boost is ideal when you’ve got the level perfectly set otherwise but it needs that little extra “oomph”.
Low Pass Around 20k (Inaudible)
20k and above is as inaudible as the lowest of the low end, but it’s not quite as impactful as those low end frequencies.
A small roll off via a low pass filter won’t do much on its own, but add in the effects of low passing every track in your mix (albeit at different frequency points), and you’re creating a modicum of extra headroom.
You can go lower than 20k; this is a very conservative point to roll off without worrying about losing any transient or air on the top end.
As with any high or low passing, you can solo the track as you sweep down to ensure you’re not losing anything which is contributing to the tone to find that sweet spot.
Lastly, note that it’s unlikely that you’re going to appreciably change the output level of the track via that EQ, but you will still want to adjust the EQ’s onboard output gain control to ensure that when you split test between the EQ being on and off, you’re getting the same level from the track.
Compression
Compression is the other major half of the processing coin when it comes to how to mix acoustic guitars.
A compressor reduces the natural dynamic range of a recording.
By reducing the difference between the quietest and loudest practical (wanted) instances on a track, you’re creating a more reliable average level. This makes the track sound more thicker and more energetic and ensures no notes are lost in the performance, not to mention it makes setting the fader position easier.
Here is a snapshot my recommend settings for compressing acoustic guitar:

As with the EQ snapshot, let’s do a quick overview of each of the major settings on the audio compressor to explain why I recommend what I do for each:
Threshold
The compressor’s threshold determines what level the acoustic guitar needs to reach before any compression occurs.
As you might expect, the lower you set this point, the more the signal will be compressed (to the rest of your settings, of course).
I like to set the acoustic guitar compressor threshold to be roughly at the quietest practical level of the acoustic guitar. This ensures that virtually the entire acoustic guitar will be attenuated, albeit proportionately which is related to its ratio.
Ratio
The ratio on the compressor is the degree to which any level which exceeds the threshold gets turned down.
This is measured in an X:1 format with X being the number of decibels going over the threshold to be turned down and output to a factor of 1.
In other words, a 2:1 ratio means every 2dB which go over the threshold, they’ll be turned into 1dB. So 10dB over the threshold means 10/2=5dB.
Knee
The compressor knee relates to the threshold in that it determines how strictly that threshold is adhered to before compression is applied.
A hard knee means no compression is applied until the threshold is hit.
Conversely, a softer knee means compression will be applied the closer the level approaches the threshold, albeit it at a lighter ratio than what we have set.
A good rule of thumb is that the more complicated the dynamics of a track, the softer the knee should be so you’re more gently applying proportionate ratios of compression.
If we have a track with extremely simple dynamics like a kick drum or snare which produces roughly the same level every time, we can get away with a hard knee.
With an acoustic guitar, the kind of knee we set is related to how complicated the dynamics of the performance are.
If it’s more of a picked arpeggiated part, we might have a lot more dynamics to account for than if we’re just strumming at approximately the same level throughout the performance.
A 12dB knee is relatively soft and generally works well with acoustic guitar, but you may want to adjust it slightly higher for a less dynamic part.
Attack
The compressor attack is the control for how fast the compression is applied. A faster/shorter attack means compression is applied more quickly to near instantly.
The reason you might want to delay compression with a slightly longer attack is to allow the transients we discussed earlier to pass through before the compression pulls down the rest of the sound.
Remember that those transients help the acoustic guitar poke through the mix and assert itself by way of that string percussiveness, so I like a relatively average attack of 5-25ms on acoustic guitar compression.
Release and Hold
The release and hold parameters on a compressor are the off ramp and extra amount of time after the threshold is no longer met before compression releases, respectively.
More specifically, the release time is that amount of time to go back to the audio’s uncompressed state after the threshold is no longer met, whereas the hold time adds a custom amount of time where the compression is still engaged before the release begins even after the threshold is no longer met.
I like a 50ms release time with a 15ms hold time on acoustic guitar compression to create a little release buffer and a short but transparent off ramp for that compression to let up.
Output Gain
Compression by its very nature affects the volume of whatever you apply it to.
Specifically it lowers the output volume by bringing down the peaks to lower that dynamic range.
With that in mind, we need to add in makeup or output gain to ensure that the level on the out is the same as it was on the in.
This effectively raises the floor of the quietest practical audio while ensuring the peaks still hit the level they were hitting before the compression.
Most compressors have an automatic makeup gain feature to approximate the amount of gain to add back in or you can alternatively turn this off and manually turn this up to match the level without the compression as you split test between the two with the compressor on and off.
Either way, make sure that you are roughly hitting the same level on the peaks and are averaging that -18dB for any other processing you want in the chain.
Additional Processing
EQ and compression are the major two types of processing in how to mix acoustic guitars to clean up your tone and get some better control of its dynamics.
A little reverb can add some depth to your acoustic, either blending in some room reverb you’re sharing with other tracks in your mix via some return tracks to make it gel better with the rest of the mix.
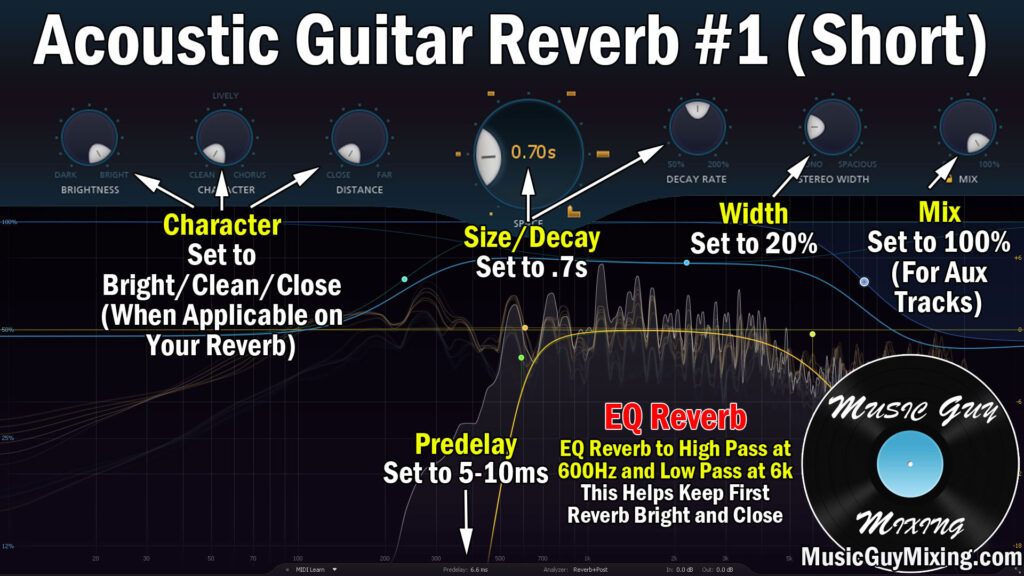
I also did a complete overview on how to use reverb on acoustic guitar where I covered two different reverb setups I like to blend in with my reverbs to add both some width and depth.
This is more to taste and won’t work with every mix, but here is the first, shorter and brighter reverb for a touch of width and a sub 1 second delay:
You might compare this with this second, longer, wider, and darker instance of a reverb, blending this in for key or larger moments in the song and mix when you need that acoustic guitar to take up a little more real estate:

Again, this is to taste and certainly not necessary, not to mention it will work far better in some mixes than others.
When in doubt, just blend in a little of your room reverb that you’re sending to other tracks like your vocal to bring a little cohesiveness to the acoustic and especially make it sound like its naturally existing in the same space as the rest of the mix.
Panning
We can’t finish talking how to mix acoustic guitars without talking panning.
This comes down to two things: how many tracks you’ve got and again how you’re using the acoustic guitars in your mix.
If you’ve got two instances of your acoustic guitar track either by way of doubled tracking your acoustic guitars or simply using multiple microphones with your initial recording, you’ll likely want to split them wide as per my audio panning guide:

If you’ve done the mid side mic technique then you’ve got the pair of stereo left and right recordings along with the centered cardioid recorded track which you can leave in the center to give you a really nice spread.
In one last time going back to the use of the guitars in the mix, if it’s more of an accent instrument in a dense mix, you may want to favor the left or right side.
Keep in mind if you’ve got two tracks for the acoustic guitar, wherever you choose to pan each of them, their core will sound like its coming from the center of their separation. So if you pan on hard left and the other in the center, it will sound like it’s coming halfway between the center and left side.
If you’ve only got the single track, you can simply fit it in wherever you’ve got space in the mix where there aren’t any frequency conflicts. In my experience, a single acoustic guitar (or the core of a pair as I just mentioned) sounds good panned on the opposite side of your piano if the piano is being used in a similar manner.
Lastly, if you’ve got a very stripped down mix, check out my complete overview of how to mix acoustic guitar and vocals.
