
As I covered in my overview of how to record acoustic guitar, there are a number of different techniques for how to mic an acoustic guitar. Microphone placement both in terms of location and distance relative to the guitar will substantially alter the sound that you capture. Let’s talk the best way for how to mic an acoustic guitar.
How to Mic an Acoustic Guitar
Let’s talk microphone placement, recording techniques, and how many microphones to use on acoustic guitar.
Before we get into that, let’s talk the best mic for an acoustic guitar.
Best Mic for an Acoustic Guitar
The truth is a lot of different types of microphone can work well for acoustic guitar and you don’t need to break the bank to get a decent sound.
First, we typically want both microphones to be of the cardioid polar pattern (with one exception I’ll cover later), meaning they’re recording what they’re facing.
Beyond that, most microphones fall into one of two categories – condenser vs dynamic microphones.
In general, condenser microphones are typically better suited for recording acoustic guitar for a few reasons:

Condenser microphones are generally more sensitive than dynamic microphones. This makes them better suited for better capturing the nuanced subtleties of audio which has a large frequency range as well as a ranged difference in volume (both like acoustic guitar) more accurately.
Because of their sensitivity, it’s better to use them on relatively quieter instruments like vocals, acoustic guitar, piano, etc.
This is in contrast to dynamic microphones which are better suited for louder instruments or settings like micing a drum set or use in a live performance.
I typically alternate between a couple condenser microphone workhorses I have in my collection, the AT2035 and SM81, for recording acoustic guitar.
I specifically get asked “can you record acoustic guitar with an SM57” quite often. Shure’s SM57 has been one of the most popular, ubiquitous dynamic microphones for decades because it’s extremely affordable as far as microphones go, it’s durable, and you can get decent results using it to record a lot of instruments.
You can certainly use an SM57 to record acoustic guitar, though I’d recommend avoid using it for the bridge. I’ll talk more about this as we talk about microphone placements for acoustic guitar, so let’s transition into that now.
Mic Placement for Acoustic Guitar
The best mic placement for acoustic guitar depends on how many microphones you’re going to use.
Typically the best mic placement for acoustic guitar is pointing the microphone at the 12th fret, 6-12 inches away from the fret.
If you want a brighter sound, point the microphone closer to the 9th fret or beyond to get more of the neck. If you want more body and warmth, move it closer to the 15th fret or beyond to get more of the bridge. Don’t get too close to or on top of the sound hole, as this will start to sound muddy and boomy very fast.
Also note that moving the microphone farther than 12 inches from the guitar will make the tone darker and bring in more room reflections, something you may or may not want. Moving the microphone closer picks up more of the strings and makes the guitar sound closer in the mix, as well.
This graphic shows how to mic an acoustic guitar in greater detail:

One important note which is mentioned in the graphic is that you should sit while you’re playing to keep the guitar more still (relative to the microphone). This yields a more consistent level and performance.
Also set your recording hardware’s preamp gain to average -18dB (with -12dB peaks) for that microphone as you play.
This keeps the acoustic guitar from clipping and sets up the ideal level to feed into any EQ, compression, and other plugins you have as far as gain staging is concerned.
The last thing to mention on how to mic an acoustic guitar is some recording techniques.
Single Microphone
I just covered the single microphone technique which is admittedly the easiest way to mic an acoustic guitar.
You cannot go wrong with the 12th fret in that 6-12″ pocket away from the guitar as this provides the perfect blend of string brightness and body warmth.
You may want to tweak this, moving it up or down the fret as I mentioned to favor the tone one way or the other.
Just listen in with headphones and open strum with one hand while moving the microphone with the other. Of course if you have a second person to move the microphone up and down, closer and farther away while you play and listen, that’s even better.
Note that if you only have or choose to record with a single microphone, you should think about double tracking acoustic guitar. This helps to fill out the sound and mixing in that second unique take can sometimes sound better than recording a single take with two microphones, especially if you can really nail that double.
Recording Guitar With Two Mics
How about bringing a second microphone into the equation, though?
Recording guitar with two mics gives you a fuller sound for a couple reasons.
One, you’re capturing the sound of the guitar at two distinct points which each have a distinct tone. This allows you to capture more body with one microphone and more brightness with the other.
Secondly, you can pan these tracks out wide to create a more natural sound as if you’re standing a few feet away from the guitar as it’s being played.
The important thing to mention when recording guitar with two mics is to make sure they’re the same distance from the guitar.
For instance, if one microphone is 6″ away from the guitar and the other is 12″, the sound will arrive at different times. This will cause phase issues, making the combination of tracks sound weak when played together.
With that in mind, let’s cover how to mic an acoustic guitar with a few of the most effective techniques using two microphones.
Neck and Bridge Technique
A tried and true technique for recording guitar with two microphones is to place one at the 12th fret to get the neck sound and one facing the bridge itself.
This works well because you’re getting the full tone of the guitar in the body and warmth of the bridge below the sound hole which balances nicely with the sound and clarity of the strings and neck of the guitar at the 12th fret.

When you blend the two tones together it sounds full and produces a very interesting stereo image. You get the low end and warmth on one side with the clarity on the other side, creating that full sound of the acoustic guitar across the entire mix.
Different microphones provide different interpretations of the sound you’re capturing. For instance, I mentioned using an AT2035 and SM81 for recording acoustic guitar earlier; I find the AT2035 produces a much brighter representation of my acoustic guitar at the 12th fret than my SM81 does which is a flatter kind of a response.
As such, when I’m using two microphones, I’ll point the brighter leaning AT2035 at the bridge to capture the warmer body sound of the guitar while I’ll point the flatter (or comparatively darker) SM81 at the 12th fret to get the brighter tone.
This creates a more similar tone between the two microphones as opposed to pointing the brighter mic at the brighter source and vice versa which would create more of a divide.
I mentioned I’d come back to this earlier but if you’re using an SM57 as part of your acoustic recording setup, I’d likewise use the SM57 on the 12th fret and whatever vocal microphone you have for the bridge. The SM57 provides a very flat response, so using it on sweet spot of the 12th fret will blend nicely with whatever other microphone you have capturing the bridge.
Whichever microphones you use, make sure they’re the same distance from the guitar itself to avoid phase issues as mentioned earlier.
There’s also a kind of golden rule with this technique which states whatever distance each microphone is from the guitar, you should multiply that by three for distancing the microphones apart from one another.
I find that generally 8″ from the guitar so roughly 24″ between microphones works well to get one aligned with the 12th fret and the other with the bridge, though the size of the guitar can affect this.
It can take a little trial and error to find that sweet spot, but again be sure to keep the guitar still so you get just the right balance of top and low end between the mics.
XY Recording Technique
The XY recording technique focuses entirely on that sweet spot of the 12th fret, albeit at an axis.
Note that it’s not a problem to slightly tilt the microphones in the above mentioned neck and bridge technique, but here we’re setting each microphone off axis by about 45 degree.
One microphone should be facing the 12th fret at an axis favoring the bridge, and the other favoring the neck, like so:

Like with the single microphone technique, you can adjust the distance or exact fret to taste for a brighter or warmer sound.
When you’re done, simply pan one track left and one right. This gives you a more uniform sound than the neck bridge technique I just mentioned which you may prefer, but you still get the width from panning the two.
Mid Side Mic Technique
The mid side mic technique is the most difficult of all of them because it requires some meticulous setting up, not to mention it requires a special microphone which isn’t cardioid patterned but bidirectional/figure 8.
This means the microphone is capable of recording both what it’s facing and what’s behind it, with its blind spot being the sides.
In the mid side mic technique, you need to point your cardioid microphone at your acoustic guitar (I once again recommend the 12th fret). The figure 8 microphone then needs to be placed directly above or below (without touching) the first microphone but turned 90 degrees:

Admittedly it can be a pain to set up the mic stands and once again it’s important to keep the guitar stationary relative to the mics while playing.
After you’ve recorded the performance, duplicate the figure 8 recorded track and pan it against the original hard left and right. Lastly, invert the phase of the duplicated track. Keep the cardioid track centered in the mix, then blend the figure 8 tracks on the sides in to taste.
The idea with the mid side mic technique and the effect this creates is it brings in some natural width for that guitar the more you blend in.
You can automate this so that it’s just the one track in the middle for the verses then bring in the side tracks on the chorus to give that guitar some natural presence as necessary.
Recording Guitar With Three Microphones
If you have a third microphone and a means of recording them all together, you can try different placements to get a more rounded sound.
I rarely use three microphones, but I will record DI from my acoustic when I record acoustic guitar and vocals for that third track just to help fill out the sound and space for stripped down performances.
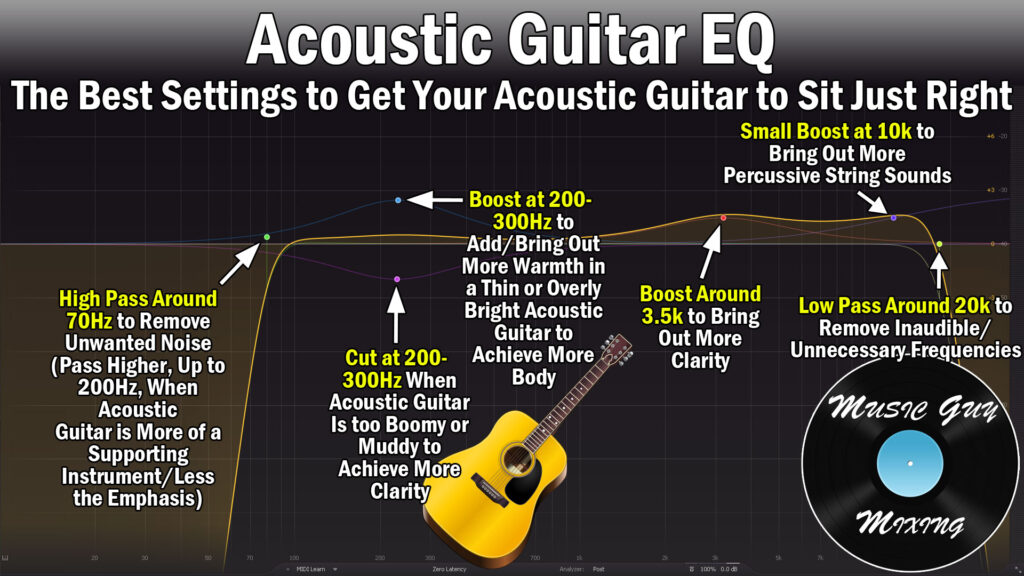
Now that we’ve covered how to record acoustic guitar in depth, make sure you check out my tutorial on how to mix acoustic guitar to get the best EQ, compression, and other processing once you’ve gotten the perfect recorded performance.

Pingback: How to Record Acoustic Guitar - 14 Tips For a Perfect Sound - Music Guy Mixing
Pingback: Acoustic Guitar Mic Placement: Key Strategies For Success
Pingback: The Best Mic For Recording Acoustic Guitar - For All Budgets - Music Guy Mixing
Pingback: How to Do the Neck and Bridge Recording Technique on Acoustic Guitar - Music Guy Mixing
Pingback: 7 Tips to Improve Acoustic Guitar Sound For Professional Results - Music Guy Mixing