
When it comes to any kind of processing on the master bus, less is always more. This is especially true when it comes to applying master EQ settings. If there are any problems in your mix in terms of frequencies, this is something which should be done on a track level. Incidentally, make sure you grab my free EQ cheat sheet to make sure that all of your individual tracks are in good shape.
All that being said, I still like to apply some small EQ adjustments to my entire mix via master EQ settings. With that in mind, let’s talk master EQ settings to give your mix that final missing piece.
Use a Reference Track for Master EQ
Before we get into exact frequencies to pay attention to in your master EQ settings, I recommend using a reference track to help guide you in a couple different ways.
Whenever I sit down to mix a track, I like to have at least one song in particular which I’m using as a rough guide for my mix. I’ve talked about the importance of reference tracks in mixing. These help keep you from mixing in a vacuum and keep your ears trained on the ultimate goal for your mix.
FabFilter’s Pro-Q 3 allows you to compare frequency profiles between tracks assuming you have an instance of the plugin on each track:

In other words, we can drop one instance on our mix bus and another on our reference track and identify differences between the two. I talk a bit more about this in my FabFilter Pro-Q 3 review.
A quick reminder – always make sure the output of your reference track is set to Ext./External rather than feeding to the Master/mix bus which new tracks typically do by default.
This will keep the reference track from being affected by any processing you have on the mix bus.
Even handier is using a Match EQ plugin like Izotope’s Match EQ on your reference track.
Drop this plugin on your reference and click “Capture” to get a frequency profile of that track. You can then save that profile and move the plugin to your mix bus, capturing a snapshot of your mix’s frequency profile:

The plugin then allows you to adjust a slider up to pull your mix’s frequency profile closer to your reference track’s and smooth it individual curves.
Again, less is more here, and when I use this on my mix bus it’s typically 25% or less to match the other profile.
If nothing else, this shows you which frequencies that reference track is richer in comparatively. This shows you that your mix might be bottom, middle, or top heavy compared to the reference.
From there you can either adjust your master EQ settings or perhaps go back in on a track level to see which elements of your mix might need more attention.
NOW let’s get on to the master EQ settings to cover some moves you might want to make via EQ on your mix/master bus.
Master EQ Settings
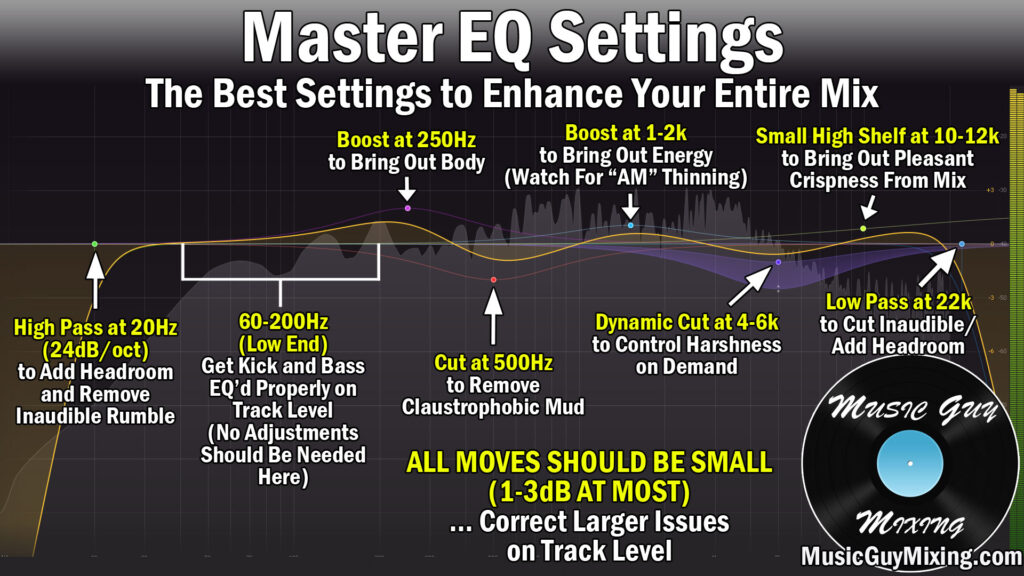
I mentioned this in opening but I’ll repeat myself as an important reminder: less is always more when it comes to changing master EQ settings.
You shouldn’t need more than 1-2dB or 3dB at MOST when adjusting mix bus frequencies.
If you find that your mix sounds significantly better after making a more significant cut or boost, try soloing that frequency range in the EQ to identify which instruments are predominant there.
With that information, revisit those instruments and make adjustments on a track level as there’s likely something off on one or more specific tracks in those frequencies.
Now let’s begin with the low end and work our way up.
High Pass at 20Hz
We should have been high passing at higher points on 95% of our instruments on a track by track level, but we can potentially unlock a bit more headroom with a 24dB/oct high pass filter at 20Hz.

Whenever we’re high or low passing on a bus, mix or otherwise, we need to be conservative.
In the case of our high pass filter, this means no higher than 20Hz. We should notice zero difference with this filter on or off at 20Hz as these are all inaudible frequencies below that point. The 24dB/oct slope will cut out all of these frequencies without sacrificing much to anything above 20Hz.
This will still catch any possible low end inaudible rumble to potentially free up a little more headroom.
40-200Hz (The Low End)
The low end of your mix is in this 40-200Hz region. Here we’re talking about the kick, the bass, and the lower end of the body of many of the other instruments of your mix.

This area is primarily for the bass and kick. It’s easy enough to add or remove more low end to your mix in those two tracks individually, so you shouldn’t have to do anything here regarding your master EQ settings.
That said, the kick and bass share these frequencies so you need to take some care to get them to work together to share this space on their individual tracks.
With that in mind, check out my low end mixing tutorial to do just that.
Boost 200-300Hz for Mix Warmth
At 200-300Hz I find I can impart a bit of low-mid warmth across the entire mix with a small 1-2dB boost.
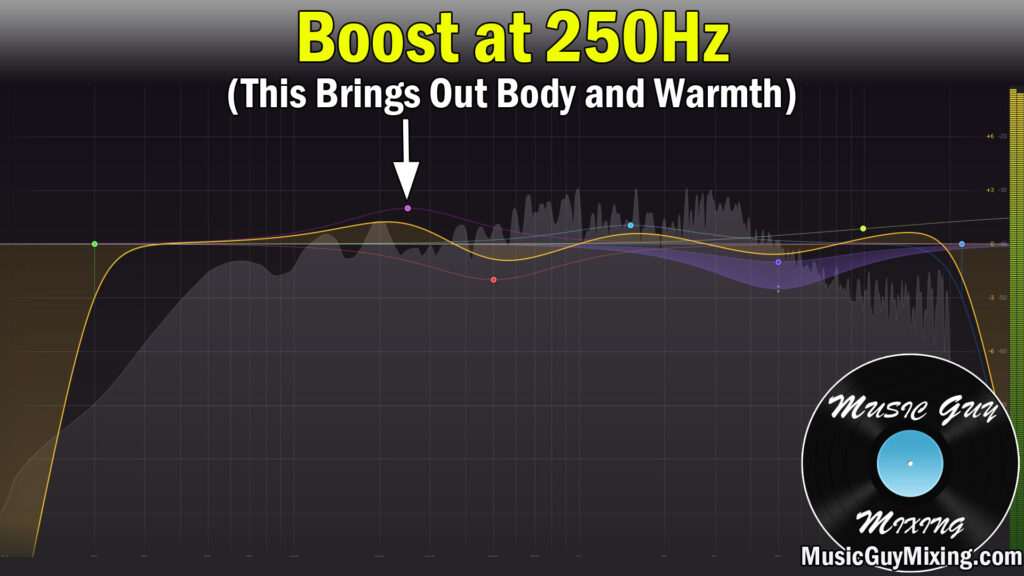
Here we’re bringing out the body in a lot of instruments from vocals, guitars, even the edge of the bass’ body.
We’re just below the area where body begins to turn into mud, so aim for about 250Hz with 100Hz on either side via your Q setting, and try a little boost here.
If you feel you need more than 3dB of a boost here, you may need to revisit the low end of most of your mix including the aforementioned instruments.
Cut at 400-600Hz for Clarity
I generally like a very small 1dB cut in the 500Hz area with a Q setting which extends 100Hz on either side.

There’s a bit of unflattering boxiness and mix mud which crops up on a lot of instruments in our mix almost across the board in the 500Hz area, from a “pinging” like knock on the kick (see my kick drum EQ guide) to a wonky kind of staleness on our vocals (check out my vocal EQ guide, as well).
While we’ve likely addressed this on virtually every track to this point, especially if you’ve been using my aforementioned EQ cheat sheet for every track in your mix, you’ll find that this area still becomes a problem when you add up dozens of tracks.
Creating a small cut at 500Hz clears up this wooden and muddy problem frequency across the mix, adding clarity via subtractive EQ without having to boost the top end.
If you find that cutting more than 3dB here is still benefiting the entire mix, that’s a sign you need to revisit this frequency range on a track level. You’ll almost always get better results by addressing it there rather than a single yet substantial move in your master EQ settings.
Boost at 1-2k to Bring Out Energy
You can bring out a little subtle but beneficial energy and life to your mix with a small boost at 1-2k.

Note that this is that peak “phone sound” – that aesthetic brassy, kinda wonky effect we can create with filters on either side of this area.
As such, boosting too much will thin out your mix and give it a little of that annoying 2k resonance that the ears can be sensitive to. Less is more, especially here.
Check 4-6k for Harsh Abrasive Frequencies (And Dynamic Cut Accordingly)
A mistake many of us make particularly when we’re new to mixing is confusing harsh brightness with clarity. Abrasive frequencies which can be grating on the ears of our listeners crop up in the 4-6k region for a variety of reasons.

Poorly miked instruments, room reflections, overly top heavy EQ settings on hardware like guitar processors or amplifiers, etc. can all lead to deceptively harsh audio under the guise of clarity.
Similar to the mud we dealt with in the 400-600Hz region, harsh frequencies have a habit of stacking on top of each other especially when unchecked or underchecked on a track level.
As such, the 4-6k region can truly go either way when you’re checking it on your master EQ. Try boosting this area, or 5k with 1k on either side via the Q bandwidth, by 2-3dB.
The result should be pretty telling – if you find that it’s suddenly way too bright, this is a sign that it’s likely too bright even without the boost and you should revisit the upper-mid frequencies on a number of tracks.
Try checking the vocals, guitars, synths, even the transient region on your snare EQ in terms of taming that harshness (see my tips on treating a harsh mix as a start). Also note that at 6k we’re on the very low end of sibilance, so check out my guide to treating vocal sibilance which can add to this overall grating sound in the mix.
If the master EQ boost doesn’t exacerbate this problem, then you will likely be okay with a small 1dB or so boost here to add a little clarity.
If you do cut here, make it a dynamic cut to keep it in proportion to the problem and make it subtle.
Either way, checking that reference track with harshness in mind is a great way to reset your ears if you’ve become deaf to those abrasive frequencies. This other track will provide some context as to what the upper-mid range of your mix SHOULD sound like.
High Shelf Boost at 10-12k for Crispness
Above that area our ears are sensitive to, there’s a much softer and less noticeable crisp “hiss” on the top end of a lot of instruments.
We can get away with a either a 1-3dB boost here to bring this out and impart a bit more crispness to our mix, or even a high shelf to increasingly boost the final audible frequencies on that top end.

We’re bringing out cymbal sizzle and vocal air in particular in this area. While it’s not necessary, this gives a subtle feeling of opening up and bringing a little more presence to the mix while not working to the detriment or taking anything away from it.
Low Pass Filter at 22k
The highest frequencies we’re capable of detecting drop off around 20k, so I like a low pass filter with a slope of 24dB/oct at 22k to roll off those inaudibles.

It won’t add nearly as much headroom as the high pass or high passing the low end in general, but we’re not sacrificing anything to get that headroom here which will help in the song mastering process.
Master EQ Settings Tips
- Any adjustments you make in your master EQ settings, meaning EQ adjustments which affect your entire mix, should be subtle and less than 3dB at most.
- 99% of your EQ use should be done on a track and bus level ahead of the master/mix bus.
- High pass at 20Hz with a 24dB/oct to keep your low end intact and clean up any remaining low end inaudible rumble.
- The kick and bass (should) own dominion of the 60Hz-200Hz, especially on the lower end. Get these instruments working together with the tips described above so you don’t have to adjust your low end one way or the other in the master EQ settings.
- Boost at 250Hz to bring out body and warmth in your mix.
- Cut at 500Hz to remove claustrophobic mud from your mix.
- Try a small boost at 1-2k to bring out some extra excitement in the mix (too much results in a thinning wonky sound).
- Check 4-6k to see if you have any problems. Boosting here can tell you if your guitars, synths, vocals, etc. need attention here. Try a small dynamic cut to control any harshness on demand if you do cut here. A small boost can add a hint of clarity if you have no problems with harshness.
- Add a small high shelf at 10-12k to bring out some transparent crispness.
- Low pass at 22k to cut inaudible frequencies and add a touch of headroom for mastering.