
The acoustic guitar is the centerpiece of some songs and genres and more of an accenting piece in others. Regardless of how it’s being used in the mix, here are 7 tips to improve acoustic guitar sound in your mix.
How to Improve Acoustic Guitar Sound

Let’s go through each of the tips on how to improve acoustic guitar sound, starting with where all acoustic guitar tracks begin – the recording phase!
Get the Best Recording
Like everything in mixing, there’s no substitute for a great sounding recording.
While condenser, small diaphragm cardioid microphones generally work best for capturing the sound of an acoustic guitar, it’s equally important to get your microphone in the right spot as I covered in my guide on how to mic an acoustic guitar:

This means:
- Aiming at the 12th fret as this provides the best blended sound of body and clarity. If you want more of the former (body and warmth), point the mic closer to the 15th fret. If you want more of the latter (clarity and brightness), point the mic closer to the 9th fret.
- Placing the microphone 6-12 inches away as this gives you a nice blend of instrument and room/reflections. If you want a drier sound, favor a closer distance. If you want more of the sound of the room, favor a farther distance.
- Experimenting with recording in different locations in the room to find the acoustic sweet spot where the recording sounds the best.
- Being as stationary as possible while playing to keep that 12th fret (or wherever you opt for) right in front of the microphone the whole time (sitting helps versus standing while playing).
- Possibly introducing a second microphone into the equation for more options in the mix (not to mention a DI recording when possible).
With regards to that last point, I did an entire overview on how to record acoustic guitar which tackled the handful of most popular and effective techniques for getting a great recording. Most of these involve using two microphones, such as:
XY Technique
The XY recording technique involves using two cardioid microphones both pointing at the 12th fret:

The wrinkle is each microphone is tilted slightly – one in favor of the neck and one in favor of the bridge. This gives you a relatively balanced tone between the two mono tracks (or single stereo tracks), albeit with a bit more brightness on one and more warmth and body on the other.
Neck and Bridge Technique
The neck and bridge technique gives you a much greater contrast between the two microphones. In this setup, you’ve got one microphone at the 12th fret like previously mentioned while the other microphone is aimed at the bridge like shown:

There’s a simple math equation which explains the ideal distance of the mics from one another and the guitar, or that the distance between the two microphones should be 3 times the distance of each mic from the guitar. For example, if each microphone is 6 inches from the guitar, they should be 18 inches from one another.
The neck and bridge technique is nice for creating a more contrasting stereo spread, with the body and warmth favoring microphone panned hard left and the clarity of the 12th fret panned hard right. I’ll talk more about panning in a moment, but that’s part of the appeal of this technique.
Mid Side Technique
Another technique which gives you a lot of panning options in the mix is the mid side mic technique.
Admittedly this requires a figure 8 polar pattern microphone at that:

Both mics are pointed more or less at the 12th fret and 3-6 inches away. The figure 8 microphone is turned 90 degrees so it’s capturing more of the neck on one side and more of the bridge on the other.
This gives you a very full sound when panned effectively. Speaking of which, let’s move on to panning in talking how to improve acoustic guitar sound.
Panning
One of the keys to making your acoustic sound fuller in the mix is to pan them wide as I covered in my guide on where to pan acoustic guitar:

With most of the aforementioned recording techniques, you should generally have two tracks (or a stereo track). If you only have one microphone, it’s a great idea to double track your acoustic guitar, meaning doing unique recordings of the same part(s), to achieve a fuller sound from the acoustic.
Even if you have two microphones, it’s still a good idea to double track your acoustic guitar because you can’t replicate with a single recording the slight changes in timing and even pitch that you’ll get from even the most perfectly matched second recording.
Regardless if you have one or two unique recordings, each of the above mentioned recording techniques lend themselves to panning your acoustic guitar tracks hard left and right in the mix.
Each of them has one microphone favoring the bridge and one the neck (even the XY technique), so I like to pan the bridge leaning track on the left and neck leaning track on the right. This gives a kind of natural stereo spread of hearing the guitar live where you’re getting more of the body on one side and more of the sound of the strings on the other.
The mid side mic technique requires that you duplicate that figure 8 mic track, then invert the phase on the duplicate and pan the original hard left and the other hard right.
This gives you a very natural stereo spread sound and you even have the cardioid microphone track leftover.
I like to keep this one centered in the middle for arguably the fullest sounding, single tracked acoustic guitar recording/sound.
Phase Issues
I just mentioned inverting the phase in the case of using a figure 8 mic to record acoustic guitar.
A simple yet absolutely necessary way to improve acoustic guitar sound is to be aware of phase issues anytime you recorded a single acoustic guitar performance with two or more sources.
This includes two microphones as well as a microphone and a DI recording (in the case of an acoustic with a preamp).
If you’re not familiar, phase issues relate to how sound waves move. When you record the same source (like an acoustic guitar) with two microphones, a microphone and a DI recording, etc. then it’s possible that the sound waves can be captured as little as a millisecond or few milliseconds apart from one another so that they’re out of sync.
Depending on HOW out of sync they are, they can actually begin to cancel each other out by virtue of how sound functions:
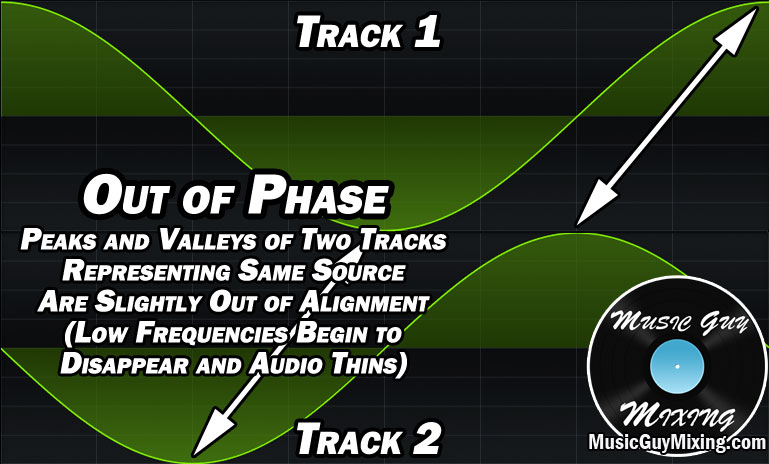
The above image exemplifies two microphones capturing the same source/performance albeit at slightly different times so they’re out of sync/alignment/phase. This can happen when either of the two microphones are slightly farther away from the source than the other (as an example).
This manifests as the lower frequencies beginning to thin between the two.
When the peaks and valleys of the sound waves are 180 degrees out of alignment, you get the troughs of one in sync with the peaks of the other. This is called phase cancellation:

This results in silence between the two tracks, giving you an idea of how serious phase issues can be in the perfect conditions.
Check for phase issues on your acoustic guitar when you’ve got two or more tracks representing the same recording by mixing in mono as stereo panning can partially mask these issues.
Refer to my complete guide on how to get in phase audio, but fixing phase issues can be as simple as zooming in on the timeline to see the peaks/valleys of one sample with the two tracks next to one another and inching one track as necessary to align with the other.
EQ
Once you’ve got your recording, you’re limited to what you can do in the mix. Obviously one of the best ways to improve acoustic guitar sound at this point is to sculpt the tone via EQ. This allows you to cut out what’s not working and leave or possible even slightly boost what is working for the sound.
Taken from my acoustic guitar EQ guide, here is a snapshot of the moves I generally like to make when I’m EQing acoustic guitar:
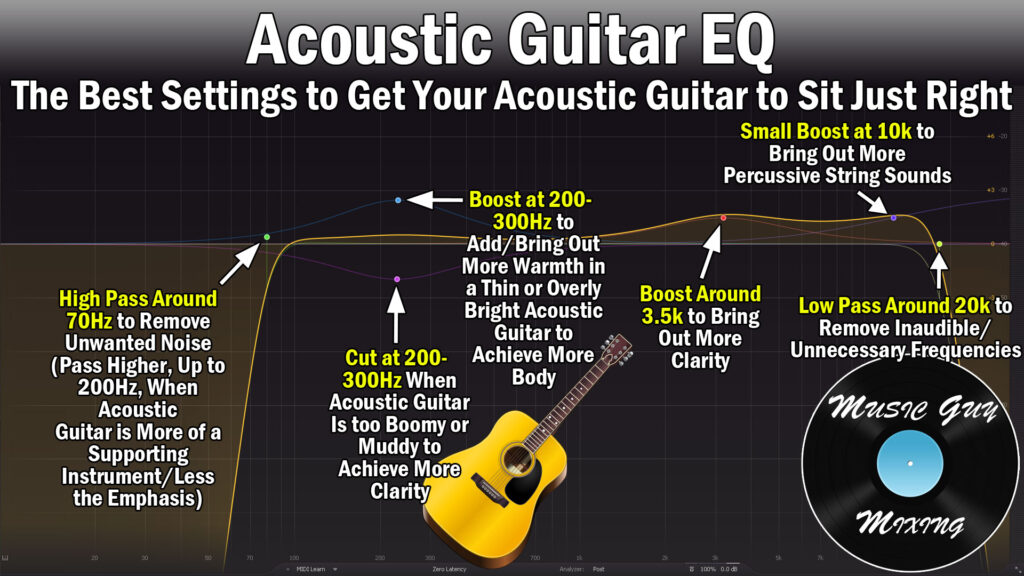
High Pass Around 70Hz
High passing your acoustic removes a lot of low end noise which goes a long way to cleaning up the guitar. This includes removing background noise as well as noise in the tone which isn’t contributing to the sound.
The fundamental frequency of the low E string is 82Hz, so a 12dB/oct or 18dB/oct high pass filter is a safe way to clean up that noise:

This cut also benefits the low end of your mix by leaving that sub-70Hz range for the kick, bass, etc.
Cut/Boost as Necessary at 250Hz
The body of the acoustic guitar, the earliest overtones, and a lot of warmth all exists around 250Hz.
Making an adjustment here falls into one of two categories: you’re compensating for a poor recording or favoring a warmer or brighter sound.
In the case of compensating for a poor recording, you might need a dynamic cut to control some boominess if the microphone was too close to the sound hole.
Alternatively you may just decide you want a warmer or brighter sound by boosting or cutting by 1dB or so. If that’s the case, 250Hz is a good place to control the overall tone of your acoustic.
Boost Around 3.5kHz
I like a small 1dB boost or so around 3.5kHz to bring out more of the brightness and clarity in the tone.
This is not to be confused with bringing out more string punch which can be accomplished with a high shelf.
High Shelf at 10kHz
If your acoustic isn’t as assertive as you’d like in the mix, rather than turning up the fader by another decibel, try a small 1-2dB high shelf around 10kHz to bring out the percussive quality of the strings themselves.
This brings out more of the transient punch of the strings, drawing the ear of the listener to the acoustic and keeping it present in the mix without pushing the acoustic louder than it needs to be via the fader.
Low Pass Around 20kHz
Low passing the acoustic guitar around 20kHz is admittedly a conservative point but this ensures you’re not cutting into the airiest end of the strings.
Compression
Another important aspect of improving the sound of your acoustic guitar is ensuring that it maintains a consistent level in the mix.
In terms of dynamic instruments in your mix, meaning instruments which have the greatest differences between the quietest and loudest practical moments in the performance, acoustic guitar falls in the middle of the spectrum.
Whether the performance is individual notes or more of a strummed part, a little compression can help glue the performance together to help it sit better in the mix.
With that in mind, here is my snapshot of the settings I like for compression on acoustic guitar:

Threshold
I like to applied compression to the majority of the dynamic range of the acoustic. This can be accomplished by setting the acoustic guitar compressor’s threshold setting at roughly the quietest practical part of the performance.
Pair this with a 12dB knee which is kind of an average point between hard and soft, meaning compression will be applied at a lower ratio as the acoustic’s level approaches the threshold.
Ratio
I like an average ratio of 4:1 on my acoustic. This means that every 4 decibels which exceed the threshold will instead by output as 1dB, accounting for 3dB in gain reduction.
I might turn this down slightly and favor a 3:1 ratio if it’s just a strummed part with less dynamics, but arpeggiated notes tend to have a greater chance of certain notes being lost due to the greater dynamic of when the performance is plucking individual notes, so that 4:1 ratio works well in that case.
Attack
I talked about the importance of punch to improve acoustic guitar sound in the mix when we covered the EQ. Setting your compressor’s attack to be too fast/short can undo the progress you made via the EQ, so aim for at least 5ms to preserve the percussive punch of the strings.
25ms is a nice conservative setting to ensure, particularly on plucked/picked parts, that your acoustic is nice and attention-grabbing-punchy by delaying that compression.
Release/Hold
A 15ms hold with a 50ms release eases up the compression in a natural, artifact-free way to keep the listener from hearing the compression from happening. This is especially important when it’s a more organic, less processed sounding mix like in the case of a folk singer or singer/songwriter.
Output
Always an important step regardless of the type of processing, setting the output level to match the input level is especially important on a compressor to makeup for the gain reduction caused by the compressor.
As an aside, gain staging is as important for improving your acoustic guitar sound as it is for any track in your mix, so aim for that -18dB average level with -12dB peaks for the best sound every step through your processing chain.
Saturation
This is a good tip to improve acoustic guitar sound in a more organic mix like the aforementioned folk or singer/songwriter where the acoustic guitar typically plays a greater role and the emphasis is on warmth.
A great way to make up for a lack of dearth of body and warmth or simply to supplement your acoustic in that direction is through a little acoustic saturation.
If your acoustic is thin or too harsh even, I love a bit of light saturation using my go-to saturator, Decapitator.
My “Guitar Tame” preset is aggressive, but works beautifully for shifting the overall tone of my acoustic when need be:

I used to use this all the time to correct an acoustic guitar I used on a lot of my own early recordings which always came out needlessly bright, thin, and even a bit harsh.
The beauty is you simply need to pull down the mix dial to find the perfect blend of saturation to perfect your acoustic tone.
This is adding frequency information in that 200-300Hz body region I talked about earlier, even if it wasn’t present in the actual recording, making this a great way to correct acoustic recordings which are lacking in that area.
Reverb
The last tip to improve an acoustic guitar’s sound is to drop a little reverb (or two) on your acoustic.
I did a complete overview on how to use reverb on acoustic guitar, so I’ll largely defer to that, but I have a couple options you can dial into your reverb(s) of choice.
Create a couple Aux/Return tracks and on the first one drop a reverb with these settings dialed in:
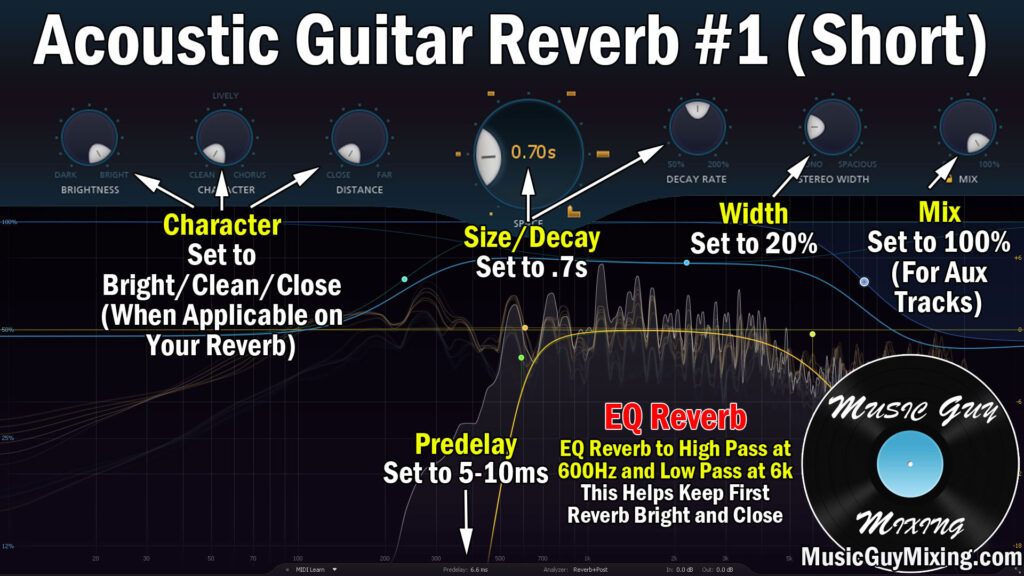
… and on the second track drop another reverb on with these settings:

The idea is to blend each of these into your acoustic guitar track(s) to taste via the respective send dials as the track(s) lend themselves to it.
I like to save the second, longer reverb for bigger moments in the mix like the chorus to make everything sound bigger by comparison to the preceding parts where I’ll reserve the first, shorter reverb for just a touch of depth.
You can (and should) use automation on these to taste as the tracks and mix dictates from section to section, so you don’t need to completely write off the idea of only using the first during the verses and second during the choruses.
With some combination of these 7 tips, your acoustic guitar sound should be improved, better sculpted, processed, and ultimately sitting much better in your mix, regardless of its role.
