
EQ is arguably the most important type of processing which we use in mixing because it deals with the frequencies which make up our audio themselves. Using an EQ/equalizer plugin, we can target specific frequency ranges then boost or cut to make them more or less prominent in the context of that audio. Depending on what we change and how much we do it by in adjusting the various EQ settings, we can completely change the character of the sound.
I talk a lot about EQ here on Music Guy Mixing and recently put together a complete, comprehensive, and FREE EQ cheat sheet which covers how to EQ every single instrument in your mix. With that in mind, I thought I would put together a complete EQ settings guide to explain what every detail and parameter on an EQ does.
EQ Settings
Note that these settings are the ones you’ll find on a typical parametric EQ – an EQ type which makes up the majority of EQs out there. When we think of an EQ, we’re typically thinking of a parametric EQ. Check out my overview of the types of EQ for more information.
Back on topic, here’s a brief overview of the various EQ settings before we break each one down in greater detail one at a time:

Band Types
We’ll begin with EQ band types. Any time we select a frequency range which we’re going to boost or attenuate, we need to choose what shape or type of EQ filter we’re going to use.
As I explained in my overview of the types of EQ filters, there are roughly 6 types:

There are occasionally other names for these filters, but virtually all of them fall into one of these categories:
Bell
The versatile bell filter allows us to select a range to cut or boost, creating a bell shape:

As you boost or cut the main area, the degree of the adjustment diminishes the farther away you get from the set frequency.
As you can see above, there are limitless uses for the bell shape when it comes to EQ.
Notch
The notch filter is similar to the bell with the exception that it affects a much narrower region and goes much deeper:

Notches are typically for surgical cuts when you have a very specific and small frequency range you want to remove from your audio.
High Pass Filter
A high pass filter removes everything BELOW a certain frequency point, allowing the higher frequencies to “pass” through and be heard, hence the name:

High pass filters are hugely instrumental in cleaning up a muddy mix because they remove low end rumble and unwanted noise which doesn’t contribute to your audio. This can be room or outside noise which was picked up by the microphone, electrical noise as a result of equipment, bleed from other instruments in the case of live recording.
Sometimes you simply don’t need as much low end on your track as you have; in fact filtering some of this out can help in opening up the low end of your mix.
I typically have a high pass filter on every single track in my mix to both clean up the tracks themselves, create more mixing headroom, and ensure that the kick and bass have the low end to the mix themselves, creating a cleaner more open mix.
I generally start around 100Hz, but a safe rule of thumb is to sweep up from 20Hz until you hear a change in the sound of the track, then dial it back down 10Hz.
Low Pass Filter
If a high pass filter lets through the high frequencies, the low pass filter does the same on the top end – filtering out frequencies ABOVE a certain point:

Low pass filters are useful for filtering out high frequencies you don’t need. This can be useful for removing harshness on the top end, creating space for the instruments which need the higher frequencies like cymbals and vocals, and once again creates headroom.
When using a low pass filter, it’s the same idea as with high pass filters but in reverse; start around 20k and sweep downward until the tone changes, then bump it back up 1000Hz or so.
Low Shelf
A low shelf lifts up or pulls down all the frequencies BELOW a certain point in a flat shape:

A low shelf is useful when you don’t want to roll off the frequencies below a certain point entirely which a high pass filter would do. Instead you can just do a smooth attenuation all the way down (or to the next EQ point).
Alternatively if you just want to better emphasize all the lower frequencies below a certain point, we can prop them up via a boosted low shelf.
High Shelf
A high shelf is simply the opposite concept as the low shelf – it boosts or cuts everything ABOVE a certain frequency:

If you want to favor higher frequencies above your point you can boost with a high shelf, or if a low pass filter is too extreme, try a negative gain high shelf.
We’ll talk more about gain, in a moment, but let’s say a quick word on the next of these EQ settings – the all important frequency parameter.
Frequency
The frequency parameter is just that: it determines the frequency point to which the filter type and rest of the settings will be applied to.
Depending on the filter type that you use which we just covered, the frequency point can end up being ground zero in the case of a bell or notch filter, or the breaking point in the case of a shelf or high/low pass filter.
If you want to cut in the typically boxy sounding 400-600Hz section of your audio, you’d create a bell filter and set the frequency point right in the middle at 500Hz.
If you want to cut out everything below 100Hz, you’d create a high pass filter at 100Hz. There are more parameters to account for, but we’ll talk about those in a minute.
In a brief digression and in case you aren’t familiar and as I covered in my overview of the parts of a sound wave, the frequency of a sound wave is the number of cycles it completes per second:
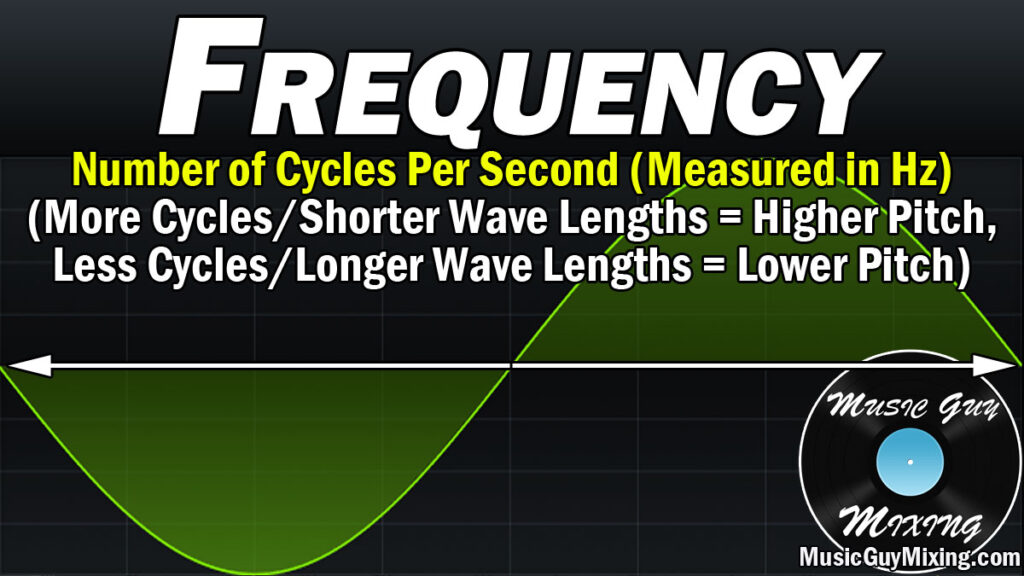
As the graphic shows, more cycles/shorter wave lengths equals a higher pitch. Conversely, the less cycles, the longer the wave lengths, and this equals a lower pitch.
As I covered in my comparison of low frequencies vs high frequencies, lower frequencies take longer to reach our ears yet are more durable when they make contact with physical obstacles which is why we can hear low frequency rich audio from farther away like the bass from a car stereo playing through the car and sometimes even the walls of the building we’re in.
But I digress – in EQ terms once again, the frequency we target determines just that: the starting point at which we want to affect with the rest of our EQ settings like another big one: gain.
Gain
Gain is the amount in decibels at which you’re boosting or cutting the frequency point you just set.
These decibels can be positive/more than zero for a boost or negative/less than zero for a cut.
Less is generally more when it comes to making ANY kinds of cuts or boosts in EQing your audio.
While you can cut or boost a frequency range by 10dB or more, it doesn’t sound natural. In fact, the more you change the frequencies of your audio either positively or negatively, the more likely you’ll introduce phase issues into your audio.
You’re typically better off keeping most cuts or boosts to a few dB or less to avoid issues and keep your audio sounding transparent and natural.
Speaking of transparent and natural, let’s talk about the width of the adjustments you’re making.
Q Setting
The Q setting on your EQ generally determines the width of the affected frequency band:

If you create a bell filter at 500Hz but want it to include 400-600Hz, you’d adjust the Q setting in order to widen or narrow it to include the frequencies you want.
The lower the Q, the wider the band will be and more of the neighboring frequencies will be affected. Similar to using smaller and more conservative gain adjustments, we want to use a lower or wider Q so that the curves are nice and wide as we go into that cut or boost before coming back to a flat/non-existent curve.
Note that the Q setting will have a different effect depending on the type of filter you’re using. For more information on how it affects low and high pass filters and shelves, check out my overview of the Q setting.
Slope
The Q isn’t the only of the EQ settings which affects the grade of the curves, we also have the slope.

It’s easy to confuse the slope and Q settings on an EQ because they both affect the grade of the curves.
While the Q does this by widening or narrowing the width, the slope determines how steep the curve is and is measured in decibels per octave.
An aggressive, maxed out slope at 96db/oct will be a much sharper entry and de-entry from the affected Q region to the neighboring frequencies.
Once again, a lower or more gradual slope of 12dB/oct or 24dB/oct is preferable for yielding more natural and transparent results.
Dynamic EQ
Dynamic EQ is a feature which is specific to certain EQ plugins. My favorite plugin, the FabFilter Pro-Q 3 (check out my FabFilter Pro-Q 3 review), allows you to make any EQ adjustment dynamic. This brings up a threshold, similar to that of a compressor, which allows you to set the level at that frequency at which it will be cut or boosted:

Dynamic EQ is preferable in a lot of situations where you don’t want to make a uniform adjustment at a point, only when it’s necessary as the audio dictates it.
For instance, if there’s a harshness which you only get on certain notes or instances on a vocal, you can put a dynamic EQ cut in the higher frequency range so that it only attenuates in the odd situation where there’s a swell there. This ensures that you’re not needlessly cutting but only as the material requires it.
Check out my overview on dynamic EQ for more information on how to use this feature effectively.
Stereo Placement
Stereo placement is another feature which is specific to certain EQ plugins.
Rather than applying your band adjustment across the stereo field, this feature allows you to target that frequency range exclusively in the middle of the stereo field, the sides, or just the left or right.
If you have a frequency conflict on one track with another which is only an issue in the center, you may just want to target the mid to make a cut.
That said, making adjustments which are specific to sections of the stereo field can cause phase issues or simply sound strange if you don’t know what you’re doing, and they’re rarely necessary.
EQ Settings Reviewed
- The various EQ settings you’ll find on a typical EQ plugin sculpt and shape the sound of your audio by affecting the frequencies themselves.
- The filter type determines what type of band you’re creating (bell, notch, high or low pass filters, or high or low shelves).
- The frequency parameter itself determines the main affected frequency you’re boosting or attenuating.
- The gain parameter determines how much you’re cutting or boosting that frequency’s presence in the context of the audio of that track.
- The Q setting determines the width of your band and how much of the neighboring frequencies will be affected. A smaller Q results in a wider and thus more natural sounding band.
- The slope parameter determines how steep the edges of the band are, measured in dB/oct. Like the Q setting, a gentler (lower dB/oct) slope sounds more natural.
- Sharper, steeper, and narrower bands are more surgical in affecting less neighboring frequencies but sound less natural and can lead to phase issues.
- Dynamic EQ is a feature specific to certain EQ plugins and allows you to cut or boost more or less relative to the changing volume in the affected frequency range.
- Stereo placement is another feature which is specific to certain EQ plugins and allows you to make frequency adjustments which are exclusive to certain areas of the stereo field on that track, including the mids, sides, left or right, or the entire field (stereo).
Pingback: Slope EQ - What is the Slope Setting in EQ - Music Guy Mixing