
EQ and compression are right there neck and neck for the two most useful plugins/types of processing in an audio mixer’s tool belt. The former allows you to sculpt your audio’s frequencies, getting rid of what’s detracting and enhancing what’s working. The latter in compression is about volume dynamics, controlling a wide range of volume changes for an audio clip. Chiefly amongst the types of audio which compression is useful on are vocals which account for many of the more dynamic tracks in your mix. Let’s talk what does a compressor do for vocals, plus how to use a compressor on your vocals.
What Does a Compressor Do For Vocals
I mentioned that vocals are amongst the more dynamic tracks you’ll have in your mix.
What I mean by that is that vocals cover a lot of ground in terms of volume; they can begin quiet (typically in a verse) and get into the loud/belting category (typically in a chorus).
It’s that dynamic range which helps to keep the listener on their toes and engaged with the vocal and song overall.
There is such a thing as TOO much vocal dynamics, to the point where the difference between the quietest and loudest parts isn’t practical to leave as is.

In the above image, you’ve got the vocal “troughing” at -20dB for its quietest parts and peaking at -6dB for the loudest parts. That’s a 14 decibel difference between those extremes.
If left untouched, this raw vocal won’t sit right against the instrumental, being either too quiet for some parts or too loud for others. It doesn’t even need to be separate parts of the song we’re talking about; a specific vocal part like shown above can cover a lot of volume/dynamic ground on its own.
While you can automate the vocal level, meaning set it up so that the fader volume of the vocal gets louder or quieter as necessary to reflect the vocal delivery, a much more efficient and effective solution is applying compression.
In getting back to the question of what does a compressor do for vocals, it attenuates those peaks in a very natural way which maintains the transparent sound of the vocal. It also simultaneously raises the quietest parts of the vocal to offset that gain reduction on the peaks to maintain roughly the same overall volume level.
The result is that vocal sits better in the mix while having more energy to it courtesy of that more consistent level.
The more aggressively you attenuate the peaks, thereby removing more of that dynamic range, the more energy that vocal will have and more up front it will be. This eventually comes at the cost of losing the natural dynamics of the vocal, and too much compression/too little dynamics can make that vocal lose its impact.
Anytime the listener is fed the same volume of something, whether it’s the vocal or entire mix/song, they instinctively and subconsciously begin to tune it out, so it’s a tightrope we’re walking when we compress vocals to find that sweet spot to get it sitting just right.
Best Vocal Compression Settings
Here’s a snapshot for the best vocal compression settings to dial into your next vocal:
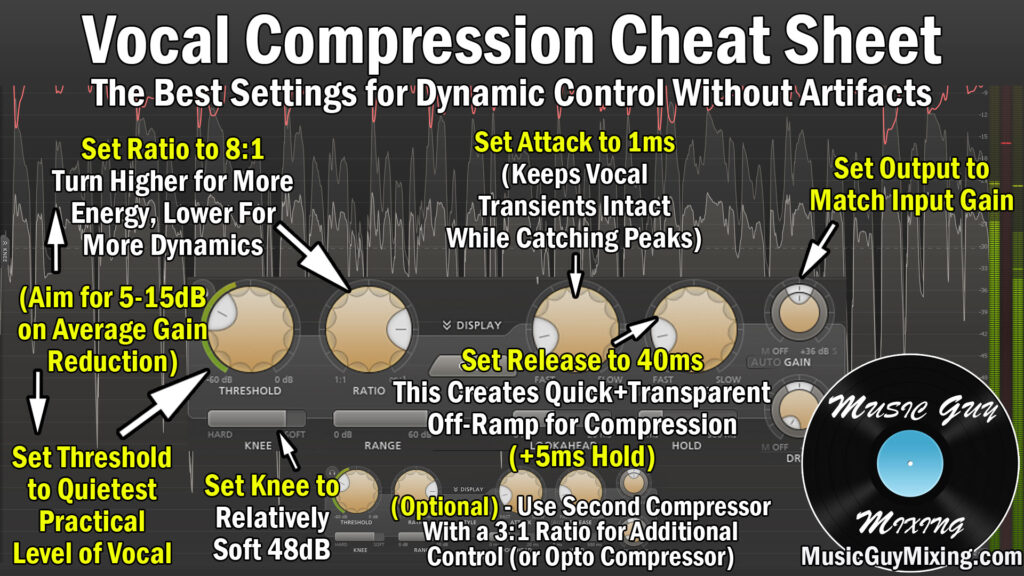
Threshold
The threshold is the volume the vocal needs to meet before compression begins.
Generally I like to set this at the quietest practical level of your vocal, meaning the quietest note/syllable/word that you want heard while excluding breaths (check out my guide on how to remove vocal breaths).
Ratio
The ratio is the degree or aggressiveness of the compression. 4:1, meaning every 4dB which exceed the threshold are output as 1dB (3dB in gain reduction), is considered to be an average level.
For a less dynamic instrument, a 4:1 ratio works well.
For vocals, I like a more aggressive ratio of 8:1 to really control those peaks and dynamics without completely losing the expression which is inherent to some dynamic range.
Attack
A compressor’s attack is the delay in milliseconds after the threshold is met before compression takes place.
A small amount of attack of 1ms allows the initial transient “bite” of the vocal to come through for that instant to keep the listener paying attention to the compressed part of the vocal.
Release
The release is the off-ramp of the compression. Set this too quick/short/instant and you can hear the vocal’s level change abruptly. Aim for a 40ms release with an optional 5ms hold on top of it to create a little buffer to naturally get that vocal back to its uncompressed state.
Output Gain
I alluded to the output gain a moment ago, but this is the control for bringing the overall volume of the vocal back up to make up for the attenuation caused by the compression on those peaks.
Ultimately and by way of the entire compression process, the output gain is turning up the volume of the quietest parts while the ceiling that was those peaks is now lower, resulting in that more average level that we’re looking for.
Again, this yields more energy from that vocal, not to mention just as importantly that it makes getting that vocal to sit right in the mix against the instrument tracks and everything else much easier and more effective.
Note that I also put together a guide on the best compressor settings for vocals using an 1176 style FET compressor, so refer to that if you prefer more of that analog compressor sound.
I also like to follow up my vocals with a second compressor. This is a practice known as serial compression, using two compressors in a row, as you can smooth out the remaining peaks for a bit more control and energy from whatever you’re compressing this way.
I like an optical compressor in this spot, and you can check out more about it in my tutorial on how many compressors to use on vocals.
Of course getting your vocals sounding their best isn’t all up to compression, so check out my COMPLETE vocal chain on how to get your vocals right every time.

