
Vocal compression can improve even the most perfectly recorded vocals by providing a bit more energy and up front presence to what I always describe as the star of your mix in the vocals. It’s easy to become frustrated when trying to set your vocal compressor, not getting the results that you want. Try these best vocal compression settings to get your vocal sitting just right in the mix.
Vocal Compression
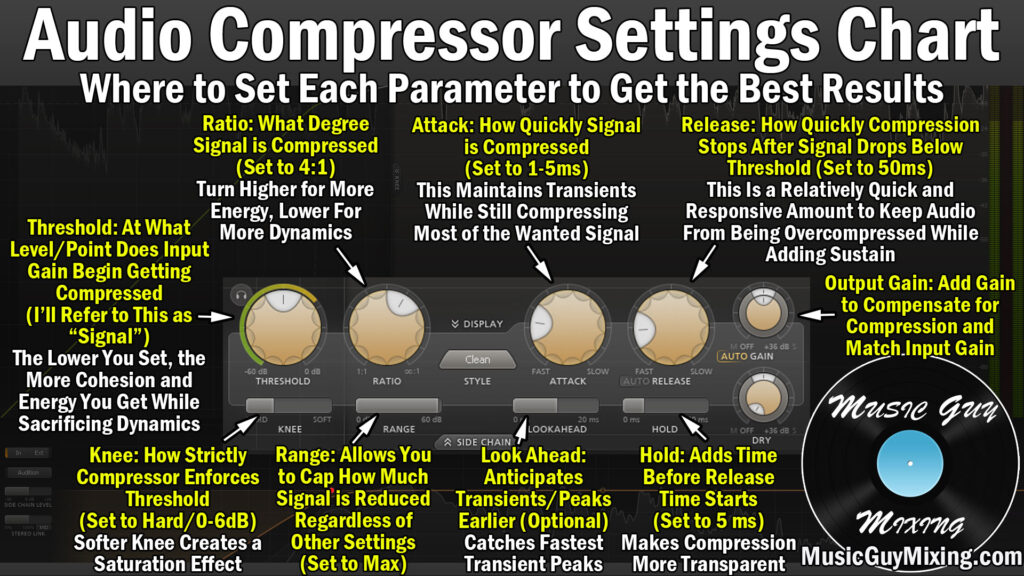
As I described in my overview of the audio compressor settings chart, most compressors have the some variation of some or all of these parameters which drive the effect and sound of the compressor:
With that context, let’s take a look at the best vocal compression settings to dial in to your vocal and explain why we’re making each move.
Threshold
The compressor’s threshold refers to the level the vocal must meet before compression takes place. For example, if you set the threshold to -10dB but your vocal peaks never exceed -11dB, that compressor will never engage, although there is one caveat I’ll mention in a moment.
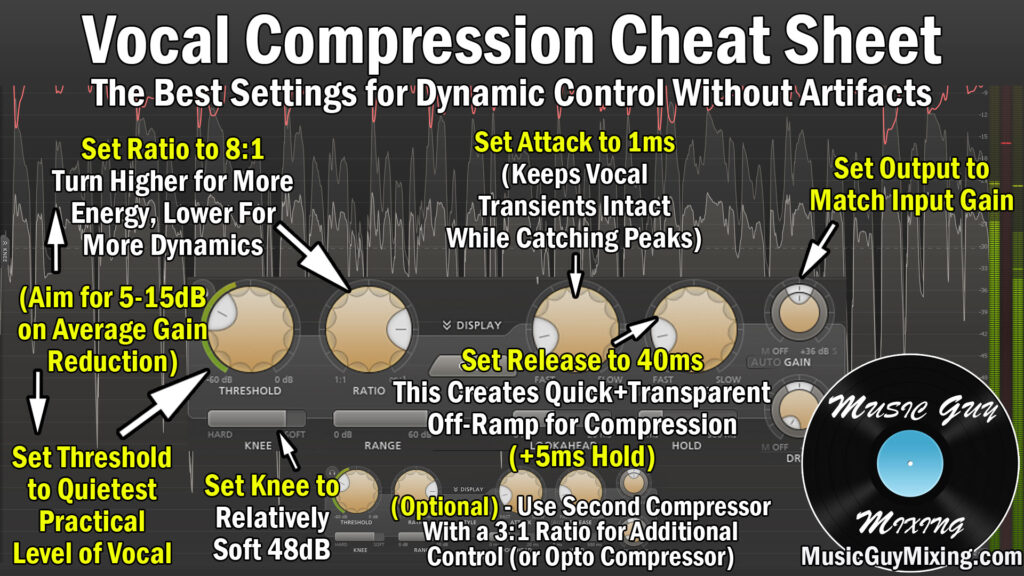
As a general rule, I like a lot of control from my compression, particularly on vocals, so I like to set my threshold at roughly the quietest practical “note” in the performance, if not a couple decibels below it.
This ensures that the entire vocal range is compressed, though by design the loudest peaks will obviously be attenuated more aggressively than the rest.
It’s worth mentioning that If you’ve got two vocal clips on the same track in your mix which have significantly different dynamic ranges, it’s worth breaking them into two separate tracks so that you can custom adjust the threshold to best suit each vocal.
An easy example of this is when the verse vocal melody is lower than the chorus in both notes and energy. You might want more conservative settings for this part in general, but I’ll talk more about that with each parameter.
Ratio
The compressor’s ratio directly affects the aggressiveness of the gain reduction on the peaks created by the compressor.
As I detailed in my compression ratio explained overview, the higher the ratio is turned, the more any decibels which exceed the threshold will be turned down:

A 4:1 ratio is generally considered to be average and is a sweet spot for most tracks which either don’t require as much attenuation or you want more transparent results. I actually don’t mind a 4:1 ratio on vocals in the context of serial compression, meaning you’re using two compressors back to back to really get the dynamics under control. ~4:1 works well on that second compressor.
On my lead compressor on vocals I almost always like beginning with an 8:1 ratio.
This means every 8 decibels which exceed the threshold get output as 1dB after the compression. This quickly tames an overly dynamic vocal so that it maintains a more consistent level in your mix, keeping it present and making it easier to set the level relative to the rest of the mix.
You generally can expect to achieve a gain reduction of 5-15dB if not a bit higher on the loudest peaks between the threshold and this ratio.
Knee
I mentioned there was a caveat to the threshold affecting the compression earlier. The compressor’s knee is that caveat:

If we set the knee to 0dB, this creates a sharp all-or-nothing approach to the threshold where, if the threshold isn’t met by the vocal’s level, no compression takes place.
With a softer knee, that -11dB vocal peak with a -10dB threshold example I gave earlier would still trigger compression.
A hard knee is good when you have audio with clear dynamic behavior, like a snare where there’s not a huge difference in the level of each hit.
When you’ve got a more complex dynamic pattern like you get with a vocal, a softer knee yields a much more transparent compression.
Rather than enforcing that strictly 8:1 ratio across the board, compression begins at a lower albeit increasing ratio as the level approaches the threshold.
I’ve got mine set at 48dB, but your compressor’s “max” soft knee can vary – my FabFilter Pro-C compressor has 60dB as the softest curve for what it’s worth.
Attack
With that context on the knee out of the way, the compressor’s attack dictates how fast that compression engages once the threshold is met.
Conventional wisdom might assume you want the compression to be instant so that there’s not a weird choppiness as the level gets yanked down midway through the vocal.
While you want it to be relatively fast, I like a compressor attack of 1ms on vocals to offset/delay it by that 1 millisecond to allow the transient punch of the consonants to sneak through before the rest of the vocal gets pulled down.
This helps to keep the vocal present in the mix as those consonants hit the listener’s ear at “full” volume and draw their attention to the vocal, keeping them engaged.
This isn’t just the rule for vocals, but you want to preserve those initial transient sounds for most instruments and tracks in your mix, though the exact ideal attack time will vary from track to track. Check out my complete compression cheat sheet for detailed visual guides on how to compress every track in your mix.
Release
I always liken the compressor’s release parameter to an off-ramp; this is the time it takes for that compression to yield and return the audio to its uncompressed state after the threshold is no longer met.
I like a relatively fast release on vocals of 40ms, not to mention pairing this with a short hold time of 5-10ms or so. The hold adds a set amount of time the compression remains engaged even after the threshold is no longer met. Once that time lapses, the release time goes into effect.
This combination helps to keep the vocal compression snappy while maintaining transparency.
Output Gain
By design, compression lowers the volume of your vocal by attenuating its peaks and thereby giving you a more consistent level. This creates energy in that vocal, not to mention keeps it visible in the mix and makes setting its level relative to the rest of the mix much easier.
The “gain” or “output gain” parameter allows you to turn the overall level of the vocal back up.
After dialing in the rest of the vocal compression settings, you should use the gain control to match the level of the vocal pre-compression. You can do this by bypassing the compressor in your DAW and listening for the level, then re-engaging it while adjusting the gain until you can’t hear a difference.
This helps to maintain the level balance across your mix which you previously attained, not to mention it keeps that level gain staging compliant for the next type of processing like you should be doing.
A lot of compressors have an auto makeup gain parameter which attempts to automatically gauge the gain reduction caused by the compression and adjust the makeup gain accordingly. I generally prefer to set this manually as I find I can get more precise results in setting it myself, but it’s worth mentioning.
If you’re more of a FET compressor fan like the famed 1176 compressor, here’s a snapshot of what are roughly the translations to apply to your 1176:

As always, the curveball and thing to keep in mind as it relates to the 1176 is that the attack and release dials work opposite to how virtually every compressor operates.
Specifically, turning the attack or release dials to the larger numbers results in more aggressive settings. “7” is the max in both cases, so if you want an instant attack and release, aim for 7.
The 8:1 ratio is still an option and is my recommendation for vocal compression, particularly if it’s the first compressor in the chain.
If you’re using this style compressor as a serial compressor or somewhere further down your processing chain, I recommend keeping it on the lowest 4:1 ratio to smooth out your remaining peaks for that added tightness and control.
Now that you’ve got your lead vocal compression properly set up, check out my complete vocal chain for my full list of processing I like on every vocal in my mix.