I recently did an overview of how to make a mix louder, and while I referenced the mastering stage to some extent, I thought I’d dig deeper in focusing on maximizing loudness in the final step of audio production. With that in mind, here are some tips on mastering louder.
Mastering Louder

Let’s first revisit something I mentioned in the aforementioned louder mix tutorial.
Gain Staging and EQ in the Mixing Stage
Gain staging is an important early step in audio mixing. It’s so early it’s arguably the first you should do after maybe importing the many types of audio into your mixing template.
Gain staging is the process of adjusting the input levels of your audio.
Because unless gain staging is kept in mind during the recording stage, audio is typically recorded to “hot”, meaning too loud. This can cause clipping across your mix, particularly at the master bus level.
More than that, a lot of plugins which are based on analog hardware yield better sounding results when they’re fed roughly -18dB level on average.
Better sounding mixes aside, keeping your entire mix’s levels at a responsible level via gain staging allows for more mixing headroom which ultimately allows for mastering louder.
Effective use of EQ is also essential during the mixing stage if you want a louder master.
I mentioned this, as well, but high passing and low passing every track in your mix removes unnecessary, unwanted, or inaudible frequencies at the bottom and top of your mix, respectively.

Grab my free EQ cheat sheet for visual guides on where to high and low pass not to mention cut or boost every single instrument in your entire mix for the best sound quality and to add some extra headroom.
Use EQ in Your Mastering Chain
Moving on to the actual mastering chain, EQ works well to help sculpt your audio one step further.
This is especially important if you weren’t the one who made the mix you’re mastering. Even still, adding a high pass filter in particularly around 20Hz and sweeping up until you hear the master change, then backing it off 5-10Hz, can add some valuable mastering headroom to maximize the mastering volume.
Just make sure you’re wearing a decent pair of studio headphones so that you can effectively hear the low end of your mix.
In the same vein, any EQ cuts you apply to your master (or even multiband compression) either reduces frequencies or dynamic range, allowing you to get more volume out of your mix.
Use Soft Clipping
Clipping is the enemy when it comes to mastering louder. Once you push the loudest peaks of your audio to a certain level, specifically 0dB in the digital realm, the tops of the waveforms get clipped off (hence the term):

This results in harsh and unpleasant white noise distortion which is proportionate to how much and often the peaks exceed 0dB.
Soft clipping is a tool which is particularly suited for the mastering stage and involves allowing for clipping but shaping the top clipping aspect of the wave form to attenuate the harsh, white noise we commonly associate with clipping.
Use a Maximizer (or Limiter)
Still, the most obvious yet effective way to ensure your master is as loud as possible is to use a maximizer or limiter.
A maximizer is just that; it’s a way of maximizing the volume of your audio, making it a common tool for a mastering engineer looking to create a louder master or at the very least make the level commensurate with other contemporary releases.
It’s very similar to a limiter (see maximizer vs limiter) in that it’s another tool designed to apply compression at an infinite ratio, albeit with more bells and whistles.
When we apply an infinite compression ratio to our audio, the threshold becomes the literal ceiling which the peaks cannot exceed.

This restricts clipping by not allowing the peaks to exceed the point of digital clipping or 0dB.
Instead the peaks get (depending on how aggressively you compress it) severely pulled down so the rest of the audio can be made louder.
This is the basis of making a piece of audio, a song, as loud as possible – you’re sacrificing the dynamic range of your audio for the sake of a more consistently louder overall level.
Depending on how hard you drive the tool, meaning depending how low you put that threshold to more aggressively scale down those peaks and bring everything else up, you’ll begin to hear some artifacts.
Izotope’s Maximizer is designed to get you the most out of your volume while minimizing those artifacts using a number of features.
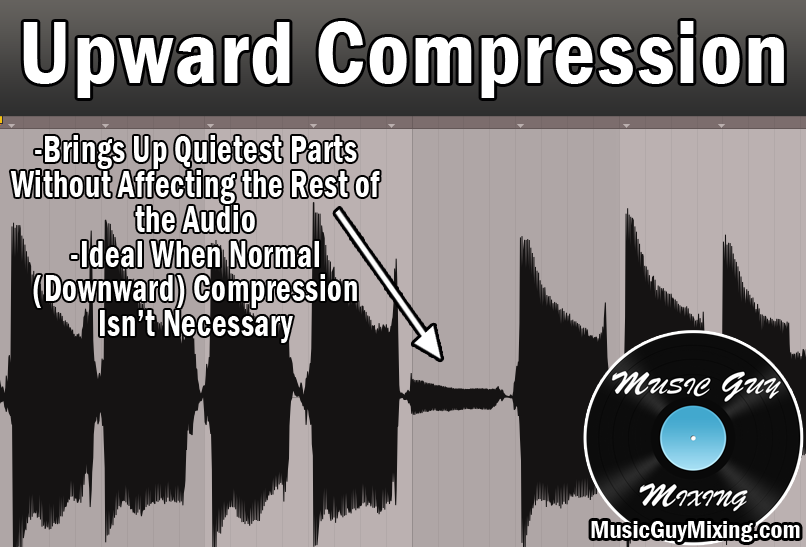
Soft clipping is one of those features which I just talked about, as is upward compression – a tool which brings up the quieter parts of audio without applying any gain reduction to the peaks:
Izotope’s Maximizer also has features onboard to preserve the transient punch of your audio as those are sometimes casualties of peak compression.
It also has a “True Peak Limiting” feature which may sacrifice a dB of headroom but at the purpose of ensuring your music doesn’t experience clipping AFTER you submit it to the Spotifys of the world as part of their conversion and encoding processes:

Speaking of which, this brings us to a final important point – your music will be normalized once it enters the Spotify, Apple Music, etc. library. In other words, music streaming services will automatically adjust the average volume of your music to be roughly equivalent with every other piece of music on their platform.
As I covered in my overview of what LUFS to master to for the various music services, you can see -14LUFS is more or less the average level.

This is generally several LUFS (see LUFS vs dB) quieter than most clients ask me to master their music to at my sister site – MusicGuyMastering.com.
-14LUFS can generally be easily reached with little to no gain reduction on the limiter or maximizer, leading to better sounding music.
All this to say, you don’t NEED to make your music as loud as you think, but now you have the techniques to squeeze every last dB out of your master!