The bass drum, also known as the kick drum, is the anchor of your entire mix. It provides the low end thud of the rhythm section of your mix, keeping the listener locked into the time signature, tempo, and even energy of the song. If your bass drum is too high, low, strong, weak, etc. then your entire mix will lose purpose. This complete mixing bass drum tutorial will cover the best way to get your bass drum sitting perfectly in your mix.
Mixing Bass Drum Tutorial

Let’s go start to finish in your signal chain for your bass drum to cover both the effects you’ll want to apply to the kick as well as the best settings for each, starting with EQ.
Bass Drum EQ
I did an entire tutorial devoted to kick drum EQ to bring out the best tone from your kick, so I need to reference that before we dive into it here:
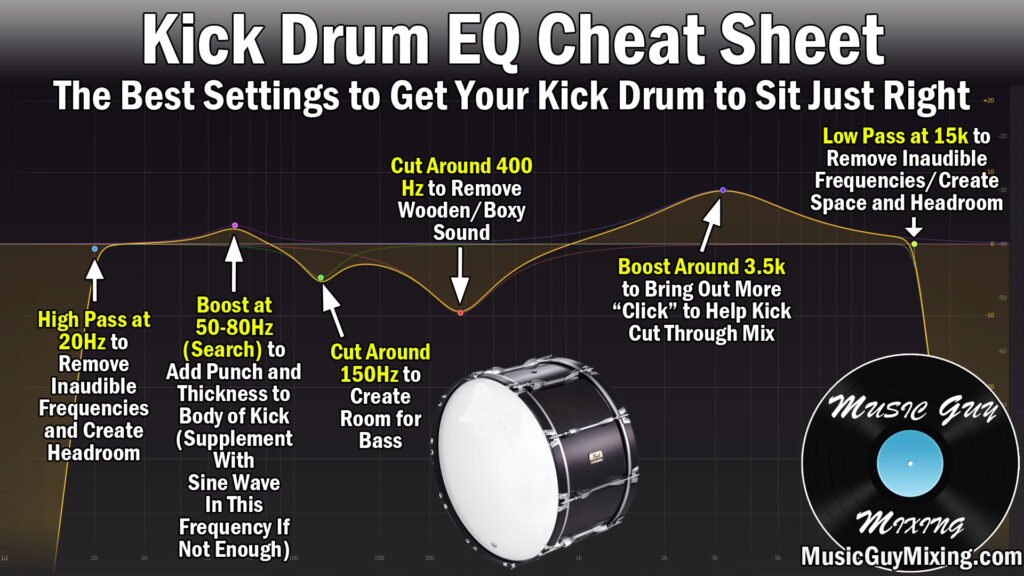
High Pass at 20Hz
A high pass filter removes everything below a certain frequency point which you designate. High pass filters are key in using across every track in your mix for cleaning up the low end and creating space for the instruments which need these frequencies like the bass drum.
I still recommend applying a high pass filter at least 20Hz on your bass drum as this filters out all noise which we cannot hear. The human ear is incapable of hearing anything below 20Hz, so by applying a high pass filter at 20Hz we’re effectively removing inaudible noise which is just eating up mixing headroom.
Boost at 50-80Hz
The fundamental frequency range of an instrument is where the loudest concentration of initial frequencies of that instrument exist.
In the case of our bass drum, we’re typically talking 50-80Hz. The exact hot spot can vary slightly depending on the kick, room, microphone, etc.
Sweep around here to find the meatiest thickness of the bass drum and give it a small and wide boost of a few dB to add thickness if it’s lacking in the mix. This is especially helpful for thin, top heavy kicks which are rich in transients but weak in that low end.
If this isn’t enough for giving your bass drum the thickness you want, I’ll have a trick in the next section for artificially adding some natural sounding fatness to it.
You should also create a dynamic EQ cut on the bass in this region, sidechaining the bass to kick so that the bass ducks out at this frequency when the kick triggers. This also helps to keep your low end clean.
Cut Around 150Hz
Remember that complimentary moves work both ways.
A dynamic EQ cut in the 100-150Hz section on the bass drum also helps to create some space for the bass guitar or bass track. You can sidechain the kick to the bass or just have a constant cut on the bass drum regardless of bass behavior since the tone of the bass drum doesn’t change like the bass guitar or other more expressive instruments.
Cut Around 400Hz
If clarity is an issue, try making a subtractive EQ cut around 400Hz to attenuate some of the claustrophobic muffled sound you can get from recording in certain rooms/certain bass drums.
Check out my many tips for avoiding a muddy mix or my tutorial on 12 tips for achieving a cleaner mix.
Boost Around 3.5k
The transients (see what are transients) of your bass drum exist in the 3.5k area. This is that percussive “click” sound which comes from the beater hitting the skin of the bass drum.
This is where most of the “mix punch” of your bass drum exists, so a small boost here will help bring out more of that click which in turn will help that bass drum cut through and sit better in the mix rather than just cranking the overall level.
If your bass drum doesn’t have enough inherent punch to bring out even with a boost, I’ll have a trick in a moment to help supplement it to help it better cut through the mix.
Low Pass at 15k
The other half of the pass filter coin, a low pass filter removes frequencies ABOVE a certain point. Not surprisingly, there’s not much happening audibly at 15k or even 10k on the kick. You’re getting a little thin top end of the transient as you approach 10k, so 15k is a very conservative point to filter out all the inaudibles above that point, though you can easily go lower.
Enhance Your Bass Drum
There are two ways to enhance your bass drum after the fact to bring out more of two key sections when EQ isn’t enough as I mentioned above.
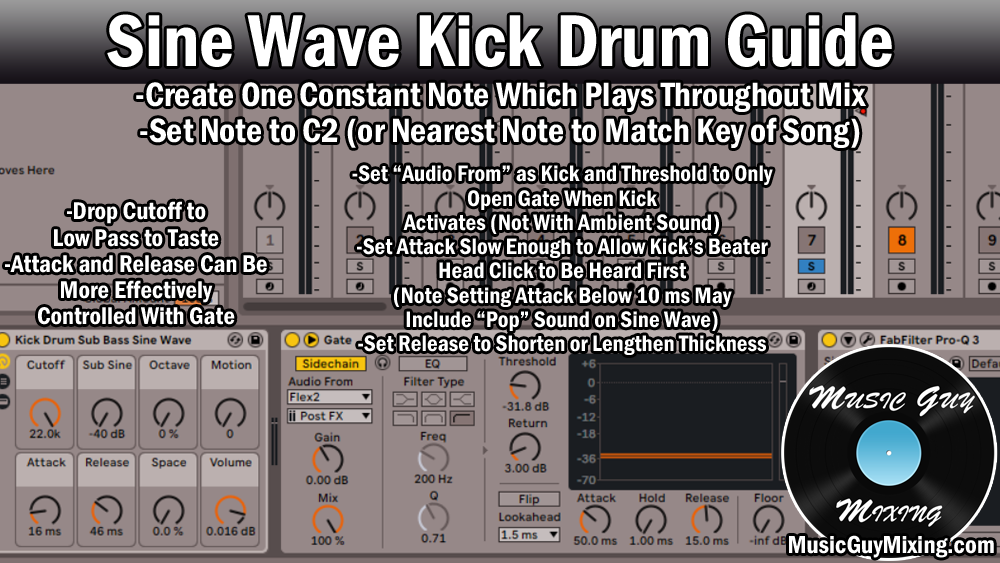
Sine Wave Kick Drum Trick
First, let’s focus on the all important fundamental area of your bass drum. Some bass drum tones are just too thin for what you want, in which case you need to supplement it.
This method involves creating a low frequency sine wave via an oscillator (every DAW will have this feature) which, when set to the C2 note (roughly 65Hz), sounds exactly like the ideal thickness of a bass drum.
You then play that note on a loop or for the duration of the mix but drop a noise gate on that sine wave and chain it to the bass drum.
When set up correctly, the gate opens and allows the sine wave to play for the split second whenever the bass drum triggers.
The effect of this is that you get realistic sounding thickness in your bass drum without anyone realizing it’s just a complimentary sine wave you’re blending in.

I cover the entire process in my sine wave kick drum tutorial, so check this out if you feel your kick is lacking low end thickness.
Adding Bass Drum Transient
What if our bass drum doesn’t have enough of the punchiness via the percussive beater on bass drum cover and thus doesn’t have the transients to cut through the mix, even with EQ?
We can do a very similar trick as we did to supplementing the low end but by using some white noise in place of the sine wave. Like a sine wave can be used to simulate low end thickness in our kick, a split second of white noise to coincide with the trigger of the bass drum perfectly simulates that transient crack/punch to help the bass drum assert itself and remain present in the mix.
Check out my tutorial on adding audio transients to any track as I cover the entire process there top to bottom.
Compressing Bass Drum
Now that we’ve got the tone of our kick sounding good, let’s add some kick compression to maintain those transients while adding sustain on the back end.
Let’s move on to compression

Threshold
The compressor’s threshold determines at what volume the bass drum must exceed before the compression begins being applied.
Thankfully the kick drum is one of the most simple instruments in terms of dynamics, or in other words the peaks are pretty consistent. This makes setting the threshold and getting good results much easier.
I like to aim for 5-10dB below the peaks for setting the bass drum threshold to reduce the dynamic range so we boost more of that back end tail via makeup/match gain.
Ratio
The compressor ratio is the degree of compression. A higher ratio means any signal which exceeds our threshold gets turned down more aggressively, more seriously reducing dynamic range.
This gives you more control but at the expense of expressiveness in some tracks.
I prefer a 5:1 ratio on the kick drum which is slightly above average but works well in walking a line between controlling the bass drum without making it sound exactly the same on every single trigger.

That said, some genres lend themselves to benefiting from a bass drum which sounds exactly the same on every hit.
If I’m working in hip hop, pop, or sometimes even rock, I want that kick to essentially be at a static level so that it’s always fully present in the mix. In this case I will crank up the ratio to 10 or even 20:1 or even apply a limiter in place of a compressor to completely remove dynamics.
Knee
The hardness or softness of the compressor knee will enforce that threshold more strictly or more relaxed, respectively.
The general rule of thumb when setting the compressor’s knee is that for tracks with more simplistic/repeating/predictable dynamics, set the knee on the harder side so that compression doesn’t begin until the threshold is exceeded.
This is certainly the case for the bass drum, so I prefer a hard knee of 6dB when setting the knee on the compressor for the kick.
Alternatively, when a track has complex dynamics which vary greatly and have a lot of nuance like is the case with a vocal for instance, a softer knee yields more natural, less pumping results.
Attack
The compressor attack is how quickly the compression begins when the threshold is exceeded. Know that the knee plays into this to an extent, but a shorter attack results in the compression triggering faster and a longer attack results in the compression triggering more slowly and yields less compression.
Setting the attack TOO fast will pull down and swallow up the initial transient crack which is why I like a relatively slower attack of 15ms for the bass drum:

This keeps those bass drum transients (which we just worked so hard to make more visible in the mix in the last step) alive and present so that the bass drum itself is alive and present in the mix while we still get the benefits of the compression on the back end.
Release and Hold
Release and hold times on a compressor determine how soon after the signal drops below the threshold that the compression lets up. The hold time specifically adds a finite amount of time where the compression is fully engaged after the signal drops below the threshold so you can pad the off ramp that is the release.

I like a hold and release time of about 40ms each on the bass drum compressor to add a little more fatness and provide a natural return to uncompression (oh, that’s not a word?).
Output Gain
It’s essential that we match the input gain via the output gain setting so that it sounds roughly the same volume with the compressor on and off.
This helps to keep the bass drum at the right level in the context of our mix and maintains gain staging so that responsible levels are observed and we get better sounding results from the next plugin in the chain.
My gain staging tutorial covers everything you need to know in just a couple of minutes on that subject and it’s an important read to keep in mind for every track in your mix, not just the bass drum.
Panning Bass Drum
The kick and bass should always be kept center panned, or in other words not panned at all.
This keeps this integral elements of the rhythm section of your mix consistent and even in the mix regardless of where someone is listening.
I covered all of this in my audio panning guide:

As you can see, the snare and lead vocal should also be panned up the center.
The only problem with keeping the bass and bass drum in the center is that you have a frequency conflict, in this case in the low end, at the same panning position.
This is why I recommend using sidechain compression (or EQ as recommend earlier – see my comparison of sidechain compression vs sidechain EQ) to allow the bass to duck out of the way for a split second when the kick triggers.
Check out my complete low end mixing tutorial for more tips on getting your kick and bass and any other low end elements working together swimmingly for a cleaner mix.
Mixing Bass Drum Reviewed
I generally don’t recommend applying any spacial effects to your bass drum because most of them end up muddying up or blunting its effect and presence in the mix, save the reverb for your snare.
A dry, center panned bass drum is ideal, not simply for its own sake but for the sake of the instruments on the sides.
Low frequencies in general also tend to not play well when placed wide in the stereo field which is why I shy away from using any stereo imaging on the bass drum.
EQ, compress, and supplement your bass drum with the tips outlined above and you’ll be in good shape.
Be sure to also check out my drum EQ chart as well as my drum compression chart to ensure that your entire kit is in ideal shape!