
Sidechaining in your digital audio workstation (DAW) allows you to control the behavior of one track based off of the level of another track. This is typically done for two different reasons: one, to create some interesting aesthetic effects, and two, to get two tracks to better work together. Let’s talk how to sidechain in your DAW to take advantage of its benefits (and more on why you’d want to do it!).
How to Sidechain in Your Daw

To best exemplify how to sidechain in your DAW, let’s detail what is arguably the most common application of sidechaining, sidechaining bass compression to the kick drum.
As I explained in both my low end mixing tutorial as well as my overview of how to sidechain bass to kick, the bass and kick drum share a similar frequency range.
We always want to keep instruments which share frequency ranges separated in the mix through panning (see my audio panning guide) or even depth like reverb.
While we could also do some EQ sculpting on these tracks, the fact remains that the kick and bass both have fundamental frequencies in the 70-120Hz range.
One solution is to duck out/drop the volume on the bass which plays more frequently whenever the kick triggers.
We can do this via a compressor utilizing sidechaining.
Step 1 – Drop a Compressor on the Bass, Set Kick as the Sidechain Source
First, drop your compressor of choice on your bass track. Before we dial in any settings, designate that you’ll be sidechaining with this compressor and set the kick as the source which will guide its behavior.
In Ableton Live this is done by setting this in the “Sidechain” section of the compressor in the insert area.
This compressor on the bass works like any other compressor with the exception being that it’s not the level of the bass which affects the threshold and settings, it’s the level of the kick.
You’ll also likely be prompted to designate at which point in the kick drum’s signal chain you want to dictate the behavior. As I explained in my overview of what is Post-FX, you generally want to set this as “Post-FX” so that it takes into account the sound of the kick as you’ve designed it, plugins and all.
Step 2 – Set Up the Compressor
Now it’s time to set up the compressor, once again keeping in mind that we’re taking the behavior of the kick track.
Set the threshold compressor to the quietest instance of of the kick to ensure that the bass is always pulled down:
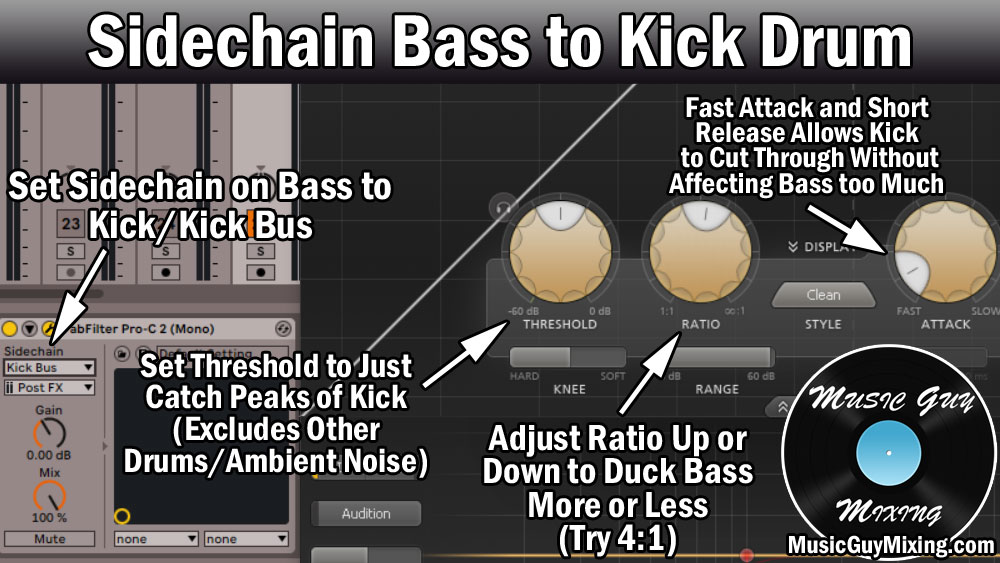
Note that we just want to catch the quietest PEAK. We don’t want to set the threshold so low that we’re getting the back end kind of fading sustain of the kick at really low volumes as this would keep the bass awkwardly tamped down to an extreme.
As for the rest of the compression settings, you can really crank up the ratio to mute the bass altogether with compression based attenuation or go with a more average and conservative 4:1 ratio like I recommend above to just pull it down enough for the kick to half the spotlight for that split second.
That’s all the time the listener needs to bring their attention to it.
With that in mind, I like a fast attack and release to hit that bass immediately so that kick can cut through, then bring the bass back in just as quickly.
This is a nice compromise and gets the kick and bass to share the same space without noticeably sacrificing anything.
By the way… there’s no step 3; knowing how to sidechain is just that easy! You may need to adjust the settings to get the result you want on the bass to duck it out more or less or more or less naturally, but that’s it!
When to Use Sidechaining in Mixing
There are plenty of applications for sidechaining in mixing.
The most obvious is for the reason I just mentioned: when you have two tracks sharing a similar frequency range and panning position.
The above documented method of sidechaining bass to your kick is the most practical application of sidechaining in mixing because it’s the most effective way to clean up the low end between two instruments which are designed to sit right on top of one another.
While this is the most often cited use of sidechaining, remember that you can use this anytime you want to make sure one track is standing out. If you find another track is getting in the way of your vocal, put a compressor on that track and set the source as the vocal to help that vocal bite through the mix better.
You can also get some interesting aesthetic effects, like sidechaining your entire mix to a drum track which isn’t even playing. Combined with aggressive compression settings, this creates an on and off pumping sound to a very particular rhythm which can be interesting for a certain stretch of the track.
Don’t limit sidechaining to compression, either. As an example, I documented how you can actually use sidechaining with a dynamic EQ which can be preferable to compression as you can duck out a particular frequency range rather than the entire track.
In the case of bass and kick, we can just sidechain the low/kick shared frequencies of the bass to the kick, pulling them down but leaving the transient punch of the bass untouched.
Like I’ve said many times before with all things mixing, with sidechaining the only limit is your imagination.
Sidechaining is something you should absolutely experiment with between different pairs of tracks to achieve different interesting results. You could stumble on to your new favorite little mixing trick of your own by doing this!

Pingback: How to Get a Clean Mix - 12 Tips for Cleaner Mixes - Music Guy Mixing
Pingback: What is a Fundamental Frequency in Music - A Quick Definition - Music Guy Mixing